I've Moved!

Friday, December 31, 2010

vanilla mousse, coffee caramel and cocoa brownie entremet.

And so, I embarked on another journey to unmold a mousse perfectly. I'd like to say I did.
The base is Alice Medrich's cocoa brownies, with a vanilla mousse from Tartelette and a coffee caramel centre using the same recipe I'd used for my macarons. I adored the caramel decoration... until it melted away into a puddle due to the humidity here. 


For easier unmolding, I found that first, the mousse must be frozen. After taking it out of the freezer, let it sit for 5 minutes before dipping it into hot water briefly. Run your knife around the sides, and it should slip out like a dream. I'm just an amateur, so professionals would probably consider this common knowledge already. 
This is something like ice cream on a brownie, upscaled. I absolutely adored the brownies. Many people have this misconception that cocoa couldn't possibly make a better brownie than melted chocolate. Alice Medrich has proven that cocoa brownies are every bit as good as brownie recipes that call for unsweetened chocolate, bittersweet chocolate and chocolate chips..., if not better. When chilled, these brownies have a dense, fudgy texture. I added white chocolate chips because I've always liked the contrast between the two different kinds of chocolate. They have won over Dorie's Quintuple Chocolate Brownies, what I considered first place until I met their cocoa cousins. Try and you won't regret it.


The vanilla mousse from Tartelette was a little weak in vanilla flavour, probably because it was overshadowed by the all-too-awesome brownies. I would increase the amount of vanilla if I were to make it again.


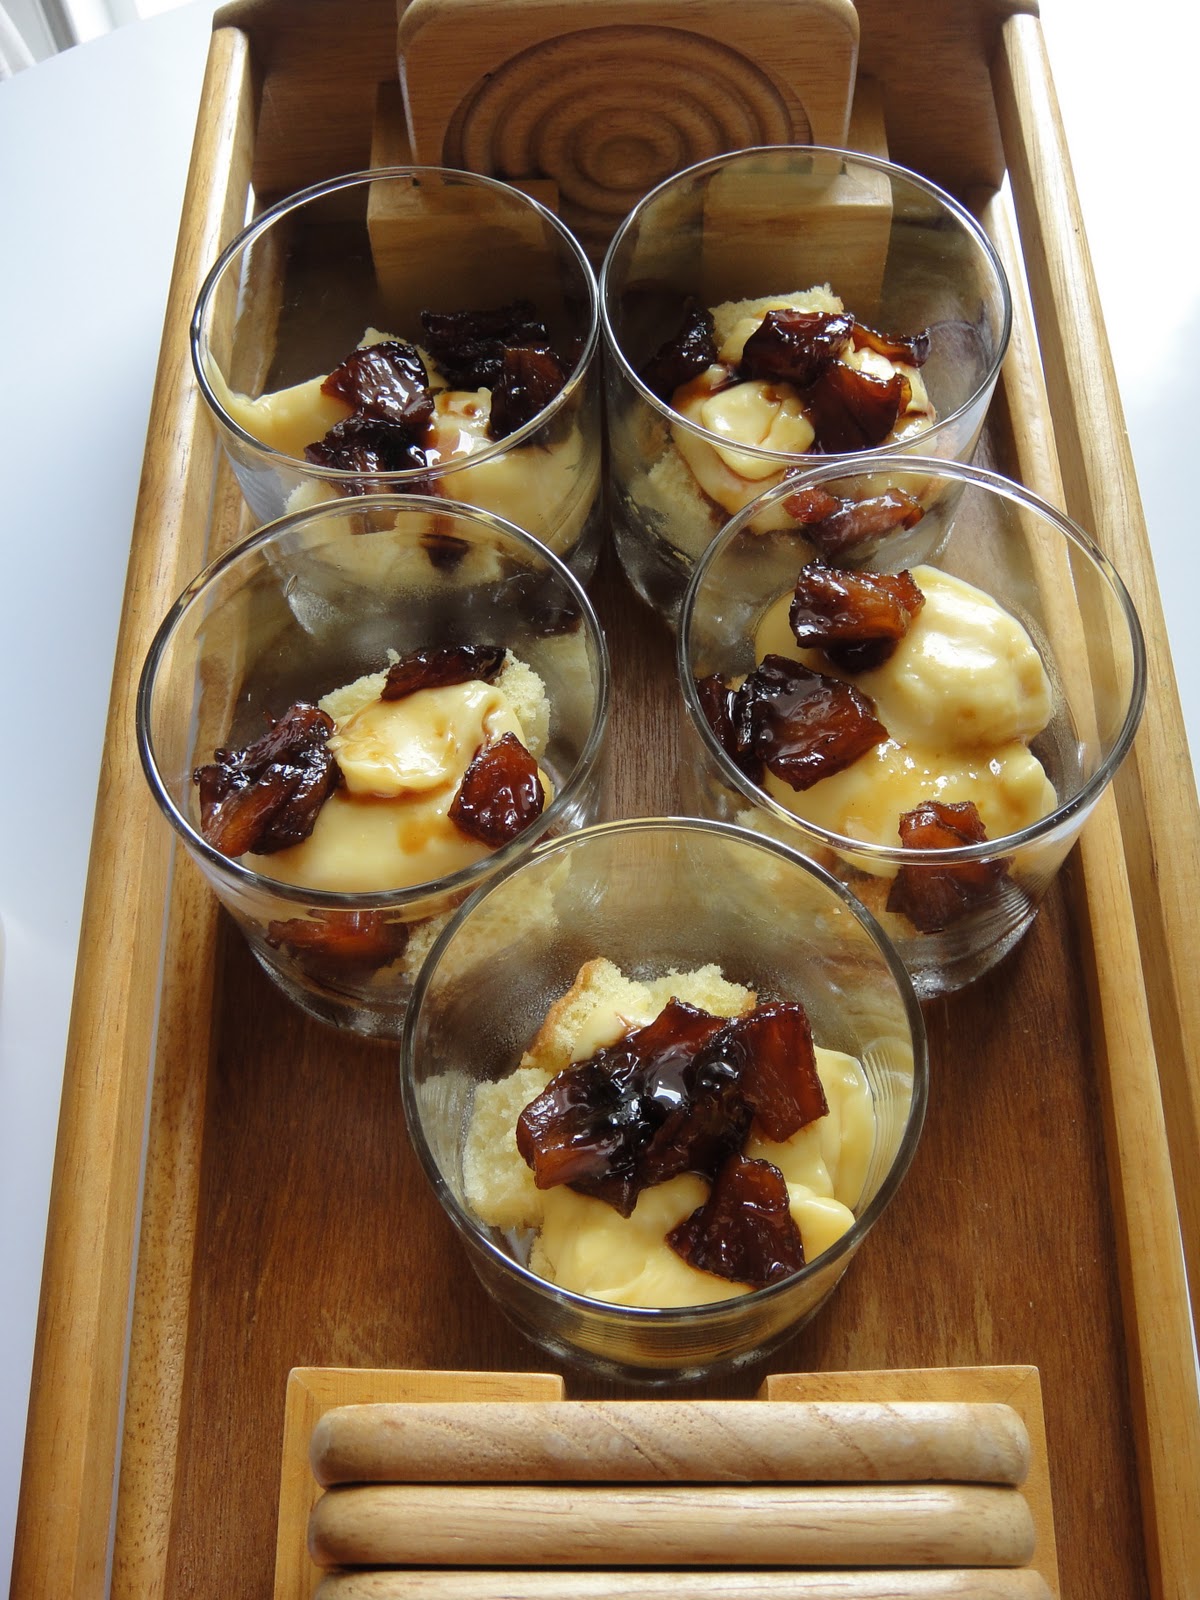
The coffee caramel sauce was a great contrast to the whole entremet. The brownie was dense, the mousse creamy. Both components are rather firm. The sauce, on the other hand, was flowy. Think molten lava cake but a coffee version. Because the sauce is denser than the mousse, when filling up the molds, fill them halfway and freeze them for a while for the mousse to firm up so that it can better support the caramel. Otherwise, the caramel would sink to the bottom.
Best Cocoa Brownies
by Alice Medrich


10 tablespoons (1 1/4 sticks, 5 ounces or 141 grams) unsalted butter
1 1/4 cups (9 7/8 ounces, 280 grams) sugar
3/4 cup plus 2 tablespoons (2 7/8 ounces, 82 grams) unsweetened cocoa powder (natural or Dutch-process)
1/4 teaspoon salt (or a heaping 1/4 teaspoon flaky salt, as I used)
1/2 teaspoon pure vanilla extract
2 large eggs, cold
1/2 cup (66 grams, 2 3/8 ounces) all-purpose flour
2/3 cup walnut or pecan pieces (optional)*I added white chocolate chips

Position a rack in the lower third of the oven and preheat the oven to 325°F. Line the bottom and sides of an 8×8-inch square baking pan with parchment paper or foil, leaving an overhang on two opposite sides.

Combine the butter, sugar, cocoa, and salt in a medium heatproof bowl and set the bowl in a wide skillet of barely simmering water. Stir from time to time until the butter is melted and the mixture is smooth and hot enough that you want to remove your finger fairly quickly after dipping it in to test. Remove the bowl from the skillet and set aside briefly until the mixture is only warm, not hot. It looks fairly gritty at this point, but don’t fret — it smooths out once the eggs and flour are added. [Note, many people who have tried this recipe have found that this step works just fine in the microwave. Couldn't test this because we don't have one, but it sounds like it would work.]

Stir in the vanilla with a wooden spoon. Add the eggs one at a time, stirring vigorously after each one. When the batter looks thick, shiny, and well blended, add the flour and stir until you cannot see it any longer, then beat vigorously for 40 strokes with the wooden spoon or a rubber spatula. Stir in the nuts, if using. Spread evenly in the lined pan.
Bake until a toothpick plunged into the center emerges slightly moist with batter, 20 to 25 minutes is Medrich’s suggestion but it took me at least 10 minutes longer to get them set. Let cool completely on a rack. 

Lift up the ends of the parchment or foil liner, and transfer the brownies to a cutting board. Cut into 16 or 25 squares.

Vanilla Mousse
recipe taken from Tartelette

4 egg yolks
1/4 cup (50 gr) sugar
1 cup (250 ml) whole milk
1/2 vanilla bean
1 Tb (7gr) powdered gelatin, sprinkled over 3 Tb water
1 cup (250ml) heavy cream

In a large bowl, whisk the egg yolks with the sugar until very pale. In the meantime, in a large saucepan set over medium heat, bring the milk and the vanilla bean (split open and scraped over the milk) to a boil. Slowly pour the milk over the yolks, whisking constantly. Pour the mixture back into the saucepan over medium low heat and cook until the cream coats the back of a spoon (as if making creme anglaise). Add the softened gelatin and stir until melted completely into the cream. Let cool to room temperature.
Whip the heavy cream to soft peaks and fold it into the cooled cream base.

For the coffee caramel sauce recipe, click here.

The next entremet I'm going to make will be chocolate-free. I think.

Thursday, December 30, 2010

macarons take #5.

This would result in a very depressed me if I didn't learn something from this batch of macarons. Allow me to explain.
You know how you must let the macaron batter sit awhile to let a skin develop? Well, I live in a humid country and to wait for the macaron to dry out that tiny bit would take hours and hours. For instance, after a considerably long hour, the tops would still be sticky. Imagine how many more I must wait for a dry surface! So, I borrowed the idea of using the oven to dry the tops out and it worked! The problem is, it worked too well.
I would leave it in the oven until not only does the batter don't stick to my fingers at all, they were quite hard, in fact. It's not a thin skin, it's like the whole thing has crusted over. That, I believe, is my downfall.  Any research on these french cookies would show that a developed skin would prevent, to a certain extent, those dreadful cracks. The shell must be strong so when they receive a blast of heat, the bottom of the macarons would rise, forming what we all desire in a perfect macaron- feet.

In my case, the feet rose up during the first few minutes and much to my dismay, started to sink and create frills instead. I think because my shell was too strong, it did not allow the feet to push the shell up. The feet, trapped and desperately needing somewhere to go, gravitated towards the sides instead, resulting in a tutu-like structure. That's my theory.
This isn't proven yet, but I think I may be right. You see, I baked in two batches, one with a weaker crust than the other because one tray had more time to dry out in the oven. The tray with the harder crusts were noticeably more frilly in comparison to the weaker crusted. I need to test this theory out again. I might be getting somewhere. Finally!

Now for the less important stuff. I actually intended for these macarons to be blue, but what you see here is green, yes? I admit I went too light-handed with the blue colouring because I didn't want it to appear like something off a flashing neon sign. I swear my meringue was a beautiful baby blue but once the dry mixture went in, it became, well, green. But I do like this green actually. Reminds me of Laduree's box. Good times... good times...


For the all important filling, I chose a rose raspberry jam. I prefer fruit fillings with macarons rather than chocolate and the like because almond just goes well with bright flavours. When I think almond, I go raspberry, strawberry, apricot, mango... See? No chocolate. Nope.
Victory is getting closer. I'm starting to smell it!

Tuesday, December 28, 2010

black bottom cupcakes.

I don't know if I can call them cupcakes... they look more like craters to me. Ah well, my bad. Because these aren't cream cheese topped, these are coconut cream cheese topped. Meaning I didn't follow that part of the recipe. When will I ever learn? But that wasn't the downfall of this cupcake. In fact, it was the part I enjoyed more.

You see, there are good cupcakes and then, there are great cupcakes. These are in the range of good cupcakes. A surprising disappointment from America's Test Kitchen.
The chocolate batter baked up light and ethereally moist, and the resulting texture was somewhat like a souffle. You know, like how you spoon a huge chunk into your mouth and it disappeared like a cloud? Actually, I think its more like melting marshmallows.

That's not to say that its a bad thing. It's just not my thing. I was hoping for something dense, dark and deeply chocolaty but this isn't the recipe to go to apparently. The other downside to this recipe- they told you to mix room temperature water into the batter. I think everyone should know that boiling water unlocks the flavour of the cocoa powder, not tepid water. If you don't know that, now you do. So I used boiling water instead, but it still wasn't chocolaty enough.
Okay, now let's switch to the cream cheese. I fashioned my own little topping from just light cream cheese, a quarter that of sugar and sweetened shredded coconut. I think there was no harm in using a reduced fat product. I didn't use an egg so the filling wasn't all flowy like I think the recipe intended. Nevertheless, it bested the chocolate batter, in my opinion.
The cream cheese was only lightly sweetened so there was still a subtle tang. The sweetened coconut lent, duh, sweetness, so you have a careful balance between sweet and tangy.

Black Bottom Cupcakes
recipe from AMERICA'S TEST KITCHEN
Test Kitchen Tip:  Butter is Better

“Black bottom cupcakes are basically miniature cheesecakes (chocolate cake cradling a cheesecake filling) and are usually made with oil, which is great for creating a cake with a rich, fudgy texture but can also cause greasiness.  We used melted butter (and sour cream) instead—our cupcakes turned out rich and moist, but not greasy.  Best of all, they were sturdy enough to support the cheesecake filling.”

Filling
8 ounces cream cheese, softened
1/4 cup (1.75 ounces) sugar
1/8 teaspoon salt
1 large egg white
1 tablespoon sour cream
1/4 cup (1.5 ounces) semisweet mini chocolate chips (Do not substitute regular chocolate chips for the miniature chips here; regular chips are much heavier and will sink to the bottom of the cupcakes.)

Cupcakes
3/4 cup (3.75 ounces) all-purpose flour
2/3 cup (4.66 ounces) sugar
1/4 cup (0.75 ounce) Dutch-processed cocoa powder
1/2 teaspoon baking soda
1/4 teaspoon salt
3/4 cup water, room temperature
6 tablespoons sour cream, room temperature
4 tablespoons (1/2 stick) unsalted butter, melted and cooled
1/2 teaspoon vanilla extract

1.  Adjust an oven rack to the lower-middle position and heat the oven to 400 degrees.  Line a 12-cup muffin tin with cupcake liners.

2.  For the filling: Beat the cream cheese, sugar, and salt together in a medium bowl with an electric mixer on medium speed until smooth, about 30 seconds.  Beat in the egg white and sour cream until combined, about 30 seconds.  Stir in the chocolate chips.

3.  For the cupcakes: Whisk the flour, sugar, cocoa, baking soda, and salt together by hand in a large bowl.  Whisk in the water, sour cream, melted butter, and vanilla until just incorporated.

4.  Using a greased 1/4 cup measure, portion the batter into each muffin cup.  Spoon a rounded tablespoon of the cream cheese mixture onto the center of each cupcake.

5.  Bake the cupcakes until the tops just begin to crack, 18 to 22 minutes, rotating the tin halfway through baking.  Let the cupcakes cool in the tin for 10 minutes, then transfer them to a wire rack to cool completely before serving.


Monday, December 27, 2010

macaron take #4 - coffee caramel macarons.

To be honest, this isn't take #4, it's take #5. The actual #4 batch was such a flop, probably as bad as my first batch, that I wanted to bury it within the deep recesses of my mind so I decided not to take any pictures. After trying so many tries, I find that my second batch produced the most desirable results so far. The batter was super sticky and more difficult to squeeze and I need to keep that consistency of the batter in mind the next time I try making macarons. Again.

I was so desperate for my macarons to work this time, I googled almost every page on troubleshooting macarons and I came across this page. She used a different macaron recipe and even suggested not beating the heck out of the macaron batter. I followed her instructions obediently and while my macarons didn't show any frilly feet this time, it was definitely under-mixed.
The shells were too full of air and fragile. Just a tiny poke and I created a dent! Uh-oh. Not good. I knew something would go wrong when the batter was too easy to pipe. And instead of parchment paper, I used a silicon baking mat despite knowing that it would produce shorter feet. But I think the silicon baking mat prevented my feet from exploding at the sides. Or is it just the batter consistency? Hmm...

On the bright side, no cracks in this batch again! At least not when baking. And I think I've gone overboard with the caramel filling. It's highly fluid so even a half teaspoon can result in a gooey mess spilling out of the macaron. Anyway, since this caramel is quite sweet, you may want to avoid spooning too much of it into the macaron.
I want, no, I need to get this right soon. My mum is already complaining at how much almond meal I've already consumed. Not good for the wallet, as we all know. I'm really near my wit's end. I've read Tartelette's, Syrup and Tang's, Not So Humble Pie's and many other sites on macaron making, not to mention the You Tube videos but I still can't perfect it. WHY?! Argh!

Anyway, if you would like to know the recipe for the coffee caramel filling, click here:)

Sunday, December 26, 2010

coffee caramel sauce.

If I say caramel, what do you think of? Did the word chocolate come to mind? Come on, admit it. I know you did.

And that's what I don't get. Chocolate-caramel. Why not coffee-caramel? I think coffee caramel is a much better combination, albeit a lesser used one. My threshold for sweetness is extremely extremely high but chocolate and caramel is testing my limits. Not to mention that they are both quite heaty on their own already. The chocolate often overpowers the caramel, and all you're left with is a too-rich chocolate mixture. Now, let's talk coffee caramel. Who loves caramel macchiato? I do! Instead of battling each other, coffee accentuates caramel and vice versa. That's why I made this sauce.

I like to substitute heavy cream for evaporated milk in sauces whenever I can. And since I succeeded with the swap in my awesome salted caramel sauce, I used it in this sauce too. The setback in using evaporated milk is that it doesn't thicken as much as with heavy cream. Desperate, I tried to use egg whites. (Think creme anglaise!) I wasn't quick enough to thoroughly mix in the egg whites, and I ended up with egg-white-drop caramel soup. Bleh. But the sauce did thicken slightly with the help of some of the egg whites that managed to be incorporated.

In the end, I strained out the scrambled whites and poured in about 2 tablespoons of heavy cream. And like magic, it started to thicken beautifully! Ah well, at least I succeeded halfway.

Note: I didn't follow the recipe's instructions to cook the caramel until it's a deep golden because I wanted the sauce to remain more fluid. I stopped at 238F, that's why my caramel couldn't thicken enough without heavy cream. I believe that if you do cook it as instructed, you wouldn't need the heavy cream.

Coffee Caramel Sauce
recipe from GroupRecipes

Ingredients

    1/2 cup granulated sugar
      3 tablespoons water
        Freshly squeezed lemon juice, two or three drops
          1/2 cup fresh whipping cream *I subbed in evaporated milk
            1/4 cup coffee, brewed double strength
            1/4 teaspoon freshly ground coffee
              2 teaspoons pure vanilla extract
                1 teaspoon sweet butter unsalted
                  Pinch of salt
                  • Directions
                  • Place the sugar, water, and lemon juice in a small saucepan and stir over medium heat until the sugar dissolves.
                  • Increase the heat to medium high until mixture comes to a boil.
                  • If sugar crystals remain, use a wet pastry brush to help them dissolve.
                  • Continue to boil the liquid until it turns a deep caramel color, but do not stir and do not allow to burn.
                  • This should take about five or six minutes.
                  • Remove from heat and stir in the coffee, cream, and coffee granules until all are dissolved.
                  • Because the caramelized sugar is very hot, stir carefully to avoid bubbles.
                  • Return the pan to medium heat and continue to stir the mixture until thoroughly mixed.
                  • Turn up the heat and boil until the mixture thickens, about five more minutes.
                  • Add the vanilla, butter and salt.
                  • Stir once more and pour into a warmed pitcher or gravy bowl, and serve.

                  • Hey, here's an idea: why not put it in your morning coffee? 

                  Saturday, December 25, 2010

                  just a trifle.

                  Merry Christmas! And Christmas means finger-lickin' dinners with food as far as your eye can see and most importantly, dessert! At my house, we have rather limited space, so desserts that can be eaten without having to sit at the dinner table would be more convenient when guests come around. A trifle in individual glasses sounded perfect to me, and that's how this trifle was born.

                  Let me take you through the makings. First, we have a genoise brushed with syrup and then cubed.
                  Pastry cream.
                  Palm sugar roasted pineapple. I took this recipe from one of the library books I borrowed. It's really simple, actually. Cube the pineapple, throw palm sugar in the saucepan and cook it together on high heat with the pineapple until it's liquified. Then lower down the heat and simmer until all the mixture is dry. Drops of vanilla go in and you're pretty much done.
                  Repeat with more cake and pastry cream.
                  Chantilly cream and salt and pepper cashew nuts dragees!
                  The dragees are caramelized cashews along with, you guessed it, salt and pepper as well as sesame oil. See how this trifle is taking on an asian twist?

                  I have to say I'm getting this caramel thing down. Not too long ago, I would have skipped a recipe just because it requires a caramel something. But seriously, how difficult is throwing sugar and water in a pan and staring at a candy thermometer until it reaches the required temperature?
                  The pastry cream was kind of a solid lump because it was refrigerated so it set. I think a creme anglaise would be better since it isn't so thick. That way, it can remain beautifully flowy. And the cashew nuts were oh my god, so good! They were, of course, crunchy. But not just that. After the crunch, it somehow dissolved in a cloud of lightness, carrying with it a bittersweet caramelized flavour. Unfortunately, the salt, pepper and sesame oil didn't come through enough to make for an interesting flavour profile but the nuts were already so droolicious I couldn't be disappointed.

                  I've never assembled a trifle before and I loved it! It's so much fun! Layering all the different components and letting them come together with just a scoop of a spoon, and you can't go wrong with presentation. Besides, anything in a bowl, or in this case, glass, and a spoon spells comfort. And it's a good way to use up leftover cake!

                  Friday, December 24, 2010

                  macarons take #3.

                   Say hi to macarons again!
                  It's frustrating. It really is. Because I actually managed to produce macarons that are 3D the last time, and now, they're back to being 2D- pancake flat. But the upside to this batch is that...
                  No cracks! Yes! *doing the happy dance* I experimented with different baking temperatures this time, which explains why each row looks different from the next. Okay, starting from the right, I preheated the oven to 200C and lowered down the temperature to 180C once the macs were in the oven. The oven door was left opened. The second row I used the fairly common 150C with the door closed. The third, oven was preheated to 180C and then lowered to 160C. Door closed. All batches were baked on the lower rack.

                  I was so excited about this experiment I completely forgot to put another tray above them to protect them from browning. Oopsie...
                  Preheated to 200C then lowered to 180C. Oven door opened.

                  These were the worst. Not only were they the darkest, their "feet" stuck out like a flying frisbee. The bottoms were getting browned before the top was done, so I moved them up to the middle rack halfway.
                  150C
                  I think this is the best temperature for my macarons. They still remained fairly pale, and they were slightly taller than the other two rows. Although it could be because I piped these out first so the batter wasn't as runny yet.
                  Preheated to 180C then baked at 160C
                  These are second best. Yes, they also got quite a bit of a suntan but a macaron from this batch had just that one perfectly formed feet. This one.
                  No sticky-outy business.

                  I had a problem with all of them, however. Even after spending close to 18 minutes in the oven regardless of any baking temperatures, their bottoms still stuck! The middle part, in particular. This problem occurred less in the first batch because of the higher heat though. Most bakers bake theirs for 12 to 15 minutes and this worries me. A lot. I think the consistency of the piped macaron batter should have a role in this. Ah well, more research to do!
                  Second and third batch
                  This recipe is based on Tartelette's. Same as before.
                  I filled them with a quick Rosewater Vanilla Raspberry jam I made out of raspberries, sugar, rosewater and vanilla.
                  Fourth try coming up and Merry Christmas!

                  Wednesday, December 22, 2010

                  crepes.

                  Bear with me, because this is yet another France-inspired post. 

                  I had crepes, with an asian twist, for breakfast! That green stuff you see in the picture is called kaya, basically a rich coconut-egg jam made with tons of egg yolks, coconut milk, pandan and sugar. It's best paired with salted butter, which was exactly what I did. After folding the pale yellow pancake into quarters, I blobbed on some, and watched it melt away into a golden puddle. 

                  I remembered when I was in Paris, where crepe stands dot every corner of the street, unsurprisingly, I had a butter-sugar crepe which was oh so divine. Just moments after the first flip, the crepe maker unwrapped an entire pack of butter and literally mopped it on the crepe while still on the pan, generously sprinkled the surface with sugar and folded butter-sugar bomb into an eighth of its original size. Then, she carefully slotted it into a paper bag and passed the precious package to me, hands outstretched and drooling. 

                  I took my time, nibbling as I took in the sights, and when I got to the end of the crepe, there was this pool of...of...what should I call it?...butter sauce, from the melted butter and sugar. Better yet, there was more in the bag! I stopped in my tracks and shamelessly slurped up the contents right there on the street, even tearing it open to reach the very depths of the bag.
                  Crepes
                  makes 8, recipe adapted from Allrecipes.com

                  Ingredients

                  • 2 eggs
                  • 1 cup milk
                  • 2/3 cup all-purpose flour
                  • 1 pinch salt
                  • 1 1/2 teaspoons vegetable oil (Butter is better!)
                  • *I added 2 tablespoons of sugar

                  Directions

                  1. In a blender combine eggs, milk, flour, salt and oil. Process until smooth. Cover and refrigerate 1 hour.
                  2. Heat a skillet over medium-high heat and brush with oil. Pour 1/4 cup of crepe batter into pan, tilting to completely coat the surface of the pan. Cook 2 to 5 minutes, turning once, until golden. Repeat with remaining batter.

                  Tuesday, December 21, 2010

                  the entremet wannabe.

                  Warning: This is not an alien. This is, believe it or not, a cake.

                  It was supposed to be an entremet, but it's just so... so... hideously ugly I cannot bestow it the honor of calling it one. Furthermore, I think pastry chefs all around the world would come after me with a chopper. 

                  Well, to be fair to myself, this is my first ever multi-component cake. What went wrong wasn't the individual components but rather the unmolding of the cake domes. You see, I didn't follow a specific recipe, the idiot I am. I somehow conjured up this creation from the depths of my imagination. So obviously, something went horribly wrong. 

                  I couldn't unmold the cake.
                  Hazelnut praline feuilette, creme patisserie au chocolat, genoise, gelee de framboise, truffes au beurre d'arachide, creme patisserie au chocolat, glacage au chocolat noir
                  *Snort* Duh, I didn't use any gelatin at all in my pastry cream even though I knew I should have. No wonder it didn't unmold! Thank goodness for the chocolate glaze because... you don't want to see what's beneath it. Trust me, you don't. 
                  Hazelnut praline sheet, milk chocolate pastry cream, genoise sponge, raspberry jelly, peanut butter truffle, milk chocolate pastry cream, dark chocolate glaze
                  Surprisingly though, it was quite good! The layering is terrible but you can roughly make out which is which, I hope. Peanut butter- chocolate- raspberry is a classic combo. Delish! I think what really makes it is the crunchy hazelnut layer below. The best thing- there's a shortcut to making it. Instead of caramelizing and grinding up the hazelnuts blah blah blah... I used Nutella and called it a day. I just had to melt chocolate, nutella and butter before stirring it crushed cornflakes and voila! 

                  This monstrosity has spurred me on to attempt other entremets, with proper recipes of course. I've learnt my lesson already. I'm thinking something non-chocolate- I've depleted a sizeable amount of chocolate today. I'm thinking this recipe.

                  Friday, December 17, 2010

                  macarons take #2.

                  Hey hey hey~ Take a look at these babies! I think I've made some improvements! They look so much better than my first attempt that's for sure. These are breakfast-tea macarons with a breakfast-tea-infused bittersweet ganache.
                  This time, the shells had feet, not frills. I discovered the reason behind that was not letting the piped batter sit out long enough. And, there were no cracks on the tops! Well, at least some of them didn't...
                  The Uglies
                  I have been researching on the possible reasons behind the cracks. I might have over-mixed the batter since I couldn't have under-mixed it because some turned out perfectly fine. I'm also contemplating too high an oven temperature. In my batch, those shells that didn't crack were those in the middle of the tray, away from the oven's hotspot. I might have also positioned the tray too far from the bottom. I used the middle rack but in my two tries, the tops of the shells always dries out before the bottoms finish cooking- some parts of the shells stick to the parchment paper.

                  The recipe I used was the same basic recipe which I cut down to a third but with the addition of 1 teaspoon of tea leaves (for a third of the recipe).

                  Breakfast-Tea Macarons
                  makes 14 macarons, 28 shells
                  recipe adapted from Tartelette


                  1 egg white
                  10 gr granulated sugar
                  67 gr powdered sugar
                  37 gr almonds

                  For the whites: the day before (24hrs), separate your eggs and store the whites at room temperature in a covered container. If you want to use 48hrs (or more) egg whites, you can store them in the fridge.
                  In a stand mixer fitted with the whisk attachment, whip the egg whites to a foam, gradually add the sugar until you obtain a glossy meringue. Do not overbeat your meringue or it will be too dry. Combine the almonds and powdered sugar in a food processor and give them a good pulse until the nuts are finely ground. Add them to the meringue, give it a quick fold to break some of the air and then fold the mass carefully until you obtain a batter that flows like lava or a thick ribbon. Give quick strokes at first to break the mass and slow down. The whole process should not take more than 50 strokes. Test a small amount on a plate: if the tops flattens on its own you are good to go. If there is a small peak, give the batter a couple of turns.
                  Fill a pastry bag fitted with a plain tip (Ateco #807 or #809) with the batter and pipe small rounds (1.5 inches in diameter) onto parchment paper or silicone mats lined baking sheets. Sprinkle with the crushed sugar or violet petals. Preheat the oven to 280F. Let the macarons sit out for 30 minutes to an hour to harden their shells a bit and bake for 15 to 20 minutes, depending on their size. Let cool. If you have trouble removing the shells, pour a couple of drops of water under the parchment paper while the sheet is still a bit warm and the macarons will lift up more easily do to the moisture. Don't let them sit there in it too long or they will become soggy. Once baked and if you are not using them right away, store them in an airtight container out of the fridge for a couple of days or in the freezer. 


                  Breakfast-Tea Infused Bittersweet Ganache
                  recipe adapted from Chocci's


                  250g double cream
                  250g Greenbecks chocolate 66% cocoa (dark chocolate) chopped roughly
                  50g unsalted cold butter
                  4 tablespoons earl grey tea leaves


                  Place the chocolate in a metal bowl which is large enough to sit comfortably over a saucepan of simmering water without the base touching the water. Slowly melt the chocolate, stirring steadily.


                  In another saucepan (preferably at the same time) heat up the double cream with the Earl Grey tea leaves over medium heat.

                  Let the tea leaves infuse into the cream until the cream is a lovely milky tea colour. The cream will taste quite bitter but it will be balanced by the chocolate and the macaroon.


                  Strain the double cream and slowly mix into the melted chocolate. Stir until the cream has been mixed into the chocolate.
                  Add in the butter and stir, you can either use a hand blender or mix by hand. Apparently using a hand blender you end up with a more glossy ganache!


                  Pop it into the fridge to cool until it firms up a little so that it is easier to pipe into your macaroons.

                  The battle's not over yet...

                  Thursday, December 16, 2010

                  chocolate pastry cream.

                  Well, I still had some unfilled cream puffs from my previous batch which I'd frozen so I figured why not make a small batch of pastry cream for the puffs and use the egg white for another macaron experiment?


                  And so I did.

                  This time, I made Pierre Herme's chocolate pastry cream which was so thick and creamy, when I passed it through the sieve, it didn't fall into the bowl below but instead clung onto the sieve in an amusing spiky formation. I couldn't be bothered to melt the chocolate separately so instead of following the step where you have to stir the melted chocolate into the finished pastry cream, I simply threw the chocolate chunks into the pot, allowing the residual heat to melt the chocolate for me. I left it alone for 5 minutes, then came back to stir it all together. Voila!
                  I noticed that he didn't include a step to sieve the pastry cream but I always do that as I find it makes the final product so much silkier. And since you've gone this far, why not do the extra step to make it even better? Although I didn't add it, I thought the recipe could use some vanilla to mask that eggy smell. But I did sprinkle in a pinch of salt.


                  Chocolate Pastry Cream
                  Recipe from Chocolate Desserts by Pierre Hermé
                  2 cups (500g) whole milk
                  4 large egg yolks

                  6 tbsp (75g) sugar
                  3 tablespoons cornstarch, sifted
                  7 oz (200g) bittersweet chocolate, preferably Velrhona Guanaja, melted
                  2½ tbsp (1¼ oz: 40g) unsalted butter, at room temperature

                  1) In a small saucepan, bring the milk to a boil. In the meantime, combine the yolks, sugar and cornstarch together and whisk in a heavy‐bottomed saucepan.
                  2) Once the milk has reached a boil, temper the yolks by whisking a couple spoonfuls of the hot milk into the yolk mixture.Continue whisking and slowly pour the rest of the milk into the tempered yolk mixture.
                  3) Strain the mixture back into the saucepan to remove any egg that may have scrambled. Place the pan over medium heat and whisk vigorously (without stop) until the mixture returns to a boil. Keep whisking vigorously for 1 to 2 more minutes (still over medium heat).Stir in the melted chocolate and then remove the pan from the heat.
                  4) Scrape the pastry cream into a small bowl and set it in an ice‐water bath to stop the cooking process. Make sure to continue stirring the mixture at this point so that it remains smooth.
                  5) Once the cream has reached a temperature of 140 F remove from the ice‐water bath and stir in the butter in three or four installments. Return the cream to the ice‐water bath to continue cooling, stirring occasionally, until it has completely cooled. The cream is now ready to use or store in the fridge.

                  Tuesday, December 14, 2010

                  no-knead bread.

                  So here I am, still on my search for a good baguette. I came across a recipe from The New York Times  which has been replicated on many other blogs so I decided to give it a try. Although the recipe didn't say baguette, but I figured it could just be shaped into one later.

                  The good thing about no-knead bread recipes? It's just waiting and waiting and waiting. This particular one requires the dough to develop from 12 hours up to 18 hours initially. Here's what you get at first.
                  And this is what I got at the end of 17 hours.
                  The dough was extremely wet. So wet, it was almost soupy. I couldn't even pick it up! I though to myself, That can't be right. So I added extra flour until it at least had some kind of structure. I had no idea how in the world can it even be shaped, let alone into a baguette. In the end, I dumped it, or rather scraped it, into my loaf pan quite unceremoniously and left it to rise, hoping for the best.

                  After 2 hours of rising and 30 minutes of baking, I had my loaf.
                  The top had a crisp crust but the sides did not even have a crust. This made slicing quite the chore! The texture- spongy and moist. Not surprising since the dough was so wet. But flavour-wise, it did not impress me enough. Sure, it was better than my previous attempt, but its still far from the best. Still, I encourage first-time bread bakers to give this a try.
                  No-Knead Bread
                  recipe adapted from JIM LAHEY, SULLIVAN STREET BAKERY
                  time: about 1 1/2 hours plus 14 to 20 hours' rising

                  Ingredients

                  3 cups all-purpose or bread flour, more for dusting
                  ¼ teaspoon instant yeast
                  1¼ teaspoons salt
                  Cornmeal or wheat bran as needed.
                  1. In a large bowl combine flour, yeast and salt. Add 1 5/8 cups water, and stir until blended; dough will be shaggy and sticky. Cover bowl with plastic wrap. Let dough rest at least 12 hours, preferably about 18, at warm room temperature, about 70 degrees.

                  2. Dough is ready when its surface is dotted with bubbles. Lightly flour a work surface and place dough on it; sprinkle it with a little more flour and fold it over on itself once or twice. Cover loosely with plastic wrap and let rest about 15 minutes.

                  3. Using just enough flour to keep dough from sticking to work surface or to your fingers, gently and quickly shape dough into a ball. Generously coat a cotton towel (not terry cloth) with flour, wheat bran or cornmeal; put dough seam side down on towel and dust with more flour, bran or cornmeal. Cover with another cotton towel and let rise for about 2 hours. When it is ready, dough will be more than double in size and will not readily spring back when poked with a finger.

                  4. At least a half-hour before dough is ready, heat oven to 450 degrees. Put a 6- to 8-quart heavy covered pot (cast iron, enamel, Pyrex or ceramic) in oven as it heats. When dough is ready, carefully remove pot from oven. Slide your hand under towel and turn dough over into pot, seam side up; it may look like a mess, but that is O.K. Shake pan once or twice if dough is unevenly distributed; it will straighten out as it bakes. Cover with lid and bake 30 minutes, then remove lid and bake another 15 to 30 minutes, until loaf is beautifully browned. Cool on a rack.

                  Yield: One 1½-pound loaf.

                  And my search continues...