I've Moved!

Monday, March 26, 2012

brown sugar bundt cake.


Brown sugar is another of those warm, comforting flavours that you can always count on. In here, it's proudly showcased in a recipe I picked up from Dorie's wonderful book, Baking: From My Home to Yours. I think that book is one of the best ones I've ever read. Not only does it contain recipes that give you that urge to make every single thing(!) and they deliver as well! I'm rarely disappointed and it's a total dejavu here.


The recipe has a slight alternative, which is the inclusion of ground nuts to complement the brown sugar flavour. If you do so, you have to add a bit of almond extract. I didn't feel like adding the nuts but I decided to throw in the extract. My advice: Listen to Dorie. She knows what she's doing. The extra almond scent didn't throw off the balance of the cake, but it would be better without since I didn't mix in the ground nuts.

The only thing I can fault it for is being a wee bit sweet. It's still manageable, but if you're one of those who prefer less sweetness, you might want to reduce the sugar by 1/4.


Brown Sugar Bundt Cake
adapted from Baking: From My Home to Yours
makes 12 servings

Dorie suggests wrapping the cake well and leaving it on the counter to ripen the flavours for a day before serving.

2 1/4 cups all-purpose flour
1/2 cup ground hazelnuts or walnuts (or 1/4 cup more all-purpose flour)
1 tsp baking powder
1/2 tsp baking soda
1/4 tsp salt
2 sticks unsalted butter
2 cups light brown sugar
3 large eggs
1 1/2 tsp vanilla extract
1/4 tsp almond extract (if you're using the ground nuts)
1 cup buttermilk
2 medium pears, peeled, cored and cut into 1/4 inch dice
1/2 cup moist plump prunes, snipped into 1/4 inch pieces or 1/2 cup moist, plump raisins

Confectioners' sugar, for dusting

Preheat oven to 350F. Butter and flour a 9 to 10 inch (12 cup) bundt pan. Don't place the pan on a bking sheet.

Whisk together the flour, nuts, baking powder, baking soda and salt.

Cream the butter and sugar until light and fluffy. Add the eggs one at a time, beating for 1 minute after each addition. Beat in the vanilla and almond extract, if using. Stir in the flour and buttermilk alternately, the flour in 3 additions and the buttermilk in two. Stir in the pears and prunes until evenly distributed. Scrape the batter into the prepared pan and smooth the top with a spatula.

Bake for 60 to 65 minutes, or until a skewer inserted in the center comes out with some moist crumbs attached. Transfer the cake to a rack to cool for 10 minutes before unmolding, then cool to room temperature on the rack.

When you are ready to serve, dust the top of the cake with confectioners' sugar.

Saturday, March 24, 2012

peanut butter and jelly bars.


How can you go wrong with peanut butter and jam, seriously. And if you happen to throw in shortbread and streusel into the equation, how can it not be a recipe for success?

This predictable combination surprised me a little- the peanut butter layer wasn't dense and heavy like typical peanut butter fillings, but rather, a little mousse-like and silky. I guess that's a little magic no-bake versions can't pull off.


One improvement I would like to make to the recipe is regarding the oat streusel. I followed the ingredient list and quantities stringently but instead of sprinkling the streusel in its powdery crumb like form, I pressed the clump together and broke off large chunks. This, I feel, provides much better texture.

I also took the easy way out with the shortbread and pressed the dough straight into the pan instead of chilling and rolling it. I made 1/4 of the recipe so it wasn't such a hardship but I wouldn't think that this is such a good idea if you're making the full quantity. Shortbread being, well, short, the dough crumbles easily and is quite inflexible. I won't lie- it took me a bit of time and patience to press down the dough evenly but it's still way faster than rolling.


Peanut Butter and Jelly Bars
adapted from Baked Explorations
makes 15 large bars or 32 more manageable squares

Update: I tried one warm and it was outta this world! Think warm gooey molten peanut butter with a bit of crunch and sweetness. It's like a hot peanut butter sandwich but made with cookies instead of bread.

For the sweet pastry dough:
1/4 cup sugar
1 1/2 cups plain flour
1/4 tsp salt
1/2 cup cold unsalted butter, diced
1 large egg

For the peanut butter filling:
1 cup unsalted butter
2 cups smooth peanut butter
1 3/4 cups icing sugar
1/2 tsp vanilla extract

For the crumb topping:
3/4 cups plain flour
1/4 tsp salt
1/2 tsp baking powder
1/4 tsp baking soda
1/4 tsp cinnamon
1/3 cup firmly packed dark brown sugar
2/3 cup rolled oats
6 tbsp cold unsalted butter, diced

For assembly:
2 heaping cups good quality jelly or preserves

For the sweet pastry dough: Combine the sugar, flour and salt in a food processor and pulse to combine. Add the butter and pulse until sandy. Add the egg, yolk and white whisked together beforehand, and add to the flour mixture. Pulse until the dough begins to come together. Form the dough into a disk, wrap it tightly in plastic wrap and refrigerate for at least 1 hour or overnight.

Line a 9 x 13 inch pan.

Roll out the dough and fit into the bottom of the prepared pan. Place the pan in the freezer for 30 minutes.

Preheat oven to 375F. Remove the pan from the freezer, place a large sheet of aluminum foil on top of the dough and fill it 3/4 full with pie weights. Bake for 15 minutes, remove the foil and weights, and bake for another 10 minutes, or until the crust is lightly browned. Transfer pan to a wire rack to cool.

Reduce the oven temperature to 325F.

To make the peanut butter filling: Beat the butter until completely smooth. Add the peanut butter and beat until combined. Add the icing sugar and vanilla and beat until smooth. Turn the mixture out onto the crust and spread it out into an even layer. Chill the peanut butter layer while you make the crumb topping. (Or you could make it the night before.)

To make the crumb topping: Whisk together the flour, baking powder, salt, baking soda, cinnamon, brown sugar and oats. Cut in the butter until loose crumbs form.

To assemble the bars: Spread the jelly evenly on top of the peanut butter filling. Sprinkle on the crumb topping.

Bake for 20 to 25 minutes or until the top is browned. Transfer to a wire rack to cool completely before cutting. It would be easier to cut after refrigeration.

Can be stored in the refrigerator in an airtight container for up to 2 days.

Tuesday, March 20, 2012

chocolate cherry cupcakes.


I must tell you about this cake. You must know about this cake.

It's the awesomest and only chocolate cake recipe you'll ever need.

It's so good, it surpassed and usurped Beatty's chocolate cake from my number 1 chocolate cake position. And do you know how many gazillion rave reviews that recipe has?


This recipe is like Beatty's Chocolate Cake Version 10.0. It's fudgier, it's chocolatier, it's denser... every delicious quality of Ina's recipe multiplied and amplified. It's that good.

I reduced the sugar a little, but can be cut down further to bring out a more bittersweet chocolate flavour. Other than that, I wouldn't change a thing.


The cherry swiss meringue buttercream is a little lacking in the cherry taste but I didn't dare to add more in fear of the buttercream becoming too liquid and soft, hence unable to set up properly. And I would definitely add some kirsh if I had some.

Words are failing me. The chocolate cupcakes have rendered me speechless.

P.S. How do you like them teacup molds? Cute, no? I need to work on my piping skills though.


Chocolate Cherry Cupcakes
makes 6
cake portion adapted from Smitten Kitchen

The original recipe was meant to be made into two 10 inch layers so I did a sixth of it instead and ended up with 6 cupcakes. The initial amount of sugar was supposed to be a 1/2 cup but I reduced it by a fifth to 80g. Also, since the batter was to be baked for cupcakes, I took the liberty of increasing the baking temperature since I didn't need flat tops. (They still baked up pretty even though.)

For the cake:
1/2 ounce semisweet chocolate
1/4 cup hot brewed coffee (or 1/2 tsp instant espresso dissolved in 1/4 cup boiling water)
80g sugar
58g plain flour
1/4 cup unsweetened cocoa powder
1/3 tsp baking soda
1/8 tsp baking powder
slightly less than 1/4 tsp salt
1/2 egg
2 tbsp oil
1/4 cup buttermilk
1/8 tsp vanilla extract

Preheat oven to 160C. Line a muffin tin with 6 paper liners.

Finely chop the chocolate and pour the hot coffee over. Let the mixture stand, stirring occasionally, until the chocolate has melted and mixture is smooth.

Sift together sugar, flour, cocoa powder, baking soda, baking powder and salt. In another bowl, beat the egg until slightly thickened and lemon-colored. Slowly drizzle in the oil, then add the buttermilk, vanilla and melted chocolate mixture. Add the flour mixture and stir until just combined.

Divide the batter amongst the muffin liners and bake for about 16 minutes or until an inserted skewer comes out with moist crumbs attached.

Cherry Swiss Meringue Buttercream
makes enough for 5 to 6 cupcakes

1 egg white
1/4 cup sugar
1/2 stick butter
3 dark cherries

Heat egg whites and sugar in a mixing bowl over a pan of simmering water until sugar dissolves, about 2 to 3 minutes. Remove from heat.

Using your electric mixer, whisk on medium-high speed until stiff glossy peaks form and mixture is cooled completely, about 10 minutes.

Reduce speed to low and add in the butter 2 tablespoons at a time, beating to incorporate fully after each addition. Don't worry if the buttercream appears curdled at this point, it will become perfectly smooth again. After beating in all the butter, beat in the cherries. You don't need to puree them beforehand because the insane amount of mixing by the beaters is going to pulverize them anyway.


Keep beating until the mixture is smooth and spreadable. If your buttercream still remains soupy, it is too warm and needs a bit of chilling. Maybe around 15 to 30 minutes in the fridge. Use immediately or refrigerate in a tightly sealed container for 3 to 5 days.

Sunday, March 18, 2012

another chocolate chip cookie.


I'm pretty sure I've found my favourite chocolate chip cookie recipe already but there's no harm in trying out another one. This one has coarsely ground oatmeal and instant espresso powder added to give the cookie a little kick. I'm not quite digging the oatmeal even though it did add a nice toasty flavour because of its texture- I like crispy cookies, not chewy.

I could kick myself for forgetting to sprinkle on the sea salt before baking. The sweet-salty contrast would really give the cookies a boost.

A good cookie, but I like mine better.


Chocolate Chip Cookies
adapted from Bob Vivant

1 cup unsalted butter, softened
1 1/2 cups light brown sugar, firmly packed
1/2 cup sugar
2 large eggs
1 tsp vanilla extract
1 to 2 tbsp instant espresso powder (I used 1 tbsp and it was pretty obvious)
1 1/2 cups uncooked regular oats (I pre-toasted them)
1/4 cup flax seeds (optional)
2 cups all-purpose flour
1 tsp baking soda
1 tsp salt
1/4 tsp ground cinnamon (I omitted)
12 ounces semisweet chocolate chips
8 ounces bittersweet chocolate chips
flaky sea salt, for sprinkling

Beat butter and sugar at medium speed in a mixer until creamy, about 3 minutes.

Add the eggs one at a time, beating well after each addition. Add the vanilla extract and espresso powder.

In a food processor, pulse the oatmeal several times until it's reduced to coarse crumbs.

Combine the ground oatmeal, flax seeds if using, flour, baking soda and salt in a separate bowl. With the mixer on low, gradually add the flour mixture to the butter mixture and mix until just combined. Stir in chocolate chips. Refrigerate the dough overnight or up to 3 days.

When ready to bake, portion out tablespoonfuls of cookie dough onto lined baking sheets and sprinkle lightly with sea salt. Bake at 350F for 14 to 18 minutes or until lightly browned but still soft.

Saturday, March 17, 2012

yellow butter cake with rich chocolate frosting.


After all the cupcakes, I felt like making a layer cake instead so that I can cut myself a more generous serving! Plus, I really wanted to try out a new frosting technique I first saw on 6bittersweets. It kind of reminds me of fish scales, or maybe feathers. Anyway, obviously mine is not as beautiful as hers.


It's a little time consuming. After you crumb coat the cake (an absolute must!), you fill a piping bag with a round tip with your choice of frosting and pipe a blob of it onto the cake. Then, you take a spatula and smoosh the end down on half of that blob so that you have a neat smearing effect. And then you repeat the process, piping the next blob of frosting on the tail end of your previous smear. It goes on and on and on until you reach the point where you started. It got a little awkward to frost at that point so I ended up with a rather ugly smear. You cannot pipe consecutive dots and then smear, that's why it takes a whole lot of patience.


The cake recipe is from the very reliable baking genius, Rose Levy Beranbaum, and like most of her cakes, this one uses the reverse creaming method. Usually, I find that cakes using that method are rather crumbly but this one isn't very much so probably because it makes a more liquid batter.

I halved the original recipe and made it in one 7 inch cake tin. I also used 1 whole egg and 1 egg yolk instead of the 3 yolks I was supposed to add. I really didn't know what to do with 2 extra egg whites sitting around so... I wish I followed the recipe though, so that I could taste the creation in its intended glory. Despite being short of one yolk, this cake was buttery and tender. It smelled so good after baking that I wished I could slice into it and have it warm and crusty with a dusting of icing sugar like a good butter cake.


The cocoa frosting is something that I used before in my Malted Milk Ball cake. At that time, I thought it was splendid but somehow, I don't really think so now. It's way too sweet for my liking and has a bit of grittiness to it, which I predicted that it would.

I'm looking for a great chocolate frosting recipe, milk or dark. Anyone has any recommendations? I think smitten kitchen's looks promising and so does Cooks Illustrated.


All-Occasion Downy Yellow Butter Cake
adapted from The Cake Bible by Rose Levy Beranbaum
makes a 7 inch cake

3 large egg yolks
1/2 cup milk
1 1/8 tsp vanilla extract
1 1/2 cups sifted cake flour
3/4 cups sugar
2 tsp baking powder
3/8 tsp salt
6 tbsp butter (must be softened)

Preheat oven to 350F. Prepare a deep 7 inch cake tin or two shallower ones.

Combine the yolks, 2 tbsp of milk and vanilla in a small bowl.

In a large mixing bowl, combine the dry ingredients and mix on low speed to blend. Add the butter and remaining 3/8 cup of milk. Mix on low speed until the dry ingredients are moistened then increase to medium speed and beat for 1 1/2 minutes to aerate and develop the cake's structure. Scrape down the sides of the bowl.

Add the egg mixture in 3 batches, beating for 20 seconds after each addition to incorporate the ingredients and strengthen the structure. Scrape down the sides.

Pour the batter into the prepared pan or divide it if you're using two, and smooth the surface with a spatula. The pan would be half full. Bake for 35 to 40 minutes if using one deep pan or less if using two shallower ones, or until a tester inserted near the center comes out clean and the cake springs back when lightly pressed. The cake should start to shrink from the sides of the pan only after removal from the oven.

Let the cake cool in the pan for 10 minutes before loosening the sides and releasing it to cool completely on a wire rack.

Rich Chocolate Frosting
adapted from allrecipes.com

1 stick butter, softened
2 1/4 cups icing sugar, sifted
1/2 cup + 2 tbsp cocoa powder, sifted
1/4 tsp vanilla extract
1/4 cup milk

In a large mixing bowl, cream the butter. Gradually beat in the icing sugar, cocoa powder and vanilla. Add enough milk until frosting reaches spreading consistency.

Thursday, March 15, 2012

sprinkle-dipped vanilla yogurt cupcakes.


Crumbs and Cookies has reached 100 followers! Thank you all for the great support! I've never been so happy to have so many people stalking me (or this blog). Haha. Jokes aside, I never really thought that people would want to listen to the ramblings of a 15 year old, although I can't say that I didn't wish for that. So yay, C&C!


My search for the perfect vanilla cupcake is yes, still on going. Hopefully I'll be able to find the right one before getting sick of it. And also before I run out of different ways to frost the cupcakes. Speaking of decoration, how do you like the sprinkle-dipped idea? I think it's fabulous! It's so pretty and colourful, plus easy to do. No matter how imperfect your frosting skills are you'll easily cover it all up. And I really love the crunch the sprinkles give. The whole thing just forms this rainbow sugar shell that you sort of have to hack into it if you refrigerate the cupcake beforehand. Delicately, of course.

P.S. Does anyone else thinks hundreds and thousands have a fruity taste? These taste like banana to me.


The frosting is a salted butter icing that I chose because I thought the saltiness would give a nice contrast to the sweet sprinkles. I didn't have any salted butter on hand so I added some salt separately. I could have made it a little saltier, just to make the contrast more obvious.

And as if lacking of one of the two ingredients wasn't enough, I ran out of powdered sugar. Not totally but not enough to make the quantity of frosting I needed. I ended up having to substitute half the icing sugar with something I found in my pantry- snow powder. What is that anyway? I'll need to do a bit of research. (Obviously I wasn't the one who bought it.)


Now for the main star of the show- the cake itself. It's an adaptation of a recipe from Alice Medrich's low-fat baking book which I got from here. The texture was really cottony and fluffy. I've used many adjectives to describe vanilla cupcakes I've made and I swear that this is the only time I've used cottony. And the cupcakes really light, weight-wise and calorie-wise (sort of). The original was supposed to be part of a marble pound cake recipe so these cupcakes definitely have their shortcomings. I thought that it wasn't eggy enough and it needed more vanilla. Still, I see a lot of potential in it.

I have just one more vanilla cake recipe on my to-do list. I think I'll do a round up after that and finally determine my winner! Unless I happen to come across another potential recipe...


Low Fat Vanilla Yogurt Cupcakes
makes 8

1 cup cake flour
1/2 tsp baking powder
1/4 tsp baking soda
1/4 tsp salt
1/2 cup sugar
1 egg
3 tbsp unsalted butter
1/2 cup yogurt
1 tsp vanilla extract

Preheat oven to 350F. Line muffin tins with paper liners.

Whisk the dry ingredients together.

Cream the butter and sugar until light and fluffy. Add in the egg and vanilla extract and beat to combine. Add in half the flour mixture and mix just until incorporated. Add in all the yogurt, mix to combine, and mix in the rest of the flour mixture until streaks of flour has just disappeared.

Portion out the batter and bake for about 15 minutes or until a skewer inserted comes out with moist crumbs attached.

Salted Butter Icing
adapted from Raspberri Cupcakes
ices 8 cupcakes, more or less

If you don't have salted butter, you can add 1/4 tsp of salt to every 1 stick of unsalted butter.

100g icing sugar, sifted
55g salted butter
extra salt to taste

Beat the butter until light and fluffy. Gradually add the icing sugar and mix to moisten before increasing the speed to high and beat until pale and fluffy. Add in extra salt if needed while mixing.

Tuesday, March 13, 2012

banana rum bread with macadamia crumble.


It all started with this.

But then I thought caramelizing the bananas would dim the flavour of them, so I scratched that idea. My next thought was, since I wasn't going the caramelize the bananas, that recipe wouldn't be special anymore. There was no need to use that recipe. Instead, I kept the macadamia topping idea and used another banana bread recipe, Flour Bakery's. It's pretty well known and has many rave reviews. Plus, I had the book so why not?


I tweaked the recipe a little bit- quartering it for a mini loaf, swapping half the amount of melted butter for applesauce and adding rum to the batter.

This recipe has a really unique way to mixing up the batter. It's somewhat like a sponge-cake method- the eggs are whipped with the sugar, fats are drizzled in and the remaining ingredients get stirred in. This produces a spongey (duh), creamy and moist texture to the finished cake. Really different from other banana breads. My applesauce substitution worked without a hitch. I doubt that any moisture has been compromised.


I betcha really curious about the rum. Right after the banana bread came out of the oven, I could barely smell it. But knowing that quick breads like this are usually at their prime after 12 hours or so, I let it sit overnight and the next day, not only has the banana scent intensified, I could detect the rum too! The first few bites it may not be obvious, you would probably detect this cooling sensation that could only be alcohol, but it slowly shows. I think its a bit like a cross between rum and raisin and banana bread.


The macadamia crumble could have looked a bit more appealing, and its an oversight on my part. I initially mixed chopped macadamia nuts with brown sugar and cinnamon, and intended to sprinkle it over the batter before I send it into the oven, but I didn't predict that the batter would be so fluid and I was afraid that the nuts may sink. At the last minute, I mixed in a tiny bit of flour. As the crumble had no moisture as a binder, it merely formed a pale dry crust at the top of the bread. Panicking, I doused the top with a few teaspoons of water which seemed to moisten and dissolve the brown sugar into a crunchy crust. Not quite the caramelized look but it was an improvement. Still, I really loved the brown sugar macadamia crumble. One of the best combinations ever!

My only complaint with the recipe is that it is too sweet. It would really depend on how ripe the bananas you're using though.

I would like to urge you to try banana bread recipe, with or without the rum. You won't regret it.


Banana Rum Bread
adapted from the Flour Bakery Cookbook

My changes have been reflected below.

1 1/2 cups all purpose flour
1 tsp baking soda
1/2 tsp salt
2/3 cup sugar
2 eggs
1/4 cup oil
1/4 cup applesauce
3 medium very ripe bananas, mashed
2 tbsp yogurt or sour cream
4 tsp rum or 1 tsp vanilla extract
3/4 cup walnuts or macadamia nuts, toasted and coarsely chopped

Heat the oven to 325F. Prepare a 9 x 5 inch loaf pan.

Sift the flour, baking soda and salt together.

Whisk the eggs and sugar until pale, light and fluffy, about 5 minutes. Drizzle in the oil while still whisking. Do not pour it all in at once because it would deflate the air out of the batter.

Add in the applesauce, yogurt or sour cream, mashed bananas and vanilla or rum, stirring until just combined. Fold in the dry ingredients and nuts until just combined.

Pour the batter into the pan and bake for 45 minutes to an hour, or until a skewer inserted in the center comes out with a few moist crumbs attached.

You could cut into it after it has cooled 30 minutes in the pan, and then some more on the rack until completely cooled, but I advise you to have a little patience and wait until the next day.

Saturday, March 10, 2012

vanilla cupcakes with mango swiss meringue buttercream.


I need to rant and curse about the buttercream.

I didn't decide on a swiss meringue one at first. I was actually intending to make Rose Levy Beranbaum's neoclassic buttercream which is someone like an italian meringue buttercream with egg yolks. I didn't incorporate the sugar syrup properly and ended up with a fine sugar structure around the whisk of my mixer. And delicious sugar chunks in my egg yolk soup. Trash bin.

Because I had an egg white left, I decided to make a swiss meringue buttercream instead. So I warmed, whipped, plopped in the butter and beat in the mango puree. The mixture didn't curdle, which I took as a bad sign because it was soupy instead. The butter was too warm. I thought hey, no big deal, just refrigerate it and whip it up again.

And so I did. For about 5 or 6 more times.

I was so frustrated. Every time I took it out from the fridge to whip, the mixture would firm up, disintegrate into yellow curds then disintegrate into soup with strands of silky butter. No matter how much I persisted, the best I could do to salvage it was to whip it back into its original stage of uniform soupiness.

I tried the whisk attachment. I tried the paddle attachment. I added in more butter. Heck, I even refrigerated it overnight. Nothing worked.

I was about to give it one final shot before giving up when I gave the buttercream some serious thought. It's all about emulsification right? There has to be a way to force the water back into the butter after it curdles. And then my mind sort of drew a link- emulsification= immersion blender= maximum contact between blade and mixture.

Up till then, I had been using the large mixing bowl for the stand mixer to make my small batch SMBC. I noticed that even though it was a scaled down quantity, it's not necessarily faster to make because there's lesser buttercream coming in contact with the whisk. Most of it would just migrate to the sides of the bowl and stay there until I scrape it down.

So I switched from the mixing bowl to my glass measuring jug and cranked up the speed of my hand mixer, buttercream pre-refrigerated again. At first it went through the same process as it did with the stand mixer and when it came to that butter-strands-in-soup stage again, I bit my lip and carried on.

For a few moments, there was just me and that buttercream.

Please work please work please work.

And by some miracle, the buttercream began to firm up. It graduated into a very-finely-scrambled-egg stage, then lo and behold, a silky buttercream! I was so happy. I couldn't believe that I'd succeeded that I even held the buttercream up to the light to check if it was properly emulsified. And it was, thank goodness! I would collapse if it wasn't.

So there you have it. A less well-known reason why your SMBC probably didn't work- because your batch was too small to use a stand mixer.

BUT as much as I'm complaining about making the buttercream, I absolutely loved every single bite of it. The taste of mango was distinct and it wasn't too buttery because I reduced the butter. It's one of the best buttercreams I've ever tasted. Promise. The only slight problem I have with it is that it doesn't firm up rock hard like regular buttercreams in the fridge, which is sad because I love that consistency. Kinda reminds me of eating ice cream straight from the freezer.


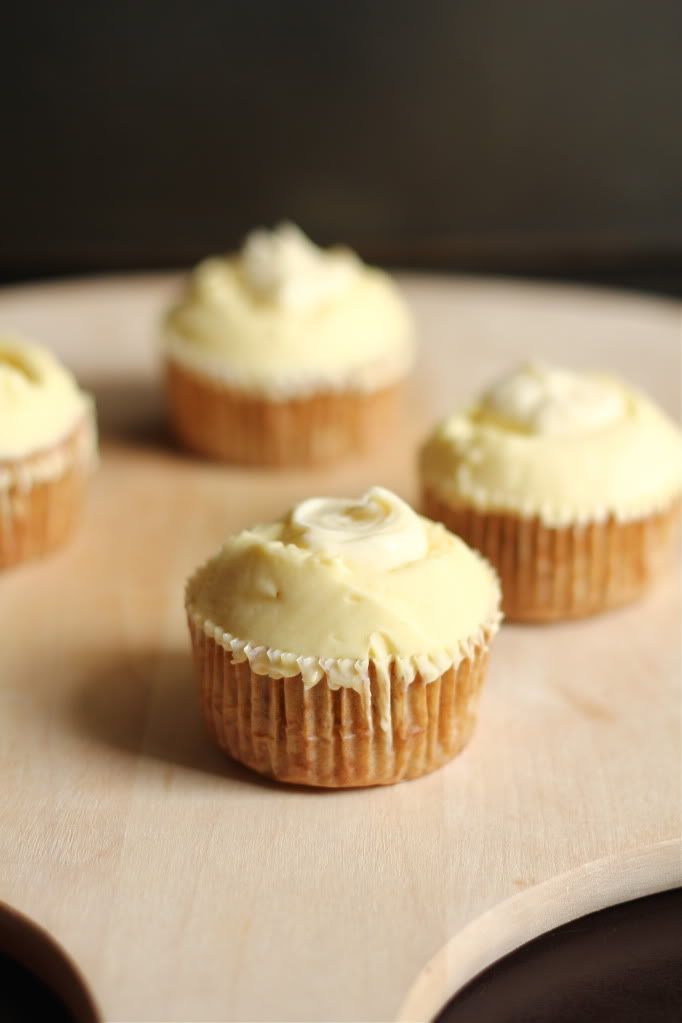
Now on to the cupcakes. I have to say that I thought that I wouldn't like these very much, based on their appearance after baking. Unfortunately, I almost always eat with my eyes first and visually unattractive cakes often get marked down without even being tasted. It's not noticeable because the cupcakes have been frosted but two out of the four were sunken in the middle. Also, all four of them had splotchy brown patches on the surface. The sinking could be due to my overzealous whipping of the eggs, resulting in too much air incorporated.

Despite all that, these cupcakes taste great! They were of the perfect sweetness and the amount of salt added was on point. They were on the dense side, but extremely moist.

I've made quite a few vanilla cake recipes so far and I realize that I prefer one made with butter. I definitely recommend trying this recipe if you're looking for a vanilla cake recipe using oil though.


Vanilla Cupcakes
recipe from here
makes 16

1 1/4 cups cake flour
1 1/4 tsp baking powder
1/2 tsp baking soda
1/2 tsp salt
2 eggs
3/4 cup sugar
1 1/2 tsp vanilla extract
1/2 cup oil
1/2 cup buttermilk

Preheat oven to 350F.

Combine cake flour, baking powder, baking soda and salt.

In the bowl of an electric mixer, beat the eggs for about 10 to 20 seconds. Add the sugar and continue to beat on medium speed for 30 seconds. Add the vanilla and oil and beat to combine.

Reduce mixer speed to low and add half the flour mixture. Add the buttermilk then add in the rest of the flour mixture. Beat until just combined. The batter will be thin.

Divide batter amongst paper liners, filling them about 2/3 full. Bake for 12 to 14 minutes. Let them cool completely before frosting.

Mango Swiss Meringue Buttercream
lightly adapted from Martha Stewart
makes about 3 cups

3 large egg whites
3/4 cup sugar
pinch of salt
1/8 tsp cream of tartar
1 1/2 sticks unsalted butter, cut into cubes, at room temperature
3/8 cup mango puree

Heat egg whites and sugar in a mixing bowl over a pan of simmering water until sugar dissolves, about 2 to 3 minutes. Remove from heat.

Using your electric mixer, whisk on low speed until foamy. Add cream of tartar and whisk on medium-high speed until stiff glossy peaks form and mixture is cooled completely, about 10 minutes.

Reduce speed to low and add in the butter 2 tablespoons at a time, beating to incorporate fully after each addition. Don't worry if the buttercream appears curdled at this point, it will become perfectly smooth again. After beating in all the butter, beat in the mango puree.

Keep beating until the mixture is smooth and spreadable. If your buttercream still remains soupy, it is too warm and needs a bit of chilling. Maybe around 15 to 30 minutes in the fridge. Use immediately or refrigerate in a tightly sealed container for 3 to 5 days.

Monday, March 5, 2012

chocolate cupcakes with cream cheese frosting.


I already know of a pretty darn awesome chocolate cake recipe, but I can't ascertain that it is the best ever yet. So I'm constantly on the lookout for better ones, and this one caught my eye because of its high percentage of cocoa powder plus its addition of melted bittersweet chocolate.


As expected, the cupcakes were intensely chocolaty, also partly due to the lesser than usual amount of sugar. I wasn't as thrilled with the texture though. Because they were made with butter, when refrigerated, the cupcakes go all rock hard. This problem can be solved by allowing the cupcakes to come to room temperature but by then, the frosting would be too soft. Plus, I find the cupcakes to be a bit crumbly which made for some messy eating.


If you like cream cheese frostings which you can actually taste the cream cheese in, you'll like this one. It's not extremely sweet, but it's not super tangy either. Actually, when cold it tastes a little more tangy but when it gradually warms up, a little sweetness creeps in. Very nice. But like most cream cheese frostings, it's a little hard to pipe unless you give it sufficient chill time. Probably at least 6 hours. This is a really good recipe- it shall become my default cream cheese frosting!

I can't really say the same for the cake, but its a worthy recipe nonetheless. My go-to chocolate cake shall remain the same for now. Next up, smitten kitchen's chocolate cake!


Dark Chocolate Cupcakes
adapted from here, originally from Cooks Illustrated
makes 12

1 stick unsalted butter
2 ounces bittersweet chocolate, chopped
1/2 cup dutch-processed cocoa powder
3/4 cup all-purpose flour
1/2 tsp baking soda
3/4 tsp baking powder
2 large eggs
3/4 cup sugar
1/2 tsp salt
1/2 cup sour cream (I used buttermilk)

Preheat oven to 350F. Line muffin tin with paper liners.

Combine butter, chocolate and cocoa in a medium heatproof bowl and heat over a saucepan of simmering water until the butter and chocolate just melt. Whisk until smooth and combined. Set aside to cool until just warm to touch.

Whisk flour, baking soda and baking powder together.

Whisk the eggs, sugar, vanilla and salt until incorporated. Add the cooled chocolate mixture and whisk to combine. Sift about 1/3 of the flour mixture over the chocolate mixture and whisk until combined. Stir in the sour cream then sift over the rest of the flour mixture and whisk batter until it is homogenous and thick.

Divide batter evenly among paper liners. Bake until skewer inserted in the center of the cupcakes comes out clean, about 14 minutes. Cool completely before frosting.

Cream Cheese Frosting
adapted from here

1 8-ounce package cream cheese
1/2 stick unsalted butter
1 1/4 cups icing sugar, sifted
1/2 tsp vanilla extract

Beat the cream cheese and butter until smooth. Add the icing sugar and vanilla and stir until incorporated before beating until light and fluffy.

Sunday, March 4, 2012

crunchy-top chocolate chip muffins.


Remember the last time I said that I wanted to try out this "to die for blueberry muffin" recipe on allrecipes? I finally got down to baking them yesterday- nothing like the possibility of finding the perfect muffin recipe to get my butt moving.

Now let's talk crust.

One of the most important criteria to me is a crunchy muffin top. Specifically not streusel-topped or brown sugar-topped. A good muffin does not need unnecessary adornments. This recipe produces crunchy golden brown crusts which are so frickin' delicious. I swear that this recipe is the most successful amongst all the muffin recipes I've tried in my life in terms of crusty tops.


Which is why I would like to kick myself for using these paper liners. I should have just used a regular, squatter but larger in terms of diameter muffin tin so I could get more crust out of these babies. I think this is the reason why my muffins didn't explode into mushroom like thingys I was hoping for too- majority of the batter went into creating the "stump".

I'm a little miffed that the muffins didn't rise higher, especially since I made some changes for an airier muffin, but it could be because I didn't fill them paper liners all the way to the top. Having said that, these muffins have attained my ideal standard of lightness and fluffiness! I am so excited! There is just a wee bit more tweaking to do before I can finally establish my go-to muffin recipe.

Here are some of the changes I made to the recipe: Omitting the streusel. Whisking the egg and sugar together until they reach the "ribbon stage" and multiplying the quantity of baking powder by 1.5. I also swapped out the regular milk for buttermilk, but that's only because I had some on hand. Obviously, I used chocolate chips instead of blueberries. And I replaced half of the oil with equal amounts of buttermilk.


By whisking the egg and sugar until pale and thick, I incorporated more air into the batter instead of just relying on baking powder. This is absolutely imperative for the lightness of the muffins. Unfortunately, in doing so, I might have reduced the viscosity of the batter, resulting in less domed muffins. I'm not very sure about this, so I will try this recipe again with my changes in a normal muffin tin to see if it really is the type of paper liner I used that caused a less mushroom-like muffin.

I must confess that swapping some of the oil out for buttermilk is a regrettable decision. The muffins were a tad dry but that is entirely my fault. I'm sure that this substitution is workable, I should have just kept an eye on the baking time more stringently.

The muffins have a sort of sponge-cake lightness to them because of the whisking of the eggs, which is unorthodox but I really like it! If heavy dense muffins have been dominating your life so far, I urge you to try this recipe. And this is something I feel very strongly about- muffins have no absolute need for vanilla. A bit of egginess is surprisingly welcomed.


Crunchy-Top Chocolate Chip Muffins
lightly adapted from here
makes 8

1 1/2 cups all-purpose flour
1 tbsp baking powder
1/4 tsp salt
1 egg
3/4 cup sugar
1/3 cup oil
1/3 cup milk or buttermilk
chocolate chips, as much as you want

Preheat oven to 400F. Line your muffin tin with paper liners.

Stir the flour, baking powder and salt together.

Whisk the egg and sugar until pale and fluffy, a.k.a the "ribbon stage". Pour in the oil and milk/buttermilk and whisk to combine.

Stir the egg mixture into the flour mixture until just combined. Throw in the chocolate chips. The batter will be thick and lumpy.

Divide the batter amongst the paper liners and let it sit for 5 minutes.

Bake for about 12 minutes. Once out of the oven, let them cool slightly before digging in.