I've Moved!

Friday, August 31, 2012

vanilla madeleines.


I made chocolate nutella madeleines the last time, so now I'm going to the other end of the flavour spectrum to make vanilla madeleines, recipe also from Baking by Flavour.

I had high hopes for these madeleines because of the immense success I've had with the other two recipes from this book. A few more of such wonderful recipes and I'd trust Lisa Yockelson fully. Sadly, I wasn't that wowed this time, because the cakes were not vanilla-y enough and tasted eggy and weird on day one (I couldn't pinpoint exactly what made them taste "off"). The second day, they tasted fine though. However, I must mention that I did alter the recipe slightly. I left out the vanilla bean and used vanilla bean paste instead, and did not use vanilla-scented sugar because I didn't have any. So, sure they were decent madeleines, but definitely not memorable.


Oh and my oven is functioning wackily. One moment it's on "bake" and the next moment it's on the "grill" function, which explains the burnt tops and flat surfaces. I baked the madeleines for only 8 minutes but look at the damage! I don't think its safe to use my oven for a while until the problem is resolved. How will I survive?!


Vanilla Madeleines
recipe from Baking by Flavour
makes 19

1/2 cup + 2 tbsp all-purpose flour
1/4 cup cake flour
1/4 tsp baking powder
1/8 tsp salt
1/8 tsp freshly grated nutmeg
6 tbsp butter
1/3 cup + 3 tbsp vanilla-scented sugar
seeds from 1/4 vanilla bean
2 large eggs
1 tsp intensified vanilla extract
2 tsp heavy cream

Preheat oven to 375F. Grease and flour madeleine molds.

Sift the all-purpose flour, cake flour, baking powder, salt and nutmeg into a bowl twice.

Cream the butter until smooth and creamy. Add the sugar and vanilla bean seeds and beat until the mixture appears light and fluffy. Beat in the eggs one by one, mixing to incorporate the first before adding the second. Blend in the vanilla extract. Add the sifted ingredients and stir until just combined. Stir in the heavy cream.

Divide the batter amongst the crevices and bake for about 10 to 12 minutes or until a skewer inserted in the middle of a madeleine comes out clean. Cool the madeleines in the pans on racks for 1 minute before unmolding.

Monday, August 27, 2012

chocolate nutella madeleines.


I took the recipe for these madeleines from my new cookbook, Baking by Flavour, and changed it slightly. For one, they were supposed to be double chocolate madeleines, meaning having chocolate chips folded into the batter, but I had no chocolate chips in the fridge (criminal) and I was too lazy to chop up a bar of chocolate. But I did have a jar of nutella. Ding ding ding! I decided to add a dollop of nutella into the center of each batter-filled madeleine crevice to make nutella-filled chocolate madeleines instead.


I didn't manage to cover up the nutella completely with batter so the exposed parts formed a crust of sorts that was a little crunchy. But the nutella that managed to remain hidden was molten. I kind of liked the contrast. You have to be careful not to burn the nutella if leaving it exposed though, because of its sugar content.


P.S. I should stock up on nutella chips!


The batter for these madeleines are actually made using a regular creaming method for cakes. This is unlike the typical sponge-cake batter. Personally, I prefer this method because the madeleines remain moist. The sponge-cake method usually yields madeleines that are a little more on the dry side, serving their purpose for dipping into tea or coffee. The chocolate flavour is intense and bittersweet, and the crumb is tightly knit.

They are a hell of a delicious tiny flavour bomb.


Chocolate Nutella Madeleines
slightly adapted from Baking by Flavour by Lisa Yockelson
makes 24

1/2 cup + 1 tbsp cake flour
1/3 cup + 2 tbsp non-alkalized cocoa powder
1/4 tsp baking powder
1/8 tsp salt
7 tbsp unsalted butter
1/3 cup + 3 tbsp sugar
3 eggs
1 1/4 tsp vanilla extract
1 ounce bittersweet chocolate, melted
nutella

Preheat oven to 350F. Grease and flour madeleine pans.

Sift the cake flour, cocoa powder, baking powder and salt together.

In a bowl, cream the butter for about 2 minutes. Add the sugar and beat for another minute. Add the eggs one at a time, beating to incorporate after each addition. Add the vanilla extract and melted chocolate. Stir in the flour mixture and let the batter stand for 3 minutes to thicken.

Spoon a small amount of batter into each mold and add a small dollop of nutella into the center. Cover up the nutella with more batter. Bake for about 12 minutes or until done.

Saturday, August 25, 2012

martha stewart's classic pancakes.


Pancakes have been dressed up, fiddled around with and transformed into so many varieties but ultimately, what we all crave for is the simple pancake. Definitely with some sort of sweet syrup for me. Butter, optional. I've made Alton Brown's pancakes before, and the fact that I still remember it even after so long is proof of its deliciousness. Recently, I came across a pancake recipe on a blog that contested Alton Brown's pancake recipe, even surpassing it! It got my attention.


The recipe in question is from the editors of Martha Stewart's Living. (By the way, Martha Stewart has an insane slew of pancake recipes! Which one is the best?)

I used to think that pancakes must be made with buttermilk in order to be the best. Over time, my opinion has changed. Now I welcome recipes made with regular milk too.


What I look for in a great pancake is a fluffy texture. The thickness is secondary because even a 1 inch thick pancake that is dense and gummy in texture is a horrible flop. I'm not particular about the egginess of pancakes but it must not be overly so.


So, if you ask which recipe won over my pancake-loving heart, I would still award that honor to Alton Brown's. This recipe produces pancakes that are reasonably tall (although not as tall as Alton Brown's) but slightly dense and not as tender. Alton Brown's pancakes have a fluffier texture, no doubt thanks to the wonders of buttermilk. And because these are made with oil instead of melted butter, they are less flavorful but this can be subjective. Some people do like a more plain tasting pancake as it can serve as a neutral vehicle to toppings.


It's time to make me some Alton Brown's pancakes again.


Classic Pancakes
adapted from Martha Stewart Living via here
makes 12

1 3/4 cup all-purpose flour
2 tbsp sugar
1 tbsp baking powder
1/2 tsp salt
1 1/2 cup milk
2 large eggs
3 tbsp vegetable oil, plus more for greasing the griddle

In a large bowl, sift flour, baking powder, sugar and salt together. In another bowl, whisk eggs, milk and oil together. Pour the wet ingredients into the dry ingredients and whisk until just combined. Let the batter sit for 5 minutes to thicken.

Grease a skillet or griddle and set on medium heat. Once hot, pour 1/3 cup of batter for each pancake. Flip when bubbles start to appear and cook until the second side is golden.

Monday, August 20, 2012

cake batter ice cream (with real cake!).


I've always wanted to try cake batter ice cream, especially after seeing so many of such recipes floating around the baking blogosphere. And there's cake batter popcorn, cake batter blondies, cake batter cookies... I've never tasted raw cake batter before but obviously I'm missing something!


I don't bake in big batches so to specially buy a cake mix for this recipe would be quite a waste. I tried to search for a homemade cake mix formula and turns out that many people think the same way too (like duh). The two main types of homemade mixes are: one without butter, and one with. Basically the typical dry ingredients for a cake are mixed together, and then butter is cut into the mixture like you do for pastry dough. I think the real commercial stuff uses shortening because there's no way you can store cake mixes containing butter at room temperature. I chose to follow a recipe that didn't call for butter (I forgot why), although I gathered that such mixes would then fall under the category of yellow cake mixes and taste better than white cake mix in ice cream.


The making of the custard was pretty uneventful, except that I boiled it a bit too far and it ended up very thick and gloopy. The original recipe said to bring it to 160F like a creme anglaise but I reasoned that because the flour coating the egg yolks prevents scrambling, it was okay to go a little crazy with the heat. I think danger of scrambled eggs or no, it's best not to heat the custard too much because too thick a consistency will give the ice cream an unpleasant mouthfeel. I easily solved my problem of gloopy custard by adding more milk. I wish all solutions were this straightforward. I didn't add enough extra milk and so my ice cream had a slightly chewy quality to it. I didn't mind so much because at least the ice cream didn't melt fast.


Oh yes, and cake batter ice cream is a perfect way to use up cake scraps too! Or any kind of ice cream for that matter. If you think about it, cake and brownies belong to the same baked good family and there should be no reason why cake is used less often in ice cream than brownies.

And I topped my ice cream with rainbow sprinkles! What would life be without them? Of course, if hot fudge is your thing, there's no one to stop you.


Cake Batter Ice Cream
lightly adapted from allrecipes, cake mix adapted from here

I used evaporated milk for a lower fat version and added almond extract. You can really taste the almond in the ice cream so if you don't like the taste of it, you can cut down on the amount of extract up to about half. The ice cream was so creamy, it could have been made with heavy cream.

Homemade cake mix:
1 cup all purpose flour
1/4 cup milk powder
3/4 cup sugar

For the ice cream:
3/4 cup cake mix (above, or any cake mix)
1/2 cup sugar
2 egg yolks
1 cup milk
2 cups evaporated milk
1 tsp vanilla extract
1/2 tsp almond extract

cake pieces from a baked cake (optional)

In a medium saucepan, whisk the cake mix, sugar and egg yolks together until the egg yolk is thoroughly combined with the dry ingredients. Add a bit of milk if it gets too dry. Add the milk and and evaporated milk and bring the mixture to a boil, whisking constantly. There's no need to worry about the egg yolks scrambling because the flour would prevent it. When the mixture thickens enough for your whisk to leave streaks in it, remove from heat and stir in the extracts. Pour the custard into a bowl to cool. It will continue to thicken further so don't cook the custard too far. If you do, just stir in additional milk to loosen.

Chill the custard until completely cold and pour into your ice cream machine for it to do its work. After churning, stir in the cake pieces and freeze the ice cream until firm.

Sunday, August 19, 2012

chocolate lemon cake with nutella frosting.


I used the remainder of my lemon cream to sandwich in between the chocolate cake layers and frosted the entire cake with nutella frosting which... was quite a disaster. If you look closely, the frosting isn't smooth at all. In fact, it has a slightly curdled appearance. I swear, if I knew that a regular icing sugar-butter buttercream was going to give me such trouble, I would have just made a swiss meringue buttercream. I creamed the butter and nutella together until smooth and homogenous and then added in a third of the icing sugar. Suddenly, the mixture began to separate out into fine tiny curds! I added another third of icing sugar, hoping that it would smooth it out but no. I kept beating and beating, but the curds only got larger and eventually, the oils from the nutella started to seep out. It was a nightmare. I just kept the mixer on, hoping that the buttercream would work itself out, even switching back and forth between the paddle and whisk attachment. In the meantime, I googled frantically how to fix broken buttercream? on my iPad but could only find solutions for SMBCs.

When I returned to my mixer a good 15 minutes later, nothing had changed. At least, not for the better. Frustrated, I dumped the remaining of the icing sugar in and the buttercream came together a bit, but frankly, the texture still resembled (I'm sorry) vomit. I decided to try a trick that I used with my SMBC whenever it separated out into a mess like this, which is to refrigerate it. So I stuck the mixing bowl into the freezer for a good 15 minutes before creaming the life out of it again. And thank goodness it whipped up into a fluffy buttercream! The mayhem of nutella oils and melted butter managed to combine readily but not completely. I think I did some damage when I added that last bit of icing sugar when the nutella and butter were not properly amalgamated.

I frosted the cake with the less-than-perfect frosting and it was such an eyesore to me that I opted to cover up as much bumpy surface area as I could with ruffle piping. The fine tip that the frosting has to squeeze past somehow compresses the curds together and makes the frosting seem smoother. I think the novelty of ruffle frosting has sort of withered away for me. I wasn't as excited seeing the results of my piping as I was when I did my basket weave piping.


Still, I'm questioning myself about the buttercream. Was it because I used the nutella at room temperature? I knew that using room temperature nutella would make the frosting soupier at first but I never would have predicted that it would separate after a bit of creaming. How about you? Have you made nutella buttercream (not SMBC style) before with nutella at room temperature without difficulty?

Friday, August 17, 2012

lemon, white chocolate & strawberry layer cake.


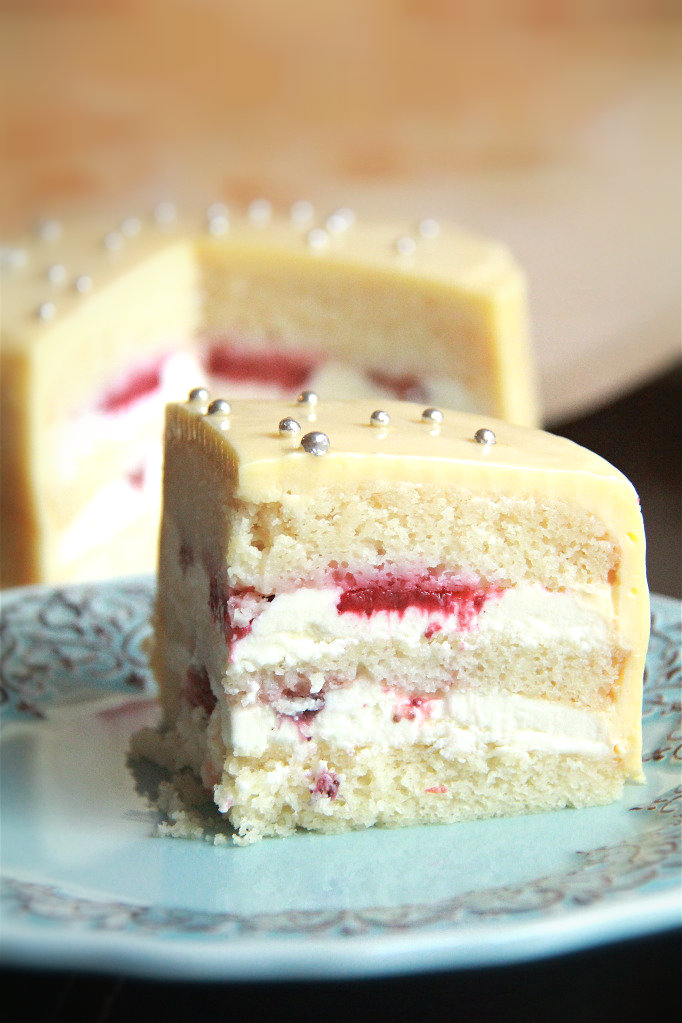
For a day that was not so suited for baking, this cake turned out pretty well.

When I say "not so suited", I mean it in the cursed sense. Why? Firstly, my white chocolate whipped cream went haywire. All was well up until I obtained soft peaks in my cream and added in my melted white chocolate and cream mixture. The next step was to beat both the softly whipped cream and white chocolate mixture until stiff peaks, and a problem arose. I didn't achieve a stiff consistency before the cream started curdling and breaking down on me! It was all SMBC deja vu. I considered trashing the current batch and starting a new one, but it dawned on me that I didn't have enough cream left.


If I had a punching bag, I would have ripped it apart.

So I switched to a hand whisk and whisked for my life, praying that the curdled mixture would act like a SMBC and come together eventually. Thank goodness that  it did! In the end, it looked like I'd just stirred together unwhipped cream and white chocolate together. I was afraid that whipping up the cream would cause it to separate again, so I settled for this denser version of my intended white chocolate whipped cream.


The second curse upon this poor cake was it being sliced unevenly. (Although it was completely my fault.) I didn't keep a firm grip on my serrated knife and one of the layers ended up thicker on one half and paper thin on the other half, with a small part of the circle uncompleted. As this calamity befell right after the whipped cream incident, I was feeling frazzled enough to discard this whole cake, not to mention that I made both components late at night. But I got a grip on myself and assembled the cake. It looked horribly naked with no frosting to cover up the huge blemish.

So I quickly frosted the cake.


The thing you must know about this lemon cream is that it is traditionally meant as a filling for cake, crepes, etc because of its soft consistency even when refrigerated. Hence, using it as a frosting is tricky, but not impossible. You will have to shuttle the cake and frosting in between the fridge and turntable a few times before you can get a decent coat of frosting, but it will be all worthwhile. I loved how silky and pleasantly tart the cream was, but I would actually prefer it with less butter. Because the lemon cream is so packed full of refreshing flavour, a modest coating would do. And it doesn't take a genius to realize how wonderful a pairing lemon makes with white chocolate and strawberries.


The mishap with the white chocolate whipped cream only made me love it more when I tasted it. Although it is not as light as the recipe intended, it turned out fine. Delish, in fact. It's like a less sweet, softer and looser version of white chocolate ganache. However, if I'd known beforehand how unstable it is at room temperature, I wouldn't have chosen it for a filling. Sometime after sitting outside, the layers started to slide and the cake started to wobble precariously.

And not forgetting the cake itself- it was great. Perfect sugar level for me (after reducing the amount a bit) and fine crumb. It's a white cake recipe that I've not tried out before, and I would love to compare how it fares in comparison with Dorie's and Rose Levy Beranbaum's but I can't say for sure which one is better. It has been too long since I made the other two versions. Oh well. Which is your favourite white cake recipe?

P.S. I hope that you can follow me on instagram!


Lemon, White Chocolate & Strawberry Layer Cake
makes a 5 inch cake
white cake recipe adapted from America's Test Kitchen, white chocolate filling recipe adapted from The Cake Bible, lemon cream recipe from Pierre Herme

It is best to prepare the lemon cream in advance. I made the white chocolate filling at the last minute but you can also make it ahead.

For the white cake:
3/4 cup cake flour
1/3 cup milk
2 egg whites
3/4 tsp vanilla extract
1/2 cup + 4 tsp sugar (I reduced this to 90g)
1 1/3 tsp baking powder
1/3 tsp salt
1/2 stick unsalted butter

Preheat oven to 300F. Line a 5 inch round baking pan with parchment.

Whisk together milk, egg whites and extracts.

Mix cake flour, sugar, baking powder and salt together in the bowl of an electric mixer on low speed. Add butter and continue beating on low speed until the mixture resembles moist crumbs.

Add all but about 3 tbsp of milk mixture to the crumbs and beat on medium speed for 1 1/2 minutes. Add the remaining milk mixture and beat for 30 seconds more. Scrape down the sides and mix on medium speed for another 20 seconds.

Pour the batter into the prepared pan and bake for 30 to 40 minutes or until an inserted skewer comes out mostly clean, with moist crumbs attached.

For the white chocolate filling:
42g white chocolate, chopped
1/2 cup heavy cream

Melt the white chocolate and 2 tbsp of heavy cream together. Set aside to cool completely.

Whip the remaining heavy cream until the beater forms streaks in the cream. Pour in the melted white chocolate mixture and beat until stiff peaks.

For the lemon cream:
1/2 cup sugar
zest of 1 and a half lemons, finely chopped
2 large eggs
3/8 cup freshly squeezed lemon juice
10 1/2 tbsp unsalted butter, diced and softened

Place the sugar and zest in a large heatproof bowl and rub the two together until the sugar is moist, grainy and aromatic. Whisk in the eggs and lemon juice.

Place the bowl over a saucepan of simmering water and cook, stirring with a whisk constantly until the cream thickens and reaches 180F.

Immediately remove from heat and strain into a blender or food processor. Let the cream cool to 140F, stirring occasionally.

Beat the cream on high speed in the blender of food processor while adding the pieces of butter about 5 at a time. When all the butter has been incorporated, beat the cream for another 3 to 4 minutes. Scrape the cream into a bowl and refrigerate until firm, at least 4 hours.

Assembly:
white cake, cooled
white chocolate filling
lemon cream (you probably won't use all of it)
strawberries, halved or quartered

Slice the cake into 3 layers. Take one layer and spread half the white chocolate filling on it. Arrange the chopped strawberries on top, making sure that they are as close to the surface as possible. Top with the second layer of cake and spread the remaining white chocolate filling on top. Again, arrange the strawberries on top of the white chocolate filling. Finish with the last layer of cake and refrigerate it until the white chocolate filling is firm, about 2 hours. Frost with the lemon cream.

Wednesday, August 15, 2012

banana chocolate chip espresso muffins.


Here's an alternative to banana bread when you have some ripe browning bananas hanging around. I've been wanting to try this recipe for quite some time already and the opportunity has finally presented itself. The espresso isn't very noticeable but it adds a complex flavour to the muffins. The muffins are extremely redolent of bananas especially when warm and I advice you to have them as such. However, the banana flavour actually intensifies after a few hours so to have the best of both worlds, I guess you would have to make them beforehand and reheat them. But baking in advance is good if you don't have the luxury of time unless you have a lack of self-control which I cannot blame you for.

Also, I feel not completely mashing the bananas but leaving random lumps instead makes for muffins. Maybe an addition of toasted walnuts too.


Banana Chocolate Chip Espresso Muffins
makes 12
recipe adapted from Baked

1 1/2 cups mashed, very ripe bananas (about 4 medium bananas)
1/2 cup sugar
1/4 cup light brown sugar
1 stick unsalted butter, melted
1/4 cup whole milk
1 large egg
1 1/2 cups all-purpose flour
1 tsp instant espresso powder
1 1/2 tsp baking soda
1 tsp salt
1 cup semisweet chocolate chips (I used less)

Preheat oven to 350F. Line a 12 hole muffin pan with muffin liners.

Stir together the bananas, sugars, melted butter, milk and egg.

Whisk the flour, instant espresso powder, baking soda and salt.

Pour the wet ingredients into the dry ingredients and stir until just combined. Fold in the chocolate chips.

Bake for 20 to 25 minutes or until a toothpick inserted in the center of a muffin comes out mostly clean, with moist crumbs attached.

Saturday, August 11, 2012

s'mores cupcakes.


I think the main reason I wanted to make these cupcakes is because I've always wanted to decorate my cupcakes with adorable peeps sitting regally in the middle. And since peeps are marshmallows, I immediately thought of combining them with a graham cracker cupcake and chocolate frosting for a s'mores combination.

The graham cracker cupcake is packed full of graham cracker crumbs while being sturdy enough to have some semblance of structure. It is also easy to make without having to whisk egg whites and fold them into the batter. The only problem I encountered with the batter was that it started to curdle after adding the milk but the cupcakes came out fine texturally.


The chocolate frosting is taken out of Rose's Heavenly Cakes. In the book, it was paired with a white cake and strawberry mousseline buttercream. If you've come across this page before, the full name of this frosting is Miss Irene Thompson's Dark Chocolate Frosting and it's touted to be sticky and gooey. How to resist that description?

The frosting is almost like hot fudge because of the corn syrup. Believe me, it is extremely sticky and when at room temperature, has a glaze consistency. If you want to frost the cupcakes in decadent sweeping swirls of frosting, you will need to chill the frosting. The best thing about this frosting is that it can keep at room temperature for up to 3 days, which is perfect because marshmallows do not take well to refrigeration. On the flip side, because the frosting is primarily made out of corn syrup, it can get pretty sweet so if you like, you can use more unsweetened chocolate and less of the bittersweet.


S'mores Cupcakes
makes 6
adapted from Nabisco

The only changes I made were to use both brown and regular sugar and add salt. The cupcakes don't rise much and if you divide the batter equally, you will get 6 perfectly risen level cupcakes.

For the cupcakes:
3/4 cup graham crackers crumbs
1/4 cup flour
1 1/4 tsp baking powder
1/8 tsp salt
1/4 cup butter, softened
3 tbsp sugar
3 tbsp brown sugar
1 egg
1/2 tsp vanilla
3/8 cup milk

Preheat oven to 350F. Line a muffin tin with paper liners.

Mix together the graham cracker crumbs, flour, baking powder and salt.

Cream the butter and sugars until light and fluffy. Add in the egg and beat until the mixture is smooth. Add in the vanilla extract.

Alternately add the flour mixture with the milk, beating well after each addition, starting and ending with the flour mixture. Divide the batter amongst the paper liners.

Bake for about 15 minutes or until an inserted skewer comes out mostly clean, with a few moist crumbs attached.

For the dark chocolate frosting:
25g unsweetened chocolate, chopped
21g bittersweet chocolate, chopped
12g unsalted butter
1/4 cup corn syrup
1/2 tsp vanilla extract

Melt the chocolates and butter in a heatproof bowl over a pot of simmering water until almost completely melted. Remove from heat and stir until completely melted. Stir in the corn syrup until incorporated. Stir in the vanilla extract until combined. Cool the frosting until thick enough to frost or glaze.

Assembly:
6 peeps marshmallow chicks

After the cupcakes have cooled, frost or glaze them with the chocolate frosting. Place a marshmallow chick in the center. Do not refrigerate cupcakes after decorating with peeps.

Friday, August 10, 2012

strawberries & cream madeleines.


When I took a bite of one of these, I had to drop whatever I was doing and write this post immediately. Of course, it did help that I was already using the computer.

This recipe is taken out of my latest acquired baking book, Baking by Flavour. It's one of those books that make you want to bake every single recipe, keeps your eyes glued to the pages despite the lack of pictures and smile unconsciously while doing so. It is, without a doubt, one of my favourite books already.

There were too many recipes I wanted to try and too little stomach space, but I had to start somewhere. I picked out blueberries and cream breakfast cake, mostly because it had the word cream in it. I didn't have blueberries but I did have strawberries, so I made the switch. I also had a sudden want to bake regular cake batters in madeleine molds so that you can eat them while they are still warm and with crunchy tops. None of that waiting for the cake to cool before slicing precautions. This idea is actually a suggestion from none other than the author herself and came up a few times in the book. Her vanilla and chocolate madeleine recipes do not yield the orthodox sponge-cake-like madeleines but madeleines made from a typical creamed cake batter. I definitely will give those a try one day but for now, cream is calling.


I've never used cream in my cake batters before and I feel like I've been missing out on this wonderful secret. The cream not just adds a subtle milkiness to the cake, it also makes the cake taste richer and more buttery. If you've always been trying to make the best-tasting butter-iest butter or pound cake by adding more and more butter but feel like it's always not quite there yet, I bet adding heavy cream would do the trick without the extra butter.

The cake was so good I almost wished I'd left out the strawberries so that I could have it in its uninterrupted glory but in the end, I was thankful for the berries' refreshing lift because a plain cake may prove to be to rich to be consumed in large quantities.

Cream just may find its way into many of my future cake batters.


Strawberries & Cream Madeleines
adapted from Baking by Flavor by Lisa Yockelson
makes 24

1 1/8 cups all-purpose flour
1/8 cup cake flour
1 tsp baking powder
3/8 tsp salt
1/4 tsp freshly grated nutmeg
1/2 cup diced fresh strawberries
7 tbsp unsalted butter, softened
1 tbsp shortening
1/2 cup + 2 tbsp sugar
1 large egg
1 tsp vanilla extract
1/3 cup heavy cream blended with 1/4 cup milk

Preheat oven to 350F. Butter and flour madeleine pans.

Sift the flours, baking powder, salt and nutmeg into a bowl. Take 1 tsp of this sifted mixture and toss it with the diced fresh strawberries.

Cream the butter and shortening until combined. Add the sugar in two additions, beating for 1 minute after each portion is added. Beat in the egg in two additions, blending well after each addition. Mix in the vanilla extract.

Alternately add the flour mixture in three parts with the heavy cream-milk blend in two parts, beginning and ending with the flour mixture. Stir in the strawberries. Let the batter stand for 3 minutes to thicken slightly before portioning into the prepared pans.

Bake for 12 minutes or until an inserted skewer comes out clean. Cool the madeleines in the pans on racks for 1 minute before unmolding. Eat while still warm.

Monday, August 6, 2012

chocolate peanut butter butterfinger brownies.


This is my take on this brownie that went viral some time ago. I used a chewy brownie recipe and instead of peanut butter cups and salted peanuts, I had them replaced with chopped butterfinger bars. To add to the peanut butter flavour, I made a peanut butter filling to be spread on top of the cooled brownies before sprinkling on the butterfingers. I kept the rice krispie layer the same.

I had full intention to follow the original recipe because it looked too perfect to be modified in any way but I had no reese's peanut butter cups conveniently lying around (even if I did, they wouldn't last long enough to make it into the bars). What I did have though, were butterfingers. So I made the switch. I knew butterfinger bars were not as packed full of peanut butter oomph as reese peanut butter cups, so I added an extra layer of peanut butter filling, inspiration from here, to make sure that these chocolate peanut butter butterfinger brownies held to its name.


The peanut butter filling is almost the same consistency of reese's peanut butter cups', maybe just a bit moister. It is a good thing because the peanut butter wouldn't ooze everywhere when sitting at room temperature, but it made spreading it on top of the brownies difficult.

It's hard to go wrong with chocolate and peanut butter and crunch but if I had to nitpick, I would throw in more rice krispies for extra crunch. Because it's a 50-50 mix of chocolate and peanut butter, you can expect the topping to remain rather soft and sliceable even when throughly chilled and for it to melt extremely quickly in less-than-cool temperatures. So eat fast, or cut them into small bars and keep going back to the fridge!


I used a chewy brownie recipe for the base and I would probably recommend using a fudgy brownie one. At room temperature, the brownies were all lovely, gooey and moist but because this brownie is meant to be refrigerated, the brownies lose their characteristic texture and slides into second place behind brownies of a fudgy nature. Besides, fudgy brownies benefit from chilling.

I actually made something of a similar before I started blogging. They were called peanut butter fudge crunch bars which I made from Cookie Madness. Those were awesome. If you couldn't care less about the brownie layer and just want crunch, crunch and more crunch, make those. As an added bonus, they are no-bake.


Chocolate Peanut Butter Butterfinger Brownies

For the brownie layer, make a 9 x 13 inch pan's worth of brownies with your favourite brownie recipe or use this chewy brownie recipe like I did

For the peanut butter filling:
1 cup peanut butter
1/4 cup unsalted butter
1/4 tsp salt
2 cups icing sugar

Cream the peanut butter, butter and salt together until well combined. Add in the icing sugar and mix until incorporated.

For the chocolate peanut butter topping:
1 1/2 cups milk chocolate chips
1 1/2 cups peanut butter
1/2 tbsp butter
1 1/2 cups rice krispie cereal (I would use 2 cups and maybe a bit more)

Melt the chocolate chips. Stir in the peanut butter and butter until evenly combined. Stir in the rice krispies. Set the mixture aside to cool slightly.

Assembly:
chopped butterfinger bars, as much as needed

Bake the brownies and let them cool completely. Spread the peanut butter filling evenly over the brownies and layer on the chopped butterfinger bars. Try to lay the chopped pieces of candy bars as close to the surface as possible so that they don't jut out of the topping later on. Pour over the chocolate peanut butter topping and refrigerate until firm before slicing, about 2 hours.

Saturday, August 4, 2012

coconut cream pie.


I've changed my blog layout! Even though I'm fine with my old classic template, I wanted a template that is wider so that I can increase the size of my pictures. For that boom effect, you know? Unfortunately, most of the default templates Blogger has are templates that I wouldn't touch with a ten foot pole. I chose the simplest and most straightforward template I could find and added changed the border background colour and that's it. I'm not a computer whiz and I would rather not bring upon a huge headache for myself downloading and fiddling with template codes so I guess this would have to do for now. I do miss my old template though.

Anyway, let's talk pie. I was scrolling through my to-bake list recently and found coconut cream pie listed there. I have no idea how it got there but I must have been strongly inspired to bake coconut cream pie at some point. I've been overloading on cakes recently so I went with the pie for a change.


Maybe the best coconut cream pie recipes have coconut cream, coconut milk and all that but I didn't want to buy those extra ingredients just to make this recipe since I was only going to make a small batch. In the end, I took a little bit of this and that from various recipes and ended up with a version that used whole milk with coconut extract and desiccated coconut, ingredients that I have readily on hand.


I've not had a coconut cream pie before so I can't boast how it easily outshines other versions but I can vouch for how delicious and un-fussy it is. The coconut pastry cream wasn't too thick and the pie crust was delicious as always. I didn't quite like the desiccated coconut in the pastry cream because it added too much texture for my liking. I guess that's why normal recipes call for shredded coconut. The good thing about desiccated coconut though is that it is unsweetened and hence makes the pastry cream less sweet overall.

I wish I'd piled on more whipped cream. I'm turning into a whipped cream monster.


Coconut Cream Pie
adapted from various sources

For the pie crust, refer to the recipe here

For the coconut pastry cream:
1/2 cup sugar
3 tbsp cornstarch
2 eggs
2 1/2 cup whole milk
2 tsp vanilla extract
2 tsp coconut extract
1 cup sweetened shredded coconut or desiccated coconut

Whisk the sugar, cornstarch and eggs in a bowl. Bring the whole milk to a simmer. Slowly stream the hot milk mixture into the egg mixture, whisking the egg mixture constantly. Pour the custard back into the saucepan and bring to a boil, whisking constantly. When the mixture has come to a boil, let it keep bubbling away for a minute to ensure that the cornstarch thickens the mixture to optimum consistency. Remove from heat and stir in the vanilla and coconut extracts. Stir in the coconut.

Let the mixture cool before pouring it into the baked and cooled pie crust. After the pie crust has been filled, refrigerate the pie until completely chilled, about 4 hours.

Assembly:
1 cup heavy cream
1 tbsp sugar
2 tbsp sweetened shredded coconut or desiccated coconut, toasted and cooled

Just before serving, whip the heavy cream and sugar until the cream is at the soft peak stage. Mound the cream on top of the pie and sprinkle with the toasted coconut.