I've Moved!
Friday, December 16, 2011
eggless vanilla cupcakes.
I've not quite found my go-to vanilla cake recipe yet, but I made one very near perfection before. What I'm looking for is a recipe that has a clear vanilla flavour. To achieve that, there must be no egg yolks or butter. The cake must not be yellow, in a sense. Because if it is, it's a yellow cake, not a vanilla cake. Ha ha.
This recipe being vegan, naturally has no eggs nor butter in it. It fits my criteria for what I think would be the ultimate vanilla cake, so I gave it a go.
I divided the recipe by 4, since I only wanted to try it out. That left me with 20ml of oil to add in. When I first saw the recipe, I thought of substituting half of it with applesauce but because 20ml is such a small amount, I subbed in the full amount with applesauce instead. There was a faint apple-y hint which I didn't quite mind since the vanilla scent was way stronger than that but I was more concerned that my substitution could have altered the structure of the cake.
See, my cupcakes rose beautifully in the oven, spreading out instead of up which would give me a nice wide surface to pile on the frosting(!). But when I took them out, they sank. Not much, but noticeable. My heart on the other hand, sank like the titanic. It wasn't just because the cupcakes turned out somewhat deflated, but also because I could tell the insides were a bit gummy when I inserted a skewer.
Usually, I like a little gumminess, especially in muffins but this was way too much. It was very gummy and dense. The worst part is, I could hardly taste the vanilla. I could smell it, but my tastebuds couldn't detect it. Which is such a pity because there was tons of vanilla in there. The good news is it wasn't too sweet and thank god for that because the frosting definitely fulfilled that department! The frosting was much sweeter than I could handle, and I have a pretty high tolerance of sugar. Maybe it's because I've not made the classic icing-sugar-and-butter buttercream in a while.
I was really hoping that this cupcake would be the one but I guess not.
Eggless Vanilla Cupcakes
makes 12
slightly adapted from Love and Olive Oil
Perhaps doubling the amount of baking powder would yield better results?
1 1/4 cups plain flour
1 tsp baking powder
1/4 tsp baking soda
1/2 tsp salt
1 cup buttermilk
3/4 cup sugar
1/3 cup oil
2 tsp vanilla extract
Preheat oven to 350F. Prepare a 12-hole muffin tin or two 6-hole ones. Line with paper liners for easy removal.
Whisk the flour, baking powder, baking soda and salt in a medium bowl. Whisk the buttermilk, sugar, oil and vanilla extract in another bowl. Add the wet mixture into the dry and mix until just combined. Divide among the paper liners. Bake for 20-22 min or until a skewer inserted comes out clean. Cool completely before frosting.
Whipped Rum Frosting
adapted from Sweetapolita
1 stick + 2 tsp unsalted butter, at room temperature
1 cup sifted icing sugar
1 tbsp milk
2 tsp rum
Using an electric mixer, whip the butter for 8 minutes on medium speed using the paddle attachment. It will become very pale and creamy. Add the rest of the ingredients and cream on low speed for 1 minute before increasing the speed to medium, beating for 6 minutes. The frosting will become very light, creamy and fluffy. The frosting is best used right away.
Wednesday, December 14, 2011
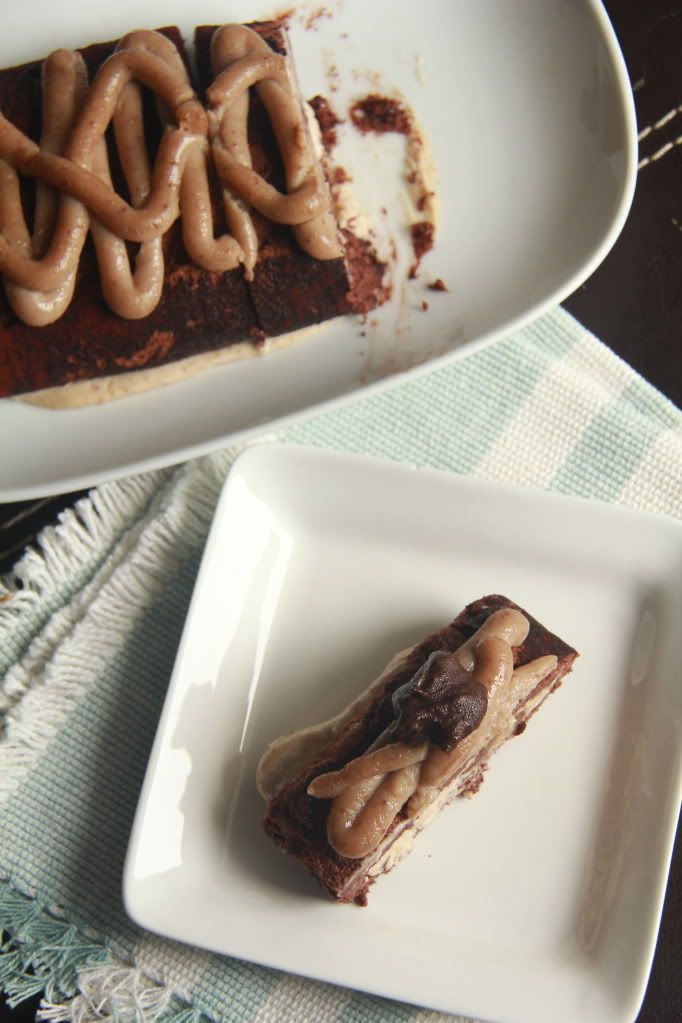
chocolate chestnut swiss roll.
I wanted to use up my chestnut pastry cream and marron glaces (sort of) from my mont blancs so I made a swiss roll. And since chocolate goes so well with chestnuts, it's only logical to make a chocolate one.
Swiss rolls are quite prone to failure. Horrible cracks that streak across the surface like fissures. Edible, but not too pretty to look at. It's that infuriating fear that ironically, compelled me to take another swing at it. I made a swiss roll before, and it nearly broke cleanly into two halves.
This time, I succeeded in not having the swiss roll crack but I didn't feel 100% victorious. It looked really flattened and squashed instead of the circular shape I was hoping to achieve. Then again, it is a flourless cake so it wouldn't be as structurally sound as one with flour. But, I don't know if it is supposed to be so spineless. At the very least, this one was easy to roll.
Being a flourless swiss roll, it had some amazing qualities to it. The sponge was spongy (ha!), soft, moist and ethereally light all at once. The chocolate flavour isn't as strong as regular cakes, say my favourite chocolate cake, but I'm going to go out on a limb and say that it's stronger than regular chocolate swiss roll sponges.
I think I'm ready for another shot at swiss roll. Swiss roll, I'm taking you down.
Chocolate Chestnut Swiss Roll
cake recipe adapted from The Cake Bible
For the cake:
1/9 cup (1tbsp + 2 1/3 tsp) unsifted cocoa powder and 1 more tsp for dusting
20ml boiling water
1/3 tsp vanilla
2 tsp unsalted butter, softened
33g + 11g sugar
2 large eggs, separated
1/4 tsp cream of tartar
Preheat oven to 350F. Grease and line a 11 x 7 inch baking pan.
In a small bowl, stir together the 1/9 cup of cocoa powder with the boiling water until the cocoa has dissolved and the mixture is smooth. Stir in the butter until it has melted and then the vanilla. Set aside to cool.
In a mixing bowl, combine the 2 egg yolks with 33g sugar and beat using an electric mixer until light and fluffy. Add the chocolate mixture and beat until incorporated.
In another mixing bowl, beat the egg whites until foamy. Add the cream of tartar and continue beating until soft peaks begin to form. Add the remaining sugar bit by bit and beat until stiff peaks form.
Fold 1/3 of the beaten whites into the chocolate mixture to lighten it up. I find using a whisk much easier than using a spatula at this point. Fold in the remaining egg whites gently until the batter is homogenous.
Pour the batter into the prepared pan and bake for about 10 to 12 minutes. The cake will have faded in colour and lost its shine. The surface should also spring back when lightly pressed.
Take the cake out of the oven and place it on a cooling rack. Sprinkle the remaining teaspoon of cocoa powder evenly over the cake and cover with a damp dish towel. Allow to cool completely.
For the chestnut cream:
1/4 recipe of chestnut pastry cream
1/2 cup cream, whipped
Fold the whipped cream into the chestnut pastry cream. You may have a little extra leftover but that's okay. Just grab a spoon and attack.
Assembly: Invert the cake on a large piece of parchment paper. Peel the old piece of parchment paper off the cake. Make three shallow slits near the ends of the short side of the cake. This will make it much easier to roll it up. Spread the filling evenly on the cake, leaving at 1 inch border from the sides. I advise you to leave a larger border towards the opposite end of the cake, the side which would be the seam after rolling it up, just in case that there's too much filling in the middle. Sprinkle some chopped candied chestnuts if desired. Roll up the cake. Refrigerate for at least 2 hours for the filling to firm up.
If you have extra pastry cream, you can use it to pipe decorations on top. Garnish with marron glaces if you like.
Monday, December 12, 2011
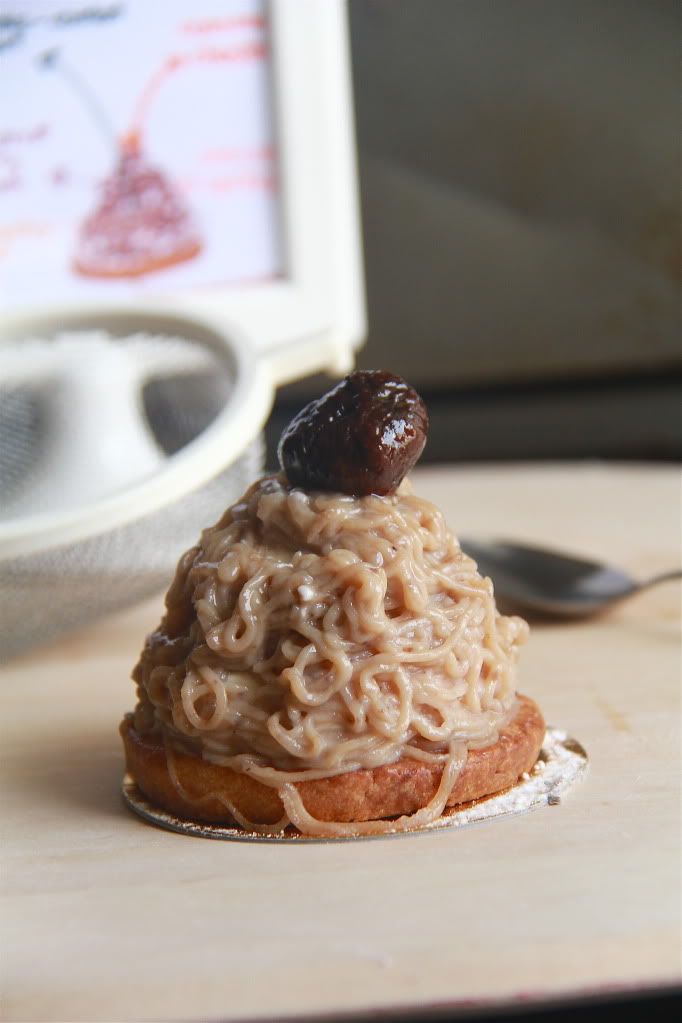
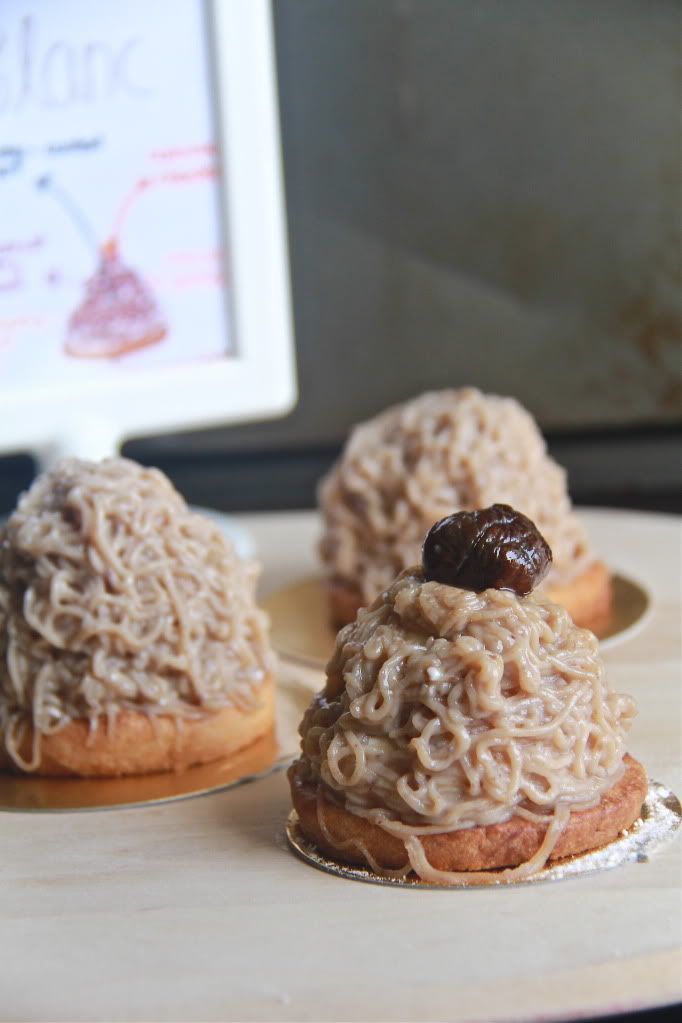
mont blanc.
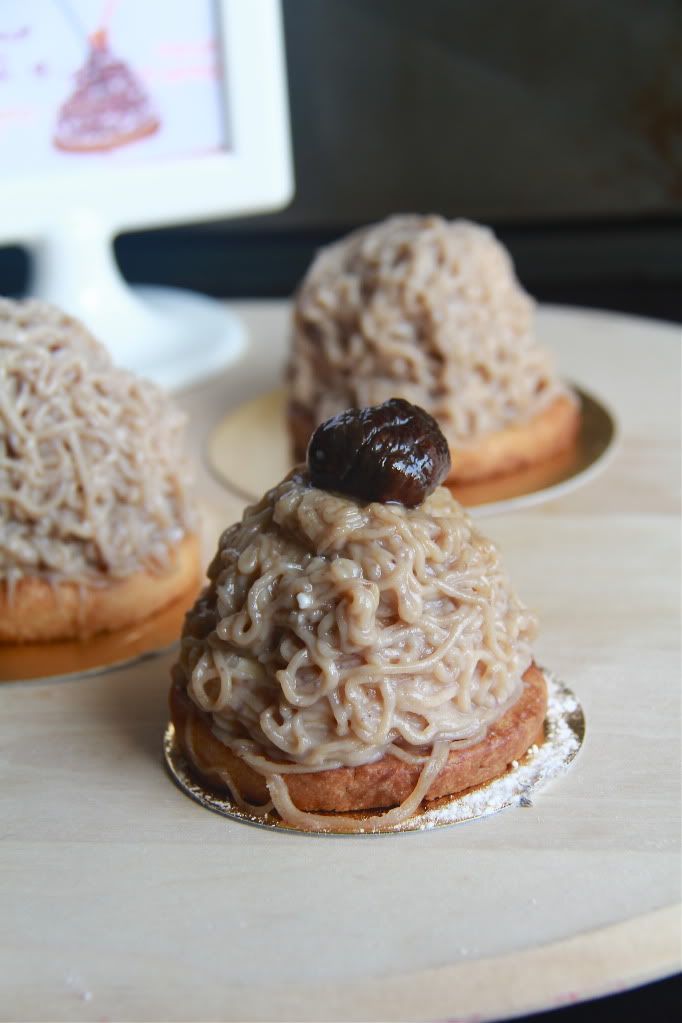
Mont blanc ranks waaay up there on my list of favourite cakes. There's something about the nutty, milky sweetness of chestnut puree and the way it is piped spiraling up to procure a messy but somewhat artistic-looking mountain. An edible delicious mountain. Plus, mont blancs usually come with a crumbly tart base!
Unfortunately, I find that mont blancs are usually quite expensive. I mean the cake, not the pen. Well, I suppose the pen is too. I think it's because the chestnut puree is pretty pricey. I saw a can going for ten bucks before. But whole chestnuts themselves are very much more affordable so it would be easier on the pocket to make my own chestnut puree. And since I could make my own puree I should make my own mont blancs. Which brings us to here, with a mont blanc and a fork. And then just the fork.
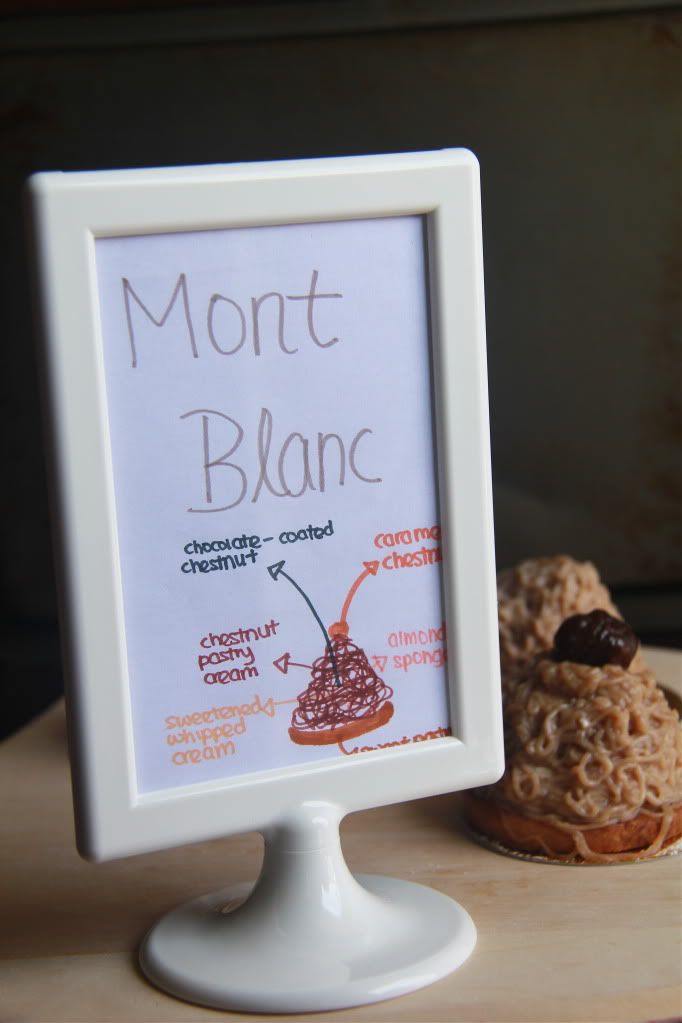
Most of the components came together without a hitch. I used my ever reliable sweet tart dough, some leftover almond sponge from my previous entremet which I froze, chantilly cream, chocolate-coated candied chestnuts and chestnut pastry cream. The chestnut for garnishing is just a candied chestnut, the same as the one inside the cake but without the creamy chocolate shell.
The candied chestnuts were the huge pain in the butt. I followed a recipe for marron glaces and I stirred the chestnuts while they were boiling in the syrup. Which is what I'm not supposed to do. To be a little less harsh on myself, the directions didn't mention anything about not stirring. But in the end, I still got hard sugar-encrusted chestnuts instead creamy sweet ones. I decided to just heck with it, and reheated the crystallized chestnuts until the sugar has melted again and heat it until it has turned to caramel. It was as if I had intended to just dip the chestnuts in caramel which hardened when left to dry on a baking sheet. They looked much better, and I felt much better, until I found that when refrigerated, the caramel liquified and dripped off the chestnuts.
And it's not just the appearance either. The unsuccessful layer of caramel on the outside became tough and chewy. So much work for nothing, hmph. If you're making those marron glaces, please please please remember not to stir when they're boiling!
The second problem, although a much milder one, is the piping of the chestnut pastry cream. The holes of the piping tip that I used were tiny! I really feel that bigger holes would pipe a prettier mont blanc. But it's not just the looks. Because the holes were so small, little pieces of chestnuts which I didn't manage to strain out from my puree got stuck behind them, constantly jamming the flow of the pastry cream. I managed the scrape by by inserting a toothpick up the holes to get it going again. Thank goodness messy mont blancs still look good!
Despite the little boo-boos here and there, I loved my final product! The chestnut pastry cream wasn't too sweet or too bland. Those chestnut spaghetti strands always make or break a mont blanc. So does the tart base, which was wonderful as always. After coating the chestnuts with chocolate, I could almost forgive them for their slight chewiness. I love chestnuts with chocolate, don't you?
Mont Blanc
sweetened whipped cream, amount depending on how much you're making (portion about 3 tbsp per mont blanc)
marron glaces recipe here, coat with chocolate if you like
Sweet Tart Dough (makes twelve 2-inch circles)
1 1/2 cups all purpose flour
1/2 cup icing sugar
1/4 tsp salt
1 stick + 1 tbsp cold unsalted butter, cut into small cubes
1 large egg
Pulse the flour, sugar and salt together in a food processor. Scatter the butter cubes over the dry ingredients and pulse until the butter is coarsely cut in. Crack the egg in a separate bowl and beat it up with a fork just to break it up. Add it a little at a time, pulsing after each addition. When the all the egg has been added, keep pulsing until you get a cohesive dough.
At this point, you can chill, roll and cut out 2 inch circles of dough or you can skip the chilling and divide the dough into 12 equal portions and press each portion into a 2 inch cutter. Transfer the circles of dough onto a baking sheet and chill until firm. Freeze, if you're short of time.
Bake at 190C for about 15 minutes or until nicely browned. I like to bake mine until they're a toasty brown to get more flavour.
Almond Sponge
*You may have leftover sponge, depending on how many mont blancs you/re making. Freeze the extra or use any other leftover sponge you have previously.
1 large egg white, at room temperature
1 tsp sugar
1/3 cup ground blanched almonds
1/3 cup icing sugar, sifted
1 large egg
1 tbsp + 1 tsp all purpose flour
1/2 tbsp unsalted butter, melted and cooled
Preheat the oven to 425F. Line a 9 inch square pan.
Beat the egg white until it forms soft peaks. Add the sugar and beat until stiff peaks. In a separate bowl, beat the almonds, icing sugar and egg until pale and fluffy. Fold in the flour gently until just combined. Fold the meringue into the almond mixture and then fold in the melted butter.
Pour the batter into the pan and bake until just lightly browned, about 5 to 9 minutes. Immediately loosen the sides of the cake from the pan, lift it out by the sides of the parchment paper and peel it off. Let the cake cool completely before cutting out 1 inch circles.
Roasted Chestnut Puree
200g cooked chestnuts
2 1/2 cups milk
1/2 vanilla bean
1/4 cup sugar
3 tbsp rum (optional, but good)
Place the chestnuts, 2 cups of milk and vanilla bean in saucepan and heat until simmering. Simmer until all the liquid has evaporated and chestnuts are tender. Add the last 1/2 cup of milk and sugar and heat to dissolve the sugar but try not to let too much milk evaporate. Pour the mixture into a blender or food processor. Add the rum and blend. Pass the mixture through a sieve to obtain a smooth puree.
Chestnut Pastry Cream
1 1/3 cup whole milk
1/4 cup sugar
4 egg yolks
1/4 cup cornstarch
2 tsp vanilla extract
all of the chestnut puree above
Heat the milk with the sugar until the sugar has dissolved. In a separate bowl, whisk the egg yolks and the cornstarch together until the cornstarch has fully dissolved. Slowly pour in the warm milk mixture into the egg mixture, whisking constantly. Pour everything back into the saucepan and bring to a boil, whisking constantly. Keep cooking until the mixture has thickened and let it boil for a minute more to cook off the floury taste. Stir in the vanilla extract and strain into a bowl. Add the chestnut puree and mix to combine. Cover with plastic wrap that is touching the surface of the pastry cream and refrigerate until completely chilled.
Assembly: Place a circle of sponge on a tart base. Top with a small mound of whipped cream. Press a marron glace into the middle and top with another small mound of whipped cream. Use a spatula to smooth down the sides so that the chestnut is completely covered and you have a shape of a mini mountain. Spoon the pastry cream in a piping bag already with a tip with multiple holes. Pipe the pastry cream from the bottom, spiraling upwards or in any fashion you desire. Top with another marron glace. Chill the mont blanc for at least 30 minutes before serving. I advise you not to dust any icing sugar over it because it would just dissolve.
Saturday, December 10, 2011
individual kabocha casserole.
It's funny, huh. How us human beings manage to take something as healthy as pumpkin and turn it into a giant calorific mess. A.k.a. kabocha casseroles.
It's starts off deceptively innocent- roasting it until soft and poke-able.
And then oh-oh. Here comes the sugar.
Oh, nuts. No really.
Whoops, how did those marshmallows sneak in?
Who cares, really?
Tell yourself that at least these are 50% healthy. Just like candy apples.
Individual Kabocha Casserole
makes 1
adapted from Tokyo Terrace
I combined the sugar, cinnamon and flour with a bit of water to make a paste so that it's easier to cover the entire exposed surface of the kabocha. I find that this is also a good way to reduce sweetness since the water dilutes it and you can stretch it way further than just sprinkling on sugar. Try to get a kabocha with less flesh or the ratio of topping to pumpkin flesh will be too little.
Half a small kabocha or any pumpkin
2 tbsp brown sugar
1 1/2 tsp cinnamon
1 tbsp flour
2 tsp water
2 tbsp walnuts or pecans
marshmallows, snipped into half or mini marshmallows
Preheat oven to 425F.
Place the kabocha half cut side down on a baking sheet lined with aluminum foil and bake until soft enough to pierce with a fork, about 15 minutes. Meanwhile, combine the brown sugar, cinnamon, flour and water in a bowl.
Turn the kabocha cut side up and slather the paste all over it. Return it back into the oven for another 5 minutes or until the filling is beginning to bubble slightly. Be careful not to burn it!
Top with the marshmallows and broil for a minute or two until they turn a toasty brown.
Eat as soon as possible without burning your tongue!
Friday, December 9, 2011
half baked cheesecake.
I got this recipe from a french desserts book which is in chinese. Basically, there's a layer of creme brulee at the bottom and then a Japanese souffle cheesecake baked on top. I guess it's called "half baked" because the creme brulee has a custardy texture similar to unbaked batter? Or perhaps because it's half-creme brulee, half-cheesecake.
I got suckered in by the novelty and cute factor (the picture showed them baked in little espresso-cup-like molds) and the fact that I had a gagillion, okay fine, four, egg yolks to use up. I like creme brulee and souffle cheesecakes separately but together, I'm not so sure. It's not because they taste bad as a whole, but rather as the slightly tangy cheesecake overwhelms the much mellower creme brulee. Plus, there was only a 1/2 inch thick layer of creme brulee so when eaten together with the cheesecake, you can't really discern it out. Maybe if I'd increased the ratio of custard to cake to an even 50-50, the overall dessert would be much more balanced.
Oh and please never try using cottage cheese in place of cream cheese in a souffle cheesecake. I did that just to finish up the last few spoonfuls and because the curds didn't smooth out, the final cheesecake was lumpy and awkward.
I'm not going to include a recipe but you can still try it out by your own reliable creme brulee and Japanese souffle cheesecake recipe. Prepare the creme brulee first, dividing the custard amongst small ramekins or even jars like I did. I would advise you to fill them up to a point where after baking the cheesecake on top, you would get an even ratio of creme brulee to cheesecake. After baking, let them cool. You can prepare this a day ahead.
Next, prepare the cheesecake batter, pour on top of the creme brulee and bake. When they're done, cool completely before refrigerating until completely chilled, a few hours or preferably overnight. Before serving, top with fresh fruit if you like.
Subscribe to:
Posts
(
Atom
)