I've Moved!

Saturday, September 27, 2014

mousse au chocolat blanc et aux bananes / ムースショコラブラン・オ・バナーヌ


Hmm I'm not so sure how to start. Do I launch into a lengthy description of the unusually spot on textures of both the sponge and mousse, singing their praises every letter of the way, or do I begin with a dramatic tale of how an absolute nightmare it was just trying to imitate the chocolate border pictured in the recipe book? The cake was delicious as it was difficult to make (just the chocolate part though), and I'm glad that the dozens of chocolate splatters and bouts of panic were well justified. I might lay off entremets for a while though - most apparently decorating isn't my forte and my confidence level desperately needs to be restored.


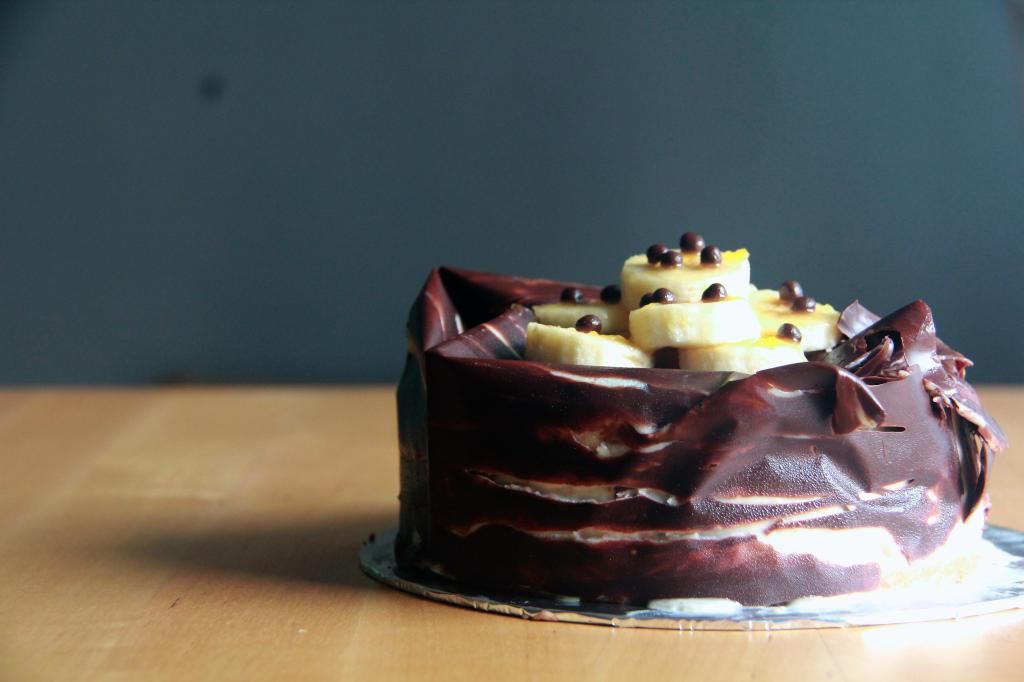
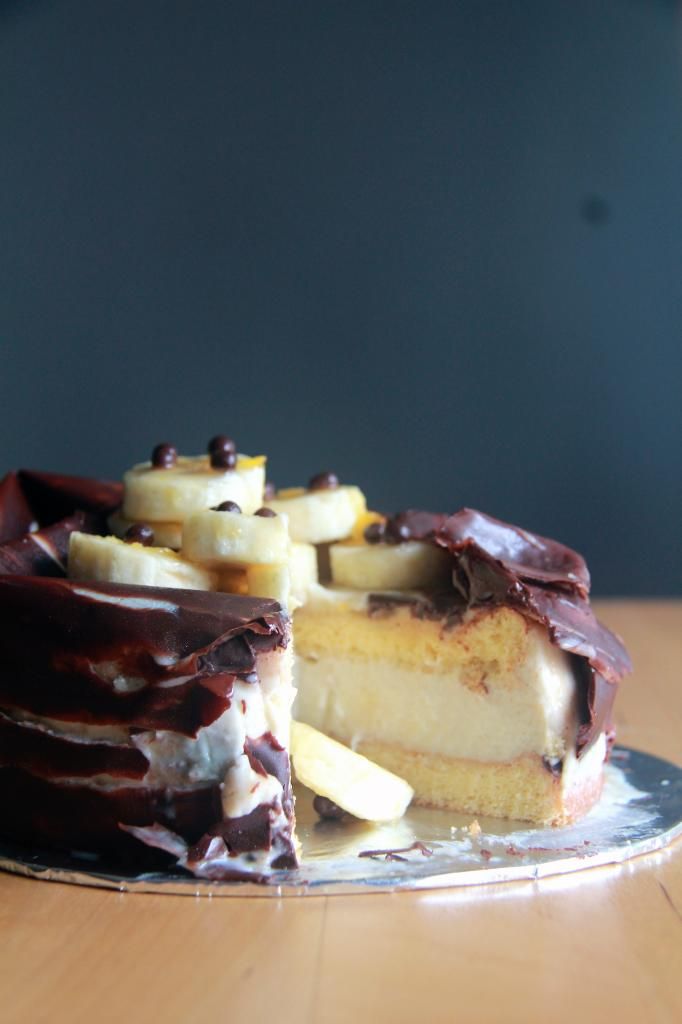
I said just now that the textures of the sponge and mousse are near perfect (to me, at least), and by that I mean that the layers of sponge aren't too soft but sturdy and slightly dense. They are rightfully springy without being in the least bit dry. No syrup was used to moisten them, by the way. As for the mousse, no it isn't so soft that it would melt on the tip of your tongue and disappear in a poof of flavours, but just enough gelatin was used such that it holds it shape while being delicate enough to jiggle noticeably. I think it wouldn't hurt to add more banana though but that would probably make the consistency of the mousse more liquid at first... You see, the top layer of sponge is supposed to be suspended in the centre of the cake but it rose to the top because the mousse was too fluid or something (I was never really good at physics while I had to learn it). A few parts of the sponge were peeking through the thin layer of mousse that covered it but I managed to keep those away from sight unexpectedly with my failure of a chocolate border.


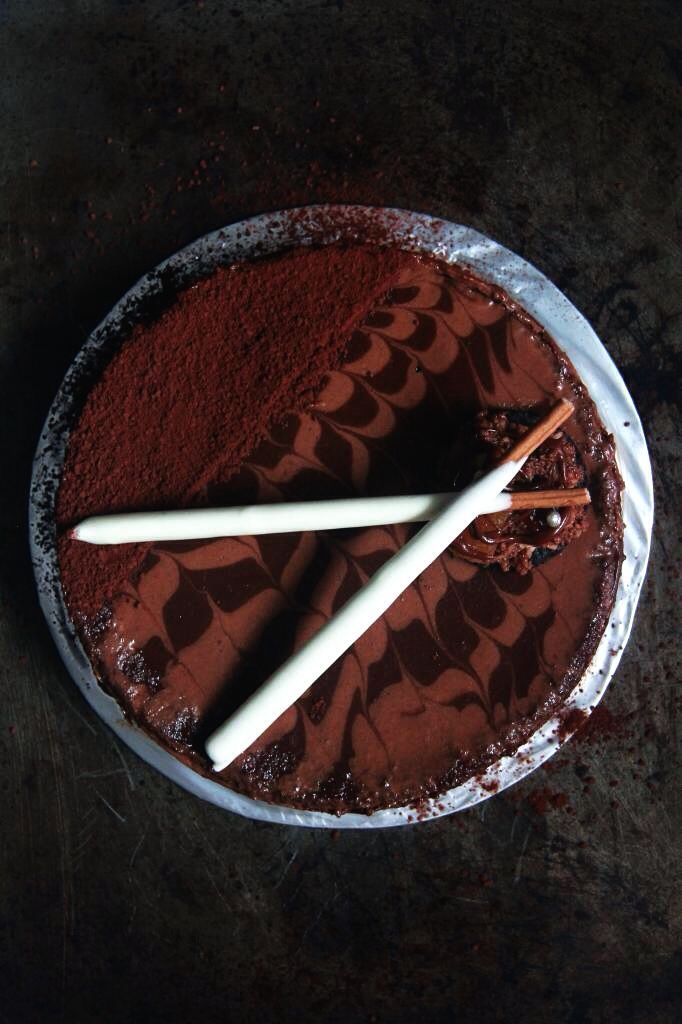
Truth be told, I thought that I could pull it off successfully because it looked rather easy to do - melt some chocolate, spread it out thinly on a plastic sheet, drag a comb through it to create tracks, chill, spread a thin layer of white chocolate over and stick it on the cake; voila. The first problem arose when I just couldn't create those tracks with the comb but I managed to somewhat solve it by tossing aside neat lines for messily hand drawn ones. The second problem was the bottom layer of chocolate melting immediately upon contact with the still slightly warm melted white chocolate, causing the pattern to smudge. I mean, I predicted that this might happen but I thought that if I let the white chocolate cool too much it might be too hard to spread evenly. Looks like I gotta research on the proper method to making this. And finally, I didn't realise that I should have measured how high the border should be and ended up with too much excess height which flopped down and formed sort of a rim as you can see here. I quite like the effect actually. I would feel better if it was intentional though.

dessert - chocolate banana mousse cake

So it looks like I have some homework to do! I definitely need to research and practice my cake decorating skills. I wonder when was the last time I focused intently on a certain aspect of baking? Can't wait to get started ~


Mousse au Chocolat Blanc et aux Bananes ムースショコラブラン・オ・バナーヌ
makes a 6 inch cake

For the sponge:
(A)
30g egg whites
15g sugar

(B)
1 egg
17g sugar
17g ground almonds

(C)
20g plain flour

Make the sponge: Preheat oven to 180C. Prepare a 6 inch and 5 inch round cake pan.

Whisk the egg whites and sugar until stiff peaks.

Whisk the egg, sugar and ground almonds for 2 minutes until light and pale.

Fold 1/3 of the meringue into the almond mixture until combined. Stir in the flour. Fold in the remaining meringue and divide equally between the two pans.

Bake for 13 minutes. Cool completely.

For the banana mousse: 
3g gelatin softened in 15ml water
50 + 150ml cream
50g white chocolate, melted and cooled slightly
1 banana (100g), pureed
1 tsp rum

Heat the gelatin mixture over low heat until it melts. Add 50ml of cream that has been warmed. Stir in the melted white chocolate. Whisk in the banana puree and rum.

Whisk the remaining 150ml cream to medium peaks and fold into the banana mixture.

Assemble the existing components: Place the 6 inch cake in a cake ring. Pour half of the banana puree. Place the the 5 inch cake on top and pour in the remaining mousse. Refrigerate.

For the decoration:
50g chocolate, melted
80g white chocolate, melted
clear glaze or jam that has been warmed
banana coins
chocolate pearls etc (optional)

Spread a thin layer of chocolate on a piece of OPP sheet. Use the comb to create patterns in the chocolate. Refrigerate until firm. Spread the melted white chocolate on top.

Retrieve cake from fridge and stick the chocolate strips around the sides of the cake. Return to the fridge until the chocolate has set.

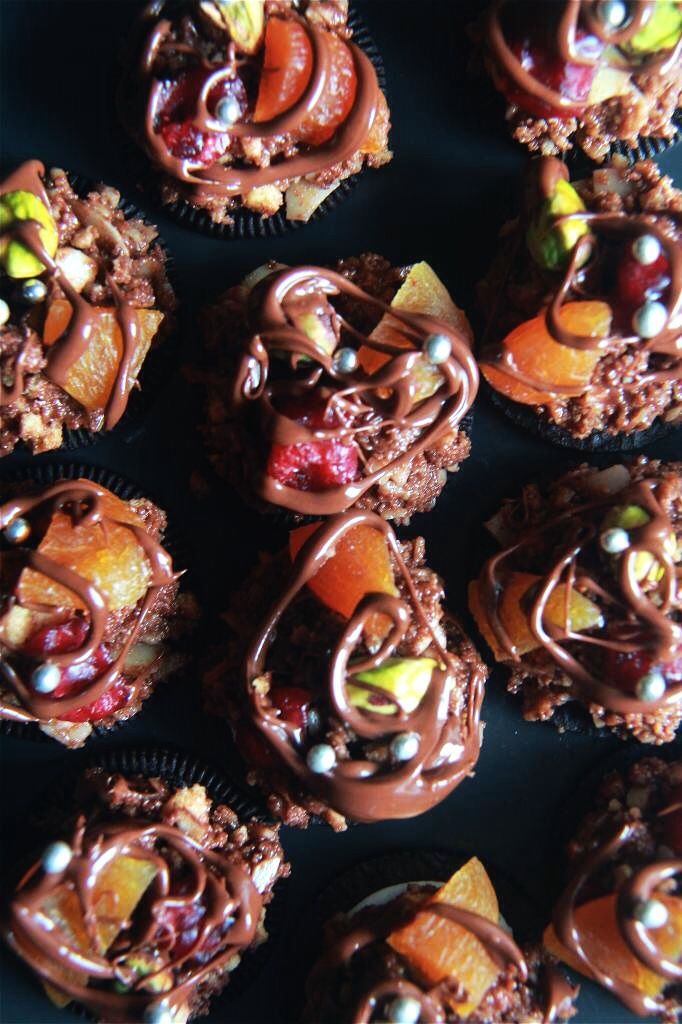
Peel off the film and apply the clear glaze or warmed jam to the top of the cake. Arrange the banana coins on top and apply another layer of glaze/jam on them. Decorate with chocolate pearls or any other decorations you wish to use.

Sunday, September 21, 2014

milk and cookie shots.


So I wanted something quick to bake since I really wasn't supposed to (darn exams) but I was withering inside from being separated from my oven for so long. I didn't want something normal either. Therefore, cookie shots! I've been wanting to try out this idea for a while but cakes usually get priority whenever I have ample time to bake.

To be honest, the only spectacular point of these is the idea of drinking milk out of an edible cup itself, which is the very reason why these milk and cookie shots were invented anyway. Each cookie cup uses up a lot of dough and having one to yourself gives you quite the sugar rush. I imagine that the younger me might quite take to these; I think I've developed a preference for desserts with controlled and complex sweetness. Still, I found these rather charming because they are unabashedly and straightforwardly sugary and chocolaty, something you reach out to when you crave a sense of familiarity and comfort.


A few problems cropped up during the making of these. Firstly, the centers of the cookie cups puffed up ridiculously to the extent that it seemed like there was no cavity in the first place. But I quickly rectified it by tamping them down with the bottom of a shot glass. As I was squishing the dough back to the shape it belonged, the chocolate chips that came into contact with the glass lost their shape and smeared the insides of the cookie cups. At that point I thought that since the cookie cups are kinda coated with chocolate already I wouldn't have to coat them with chocolate later but huge mistake. I realised that there were still cracks in the dough when milk flowed out of the cups as quickly as I poured it in. I tried to prevent leaks in the remaining cups by coating the insides with peanut butter but they were leaky all the same. Takeaway: follow the recipe's instructions. (Although I never really learn to completely.)

I think this is a fun idea that lends itself to many variations. Definitely making cake next though!

dessert - milk and chocolate chip cookies

Milk and Cookie Shots
yield depends on the size of your mold
adapted from here

1 cup butter
1/3 cup sugar
1/2 cup light brown sugar
1 large egg yolk
2 tsp vanilla extract
2 cups all-purpose flour
1/2 tsp salt
1 cup mini chocolate chips

melted chocolate
1 1/2 cups milk
2 tbsp condensed milk (or 1 1/2 tsp vanilla extract)

Grease the molds of a popover/cupcake pan.

Cream the butter and sugars until pale. Add the egg yolk and vanilla extract and beat until incorporated. Add the flour and salt and mix until combined. Stir in the chocolate chips until evenly distributed.

Press the dough into the molds, ensuring that the walls are about 1/4 inch thick. Chill for about 20 minutes.

Meanwhile, preheat the oven to 350F. Bake cookies for about 20 minutes or until cookies start to brown. If the centres puff up, use the bottom of a shotglass to flatten them back down once they are out from the oven. Alternatively, you can use some parchment paper and baking beads to prevent the dough from rising, just like when baking pie crusts. Cool cookies completely.

Brush some melted chocolate onto the insides of the cookie cups and chill them until the chocolate has set.

Mix the milk and condensed milk (or vanilla extract) together and serve in the cookie shots.

Saturday, September 13, 2014

gâteau au earl gray/ガトー・アールグレイ

dessert - chocolate earl gray mousse cake

I was assembling all my baking tools in preparation for this cake - stooping down to get the mixing bowl from the cupboard underneath the counter, tiptoeing to reach the canister of flour on top of that shelf, opening that narrow compartment near the fridge to get out the rimmed baking sheet. Ah, that tray. As I retrieved it from the pitch black storage space, the fluorescent kitchen light bounced off its surface and there were the scratches and dark patches (undoubtedly from too much harsh scrubbing), as plain as day. I used to regret not taking good care of it, especially during those times when I was into black backgrounds and often resorted to using my baking trays as backdrops - the scratches showed up all too starkly in the pictures - but looking at this picture here, I think its imperfections are actually quite lovely. It has so much character now, very much unlike when it was brand new and just a uniform sheeny dark gray. It just goes to show that y'know, no matter what happens and how much you change, there will always be someone there to love you. #unexpectedlydeep #storyofmybakingsheet


To be honest, the reason why I chose this cake to make was because of its appearance more than the flavour itself. As you can see, there's a swirly sort of pattern on top which I really wanted to attempt the moment I saw it in the book. But I kinda messed it up because I didn't know that you're supposed to drag the toothpick in opposite directions every other stroke. Whoops. I realised it only halfway which explains the uncoordinated swirls. There's also supposed to be a chocolate ribbon twirl thing on top but I wasn't really up to tempering chocolate, perhaps next time. So to compensate for the ugly swirls and the missing chocolate ribbon, I dusted cocoa powder over the worst of it and used an almond nutella cookie I still had (miraculously) to prop up two vanilla pocky sticks. I think it doesn't look half bad!

I also deviated from the recipe in another aspect, which is to slice the cake into just two instead of three layers because I have absolutely no trust whatsoever in myself when it comes to slicing a rather short cake that thinly. The layers I ended up with were still pretty thin in my opinion so the syrup managed to moisten them nicely.


Earl gray chocolate is a pretty safe combination so it's a no-brainer that the cake tastes pretty good. I would like more of the mousse though; it's heavenly! Earl gray permeates the entire cake - the sponge, the cake syrup and the mousse - so if you like earl gray, this cake is destined for you. A word on the sponge: whole tea leaves are folded into it so you will be chewing the occasional leaf or two as you're having the cake. It isn't unpleasant, but just a heads up.


Gâteau au Earl Gray/ガトー・アールグレイ
makes a 15cm cake

For the sponge:
1 1/2 eggs
45g sugar
1 tsp water
45g flour
1 tsp earl gray tea leaves
20g butter, melted and cooled

Preheat oven to 160C. Prepare a 6 inch round cake pan.

Whisk the eggs and sugar in a bowl over a pot of simmering water until the mixture is warm. Remove from heat and continue whisking until pale and thick (the batter should fall back in a ribbon when the whisk is lifted up). Whisk in the water. Fold in the flour and tea leaves in two additions until no traces of flour remain. Fold in the butter until combined.

Pour batter into prepared cake pan and bake for about 25 minutes or until an inserted skewer comes out mostly clean, with a few moist crumbs attached.

For the earl gray syrup:
40ml boiling water
1 tsp earl gray tea leaves
10g sugar
1 tsp brandy (I used rum though)

Place the tea leaves in a small bowl with the boiling water and let the mixture stand for a few minutes. Pass the tea through a sieve and mix in the sugar and brandy.

For the earl gray chocolate cream:
5g earl gray tea leaves
10ml boiling water
120 heavy cream
80g chocolate, melted and slightly cooled
1 tsp brandy
100ml heavy cream, whipped the medium peaks
a splash of milk

Mix the boiling water with the tea leaves and let the mixture stand for a few minutes. Add the cream and heat the mixture in a saucepan over low heat. Let the mixture stand for 2 minutes then pass it through a sieve.

Add the melted chocolate in three additions until the mixture is homogenous. Mix in the brandy. Reserve 80ml of the mixture.

To the remaining mixture, fold in the whipped cream. Reserve 20ml.

Assemble the cake: Slice the cooled sponge into three layers. Get a 6 inch cake ring and place the first layer of sponge in the bottom of the cake ring. Brush generously with the cake syrup. Pour 1/3 of the chocolate cream mixture; repeat for the remaining layers. Refrigerate.

Pour the 80ml reserved mixture on top of the cake, rotate the cake so as to spread it out evenly. Before the chocolate sets, mix the 20ml reserved mixture with a bit of milk and transfer to a paper coronet and pipe line on top of the cake. Drag a toothpick across the lines to form a pattern, changing direction every other line. Refrigerate the cake until the pattern has set.

Remove the cake ring, decorate and serve.

Sunday, September 7, 2014

almond nutella cookies.


Believe it or not, I found this recipe in a book with cakes that are patisserie-worthy with all their fancy chocolate twirls and sophisticated flavours. I was flipping through the book looking for a cake to bake soon when out of the blue (or multi-colored sugar dreamland), these cookies. But I ceased all questions immediately because I would be a fool to pass up a chance to make something so effortlessly beautiful.


I made these even easier to make by subbing a melted chocolate and cream mixture for nutella. Assembling the cookie mixture was a breeze and took practically no time at all while the decorating bit was unexpectedly time-consuming. I think I took close to 40 minutes for just 12 cookies, although I must admit that the end result was extremely rewarding. You start off with an almost unattractive heap of brown on black but as you press each petite ruby cranberry, pale green pistachio and amber apricot gently into the cookie, it slowly comes to life like a dull sepulchral street which festive christmas lights are being lit up one by one.

These take the no-bake cookie concept to the top.


dessert / snack - no bake almond nutella cookies

Almond Nutella Cookies
makes 12

6 oreos, halved (you can choose to leave the cream on or not)
40g digestive biscuits, crushed finely
20g almonds, crushed
nutella
dried fruits or nuts for decoration

Mix the digestive biscuit crumbs and almonds together with enough nutella for the mixture to hold together. Place a small heap on top of each oreo cookie. Refrigerate until firm.

Using nutella as glue, stick your choice of dried fruits or nuts on top of each mound. Finish with a drizzle of nutella.

Thursday, September 4, 2014

cake baked in oranges.


Cinnamon cake with chocolate fudge cake chunks baked in oranges? Too long. Cake in orange surprise? Sounds like an outdated can of soda. Orange-baked cake? Wait does that even make sense?? So here you have it - cake baked in oranges; a name extremely unvarnished and so blatantly plain it appears almost vulgar but I think it gets the point across without being too unpalatable. Thank you for clicking on this link despite the unattractive title, I promise that this recipe will be worth your time.


I feel that I must warn you that if you decide to try out this idea, and I hope that you will, before you embark on the arduous process to cave out the insides of the oranges please please either wear an apron and elbow-high rubber gloves and goggles that can shield at least half your face, or hollow them out in the sink with your hands way outstretched. Like a one meter kinda distance. (Okay I exaggerate.)

Seriously though, there's a high possibility that juice will spurt all over like a malfunctioning sprinkler once you jab a spoon into into the flesh of the orange so here's a tip! Try to cut into the orange along the lines of the segments and really try to keep the spoon as close to the wall of the fruit as possible. It's kinda hard to explain but I guess you'll get what I mean when you try it yourself! I know it's hard to resist the urge to plunge the spoon right into the centre of the orange just because you can and you will feel like it but don't. Please. (I should know.)


And since we're on the topic of spurting orange juice, I must also caution you to try not to accidentally cut a hole in the skin of the oranges because then the batter will flow out of them like mini Niagara Falls, as evident from my picture. But even still there was more than sufficient batter to make sure that the cake baked all the way to the rim of the oranges, thank goodness.

So after all the hair-tearing drama I'm happy to report that this recipe is a winner! These elicited many wows simply from the presentation but they taste really good too. There's a moderately strong orange fragrance that pairs really well with the cinnamon, and the cake is super moist. Pity that the chocolate chunks rose all the way to the top and are not evenly distributed throughout though.

I've used a pound cake recipe here but you don't have to use this cake recipe, you can just use your favorite! But just make sure that it is a sturdy one so that the oranges will be easier to slice.

Have fun!


Cake Baked In Oranges (I feel so silly typing this)
makes 3 oranges worth

100g butter
100g icing sugar, sifted
pinch of salt
2 eggs
100g cake flour
pinch of baking powder
1/2 tsp ground cinnamon
about 12 small chunks of chocolate fudge cake

3 oranges, hollowed and washed

Preheat oven to 350F. Get out a baking tray and mini tart molds for the oranges to be placed on to prevent them from falling over while baking.

Cream butter until smooth. Add the icing sugar and salt and beat until light and fluffy. Add the eggs one at a time, beating to incorporate the first before adding the next. Sift in the cake flour and baking powder and stir until all traces of flour have disappeared. Stir in the ground cinnamon.

Divide half of the batter equally amongst the three oranges, drop in two cubes of chocolate cake in each, divide the remaining batter equally amongst the oranges again and finish with the rest of the chocolate cake chunks.

Bake for 20 to 25 minutes or until an inserted skewer comes out with only a few moist crumbs attached. Cool to room temperature then refrigerate until completely cold before slicing.