I've Moved!

Sunday, August 24, 2014

honey lemon brown sugar chiffon cake.


It just struck me as I was typing out the recipe that, as obvious and silly as it sounds, the language of baking is such a familiar tongue to me. After close to 6 years of baking I've forgotten how strange and foreign recipes were like when I just started. Right now I think nothing of a laundry list of ingredients in unusual and exacting quantities - in fact if the recipe was too simple I'd be suspicious - but perhaps to the uninitiated, recipes that demand ingredients to be measured out to the gram might be off-putting and well, plain OCD. If I were to recall the feeling I felt as an amateur, perhaps it would be something similar to how I, an ultimate failure at all things technology, felt when trying to fiddle around with the settings of this blog - utterly helpless and immediately wanting to drop the task and bury my head in the fluffiest pillow available. Yep that sounds about right.


Anyway, I wanted to make chiffon cake sandwiches like last time because they're just so cute but the plan was disrupted as the cake didn't rise high enough. I could still cut a slit down the middle but the pocket would be extremely small and wouldn't be able to contain much cream. But these are good enough as they are so I didn't regret not being able to carry out my sandwich plan. Imagine soft, spongy and moist pillows of cake thoroughly imbued with the floral scent of honey and a refreshing lemony hint. The brown sugar I used is a type of Japanese brown sugar that is more bitter than sweet so the cake wasn't too saccharine overall. I only wish that I had foreseen the possibility of them sinking to the bottom and prevented them from causing all those unsightly mini craters at the bottom.


All the flavours work extremely well together and the texture is just mind-blowing (it's moister and denser than most chiffon cakes but that's a good thing because the flavour is compressed such that every bite you take is an explosion of flavours!). This is definitely one of the more memorable cakes I've ever made.

  
Honey Lemon Brown Sugar Chiffon Cake
recipe adapted from here

For the cake:
3 egg yolks
4 tbsp honey
3 tbsp oil
1 tbsp water + 2 tsp lemon juice
85g cake flour
1/2 tsp baking powder
pinch of salt
zest of 1 lemon
4 egg whites
1/8 tsp cream of tartar
4 tbsp sugar
1/4 cup kurozatou (japanese brown sugar), in small chunks

Make the cake: Preheat oven to 170C. Prepare a 7 inch tube pan.

Whisk the egg yolks with honey until homogenous. Gradually drizzle in oil while still whisking, until completely incorporated. Add water and lemon juice and mix until combined. Sift in cake flour, baking powder and salt and mix until no traces of flour remain.

Whisk the egg whites and cream of tartar until foamy then gradually add the sugar while whisking constantly. Continue whisking until egg whites reach stiff peaks.

Whisk 1/3 of the meringue into the egg yolk mixture until homogenous. Pour this mixture into the bowl with the rest of the meringue and fold gently until incorporated.

Pour batter into prepared pan and bake for 35 to 40 minutes. Cool the cake completely upside down before slicing.

Sunday, August 17, 2014

milo chocolate peanut butter oreo buns.


Nothing much to say today so I shall leave you with a few pictures and a few words.

1. Theses buns are crazy soft and fluffy - you can squish them to half of their original size and they will bounce right back up like inflatable pillows.

2. Milo needs to be upped; god forbid any self-restraint be exercised in the presence of milo (change reflected in the recipe already).

3. Oreo chunks are the new chocolate chips.

4. The process of taking the picture showing the extent of the pillowiness of the bun was rather amusing:

Me: Hey take that corner one there and tear it.

Brother: This one?

Me: Yeah.

*Brother rips the bun apart*

Brother: Err, like this? *holds a giant section of the bun awkwardly in left hand*

Me: Um, next time try stopping in the midst of tearing it. Try again. And can you eat that one in your hand first. (obviously we have a very asymmetrical power relationship).

*Brother starts to tear the remainder of the bun*

Me: Okay hold it right there. *snaps multiple pictures* Can you kinda position your hand more naturally?

Brother: Like this?

Me: Um that's not very natural. Can you like, angle your hand slightly downwards?

Brother: But how is that natural?

Me: ... Okay never mind I'll just use what I have and you finish the bread. By the way is it good?

Brother: Yeah. 


Milo Chocolate Peanut Butter Oreo Buns
makes around 14

500g bread flour
60g milo powder
50g sugar
7g salt
1 egg
8g instant yeast
300ml water, plus more if needed
40g butter, softened
a sleeve of chocolate peanut butter oreo cookies, crushed roughly

Place the flour, milo powder, sugar, salt, egg and yeast into the bowl of a stand mixer and mix. Gradually add the water until a dough forms. Add more water if the dough is too dry. Knead until the dough isn't too sticky and is very elastic (it will pull away from the sides of the bowl). Add the butter and continue to knead the dough until you are able to stretch it thinly without it tearing. Add in the crushed cookies. Cover the dough and let it proof until it has doubled in size, about 1 hour.

Divide the dough into 14 portions and shape each into a ball. You can choose to bake all of them in the same pan or in individual molds like I have. Remember to butter the pan/mold if you're not using a silicon one! Let the dough proof until nearly doubled in size, about 45 minutes.

Bake buns at 180C for about 10 minutes or a few minutes longer if you are baking all the buns in the same pan.

Sunday, August 10, 2014

chocolate chiffon cake with peanut butter frosting.


So this is the chocolate cake idea I was talking about the other day! To cut straight to the chase, I was banking on the decoration to be the most outstanding component of the cake but the chiffon cake itself was pretty darn good too! Best chocolate chiffon I've ever eaten, I swear.


Decorating the cake was unexpectedly challenging. Not all the balls of cereal are of the same size so after you've done a few rows you might notice that the diagonal lines are becoming crooked. Packing the studded cereal even closer together would be a futile effort, not to mention the possibility of them dropping off, so I decided to repeat the same color twice in a row to get the remaining rows to align again. Studding the reese's cereal one by one by hand was also extremely boring and repetitive (peanut butter, chocolate, peanut butter, chocolate, mutated cereal - eat, peanut butter, chocolate) ; I found myself wishing that I had made a shorter cake! But then it wouldn't have as much of a visual impact, of course. Oh, I highly recommend that you set the cake on a turntable when decorating the cake because it's less tiring that way and you'll risk accidentally jabbing the cake with your finger not so often.


This is one of those "I can't bear to eat it!" and "How in the world do I cut this??" kind of cakes. Slicing into it was a nasty job but hey, someone's gotta do it.


Chocolate Chiffon Cake with Peanut Butter Frosting
makes a 6 inch tube cake
cake recipe adapted from here

For the cake:
(A)
15g cocoa powder
1 1/2 tsp espresso powder
1/4 cup boiling water

(B)
50g cake flour
1 tsp baking powder

(C)
2 egg yolks
30g sugar
1/4 tsp vanilla extract
42g oil

(D)
2 egg whites
1/4 tsp salt
60g sugar

For the frosting:
1/2 cup peanut butter
1/4 cup butter
1 cup icing sugar, sifted
1 1/2 tbsp milk, as needed
pinch of salt

For the decoration:
Reese's cereal

Bake the cake: Preheat oven to 350F. Prepare a 6 inch tube pan.

Mix all the ingredients in (A) together and set aside.

Sift the cake flour and baking powder together.

Except the oil, whisk all the ingredients in (C) together until pale and creamy. While whisking, slowly stream in the oil until incorporated. Stir in (A) until combined. Sift in (B) and stir until no traces of flour remain.

Whisk the egg whites and salt together until foamy. Add in the sugar gradually and continue whisking until the egg whites reach stiff peaks.

Take 1/3 of the egg white mixture and whisk gently into the chocolate mixture until homogenous. Pour the chocolate mixture into the bowl with the remaining egg whites and fold until homogenous.

Pour batter into pan and bake for about 30 minutes or until an inserted skewer comes out clean. Cool upside down on a cooling rack.

Make the frosting: Beat butter and peanut butter until smooth. Gradually beat in the icing sugar and when the mixture starts to get thicker, add in the milk a teaspoon at a time until all the sugar has been incorporated and frosting is thick and spreadable. Continue beating for at least 1 minute to get the frosting light and fluffy.

Frost and decorate the cake: When the cake has cooled completely, remove it from the pan. Frost the outsides of the cake evenly with the peanut butter frosting. Stud the frosting with the Reese's cereal, alternating between the two colours.

Sunday, August 3, 2014

swiss roll tower.


"I want to run my own bakery in the future."

I've repeated that line so many times that now my lips instinctively form those words everytime I'm asked what I want to be when I grow up before my brain even starts to process the question. But lately I've been thinking - do I really want to do that?

It might come as a shock to those who have been witnessing me churn out cakes, cookies, tarts whatever sweet treat you could possibly name with untamable passion and devotion. Rest assured that I do not intend to stop baking, but I've been exploring possibilities beyond opening a shop.

My driving force behind opening my own bakery has for the longest time been, aside from the wonderful notion that I can make a living based on what I love to do, to interact with people who have a sweet tooth just as I do. And I don't just want to talk to my customers, it would be nice if my customers could talk amongst themselves as well. For them to ask the people sitting near them "hey, what are you having?", for them to bond over cake, for them to make new friends who love desserts just as they do themselves. I want my bakery to be more than a space; I want it to be a friendly community of dessert lovers. And to do that, I intend to plonk a huge rectangular wooden table - the kind that is of a pale beige with uneven rings of mahogany - with matching benches that resemble ridged, deep brown logs at, err, some part of my bakery with ample room. Or something like that. (Apologies for the lengthy description of the table set. I just really like wooden furniture.)

But what that is stopping me from realising that image that I've just described is this one very simple reason - I cannot repeat what I bake continuously for 6 or 7 days a week, and for (hopefully) years at that. Trawl through baking/cooking blogs and you'll find that the same recipe is rarely put up twice. The authors behind the blogs may have repeated the same dish, just that they don't post it again. But for me, when I post a certain recipe once, there is a 99.89% chance that I only made it that time and that time only. Only the extremely memorable ones see the light of my kitchen again. I just like to keep on creating new things, inventing new recipes. I get bored extremely easily, for the better or worse. That is why I cannot fathom repeating the same cake everyday; I don't want to become sick of the cake I once loved, I don't want to turn baking into a chore.

I fully understand that no matter how much the owner of the bakery wants to innovate, it is not possible to endlessly change the menu and have an entirely different array of desserts every few days. There are likely to be customers who want certain items to stay, and you can't be so selfish as to deny them that. Moreover, a bakery is a business and you have to ensure it survives.

"Teach someone else and get them to bake the mainstays for you while you handle the creation of new items" - I could, but I cannot. Because if I let that happen, I cannot wholeheartedly accept compliments for those desserts because those were not made with my own two hands. No, perhaps not just accept, but also because I don't feel worthy of those kind words.


Therefore, I've been thinking that I could focus on blogging instead. Of course I don't think it's a very reliable option as a source of income - in fact it's quite risky in my opinion - but it's just a thought. I can continue to share my love for baking with others without restricting myself, but in the process I sacrifice real-life interactions with people.

I hope that I can find the answer to what I really want soon, but in the meantime, let's shift our attention to this marvelous creation shall we?

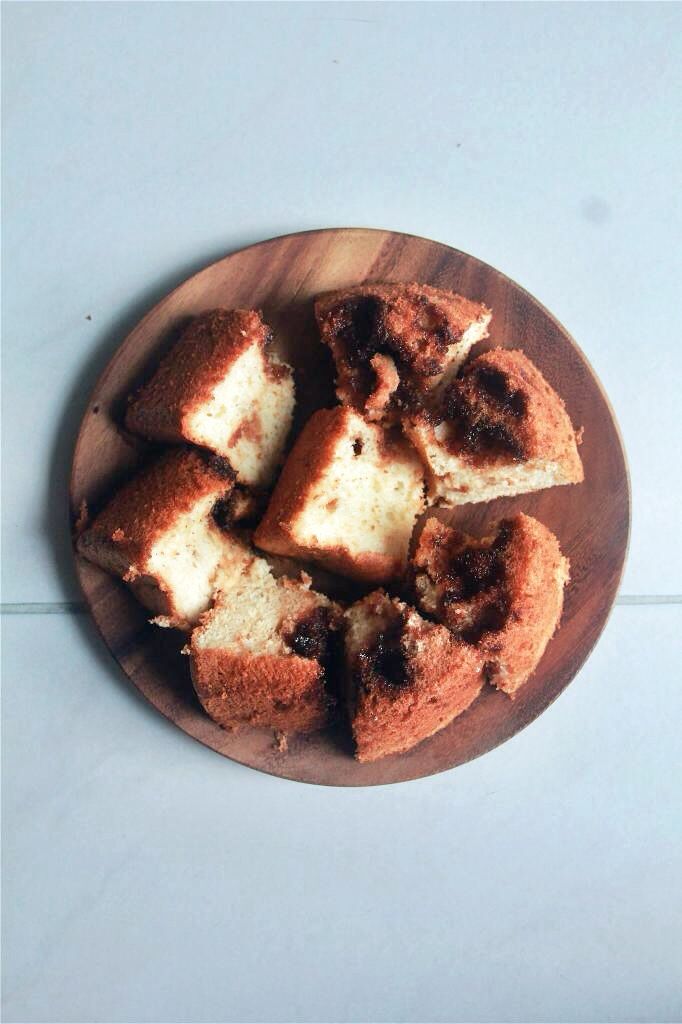
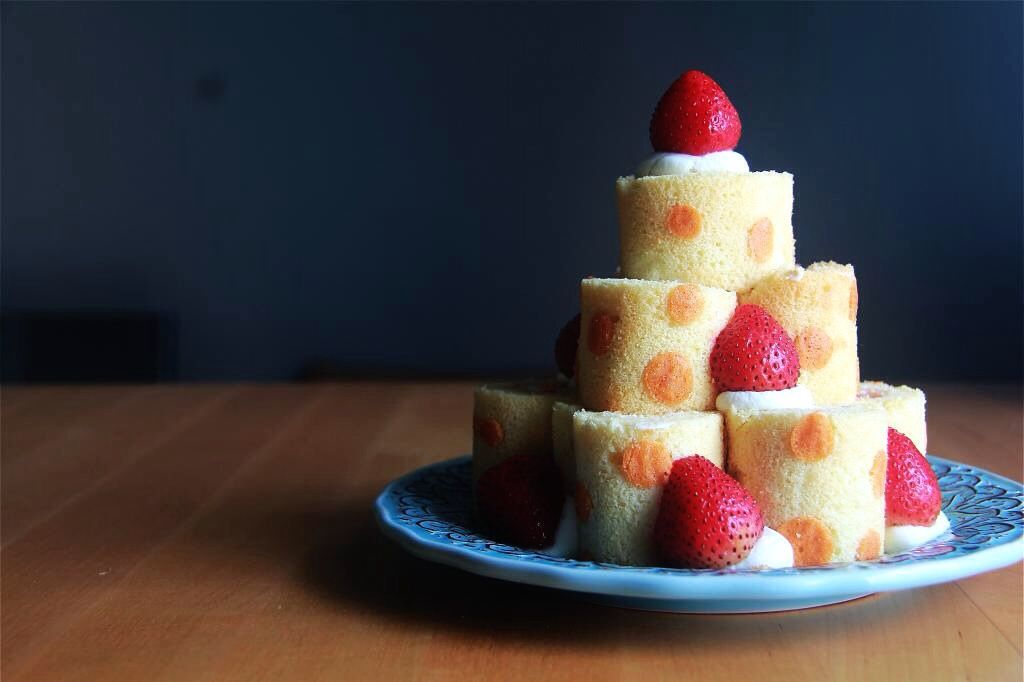
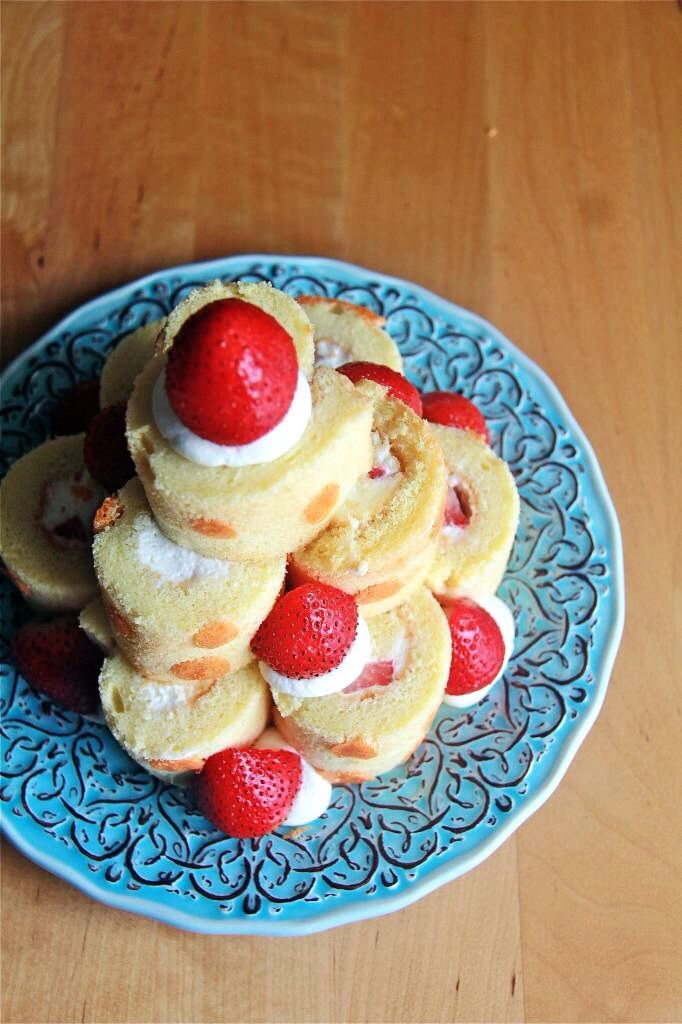
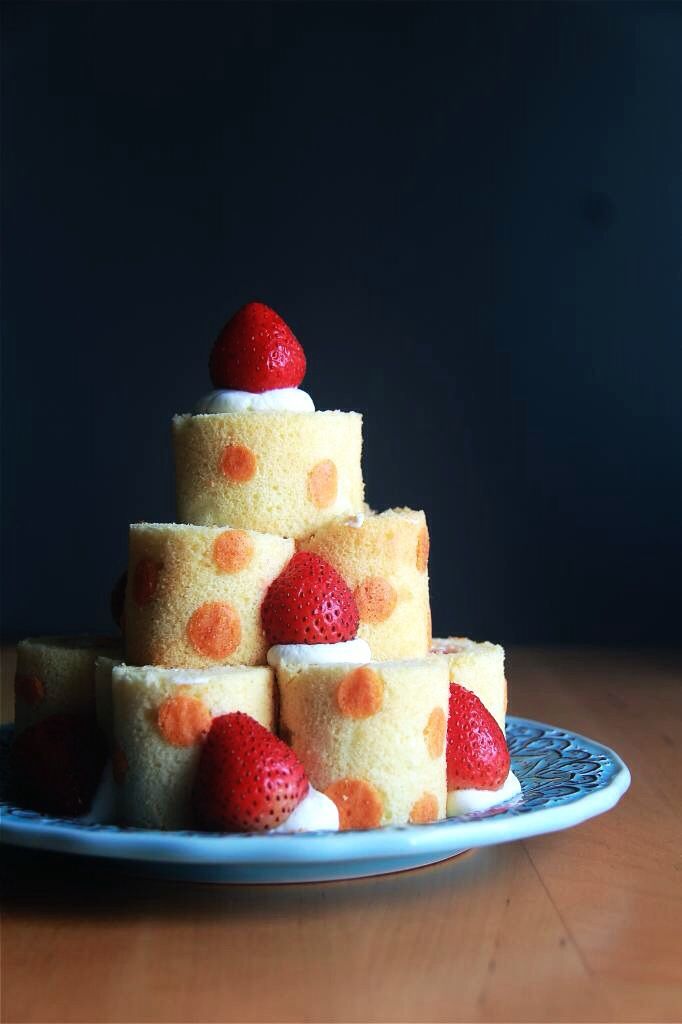
This is the result of mindless surfing of hashtags on Instagram. One day I keyed in ロールケーキ (roll cake, in Japanese) in the search box and several alternatives appeared alongside it, including ロールケーキタワー (meaning roll cake tower). I clicked on the latter out of curiosity and I was floored. Who would have thought that you could create such stunning structures out of swiss rolls?! This version you see here is but a very simplistic one. Some towers I saw had cakes that are each of a different colour and pattern and decorated with an assortment of cookies and fruits before finished with a ribbon tied snugly around the bottom layer. I was itching to recreate some of the best (i.e. crazy) versions I saw but this, I tell you, is mighty troublesome work. I made a pattern using only one colour and I had a whole mountain of utensils to wash up already. If I had made patterns of two or more colours I would have at least an extra bowl, spoon and piping tip to clean. I could only contemplate the amount of dirty dishes I would have to wash, soap, rinse and dry if I had made multiple batters of different hues for two seconds before fainting.

Luckily, this isn't a recipe which only purpose is to look good. I merely did a very unchallenging design, but it's points were infinitely upped when I tasted the cake. It may be the best swiss roll recipe I've ever attempted - moist without needing syrup, pillowy soft besides having been refrigerated overnight. I knew I was right to hope for an astounding recipe when it didn't crack at all when I rolled it. (My swiss roll history has been marked with countless cracked cakes.)

It's not in my nature to repeat the same recipe twice, but you can count on seeing this one again, but of course in a different form!


Swiss Roll Tower

For the cake:
3 egg yolks
3 + 1 egg whites
35g + 30g sugar
60ml water
40ml vegetable oil
1/2 tsp vanilla extract
80g cake flour
1 tsp cornflour

For the pattern:
1/2 tsp cake flour
1/8 tsp liquid food coloring diluted with 1/4 tsp water
pinch of cornflour

For the filling:
2 tbsp caster sugar
150ml whipping cream
strawberries, sliced

Make the cake: Preheat oven to 170C. Line a 10 inch square baking pan with parchment paper.

Whisk the egg yolks and 35g sugar until pale and light. Whisk in the water, oil and vanilla until combined. Sift in the cake flour and stir until incorporated.

For the pattern: Take 1 tsp of the batter and stir it together with the cake flour and food coloring mixture.

Beat 1 egg white until stiff peaks are about to form. Add a pinch of cornflour and continue to beat until stiff. Add 3 tbsp of the meringue into the colored mixture and mix well. Hold on to the remaining beaten egg whites - you'll need it later.

Transfer to a piping bag fitted with a small round piping tip and pipe your desired pattern onto the prepared pan. Bake for 1 minute.

Continue with the cake batter: Beat the remaining 3 egg whites until foamy. Add in the 30g sugar and continue beating until the mixture is glossy and stiff peaks are about to form. Add 1 tsp cornflour and continue beating until stiff. Mix in the remaining meringue from earlier.

Fold in the meringue mixture one-third at a time to the egg yolk mixture until no traces of meringue are left.

Pour batter into baking pan with the baked pattern. Bake for 14 minutes or until an inserted skewer comes out clean. Remove from oven and cover with a new sheet of parchment paper. Invert pan onto a wire rack and unmould cake.

Peel parchment paper from the bottom of the cake immediately and place it back on top of the cake to allow latent heat to escape. Leave cake to cool.

Make the filling: Add the sugar to the whipping cream and whisk until stiff.

Assemble the cake: Flip cake over such that the pattern faces down. Slice it into half. Make shallow cuts 2 cm apart on the surface of the cake. Spread the whipped cream evenly on the cake but leave a 1 cm space at the end opposite to the side you're going to roll from (which is by the way, the long side). You can choose not to use all the cream and save some for decorating the finished cake tower. Arrange the sliced strawberries on the cream. Roll the cake up and wrap it in parchment paper. Refrigerate for at least 1 hour.

Slice the cake rolls evenly into 6 portions each. Stack them up to form a tower. There will be 7 on the first layer, 3 on the second and then 1 for the very top. If you have extra cream, pipe little blobs in the spaces between individual rolls and then garnish with a strawberry.

Consume immediately or within the day of assembly.