I've Moved!

Tuesday, December 31, 2013

best of 2013.

The year is coming to a close and I feel that it's fitting, and hence obliged, to dedicate a post to the best 13 bakes of this year. Now "best" can mean different things and in this case, it refers to the most delicious and memorable desserts of the year in my opinion. I could do a list of the most liked desserts instead, but I really would like to use this chance to highlight some of those that didn't receive as much attention as they deserve.

Because I didn't bake as much this year - in fact, this year represents the least number of times per year I've baked ever since I started baking - I thought that I would be running low on candidates but I still had to make some tough decisions on elimination! So without further ado, in no particular order, my favorite bakes of 2013:

1. Mocha Bars


The top was so crispy and the center was so fudgy~

2. Pierre Herme's Carrément Chocolat


Chocolate in five different ways - five different textures, five different flavours. Labour intensive but every minute spent was worth it.

3. Tish's Chocolate Peanut Butter Cloud Pie


Perfect for peanut butter freaks like me.


I love love love this cupcake so much. The coffee custard in the middle is probably the best coffee thing I've ever tasted. Please try this recipe!

5. Malted Milk Pots de Creme with Malted White Chocolate Walnuts


So simple yet so delicious. I finished my serving then proceeded to wipe out half of my mum's.

6. Filled Raisin Cookies


I'm rarely impressed by cookies but these. These are worth my attention. And yours too.

7. Chocolate Chip Cookie Dough Cake


Needs no explanation why it made it into my top 13 list.


The glaze is the killer application.

9. Caramel Almond Cake


Make sure you have the cake while it's hot and the topping is still crunchy!

10. Chocolate Chunk Pumpkin Bread


My first time making pumpkin bread and it definitely won't be the last! I almost regret turning half of what I made into pumpkin bread pudding because the loaf was so good on its own already.

11. Cherry Chocolate Chip Cake


I ate three quarters of the whole cake.

12. Mocha Cream Cheese Tower


Just. Woah.

13. Earl Grey Pots de Creme


I feel that this is the most under-appreciated recipe of the year! It's looks plain and unassuming but please please please just try this recipe and you'll see why I love it so much. (Even more than number 12.)

So that's it for this year! With 10 out of the 13 recipes containing chocolate, I would be lying if I say that I'm not a chocolate fiend but in all honesty, I don't like things to be overly chocolaty - just a bit in everything is enough to make me happy.

2014 awaits. I don't have high hopes that I'd get to bake often but let's hope that I chance upon some good recipes!

whipped cream cupcakes.


How do you guys decide what to bake?

I was faced with a dilemma a few days ago when I had this sudden urge to bake but I had no idea what. In the end, I decided to make my decision based on what I had to use up urgently in the fridge, which happened to be heavy cream this time. And because I was impatient to bake, I didn't want to wait for butter to soften to room temperature and all so I went with this whipped cream cake recipe which doesn't call for butter at all.


The resulting cupcakes are moist, but the texture is a little coarse and they are a tad sweet as well. I guess this is a recipe you can turn to if you're out of butter and oil. At least I've satisfied my curiosity about this recipe.

The whole point about baking cupcakes, to me, is the decorating of them. Before I piped the whipped cream on though, I filled them with a black bean black sesame jam I got from Japan (delicious). This is the first time I'm trying this piping method, and I think it's pretty obvious unfortunately. But then again, piping has never been my strong point. I just wished I'd realised sooner that to pull of this piping technique the cupcakes had to be level.


And since today is the last day of 2013, I think I shall do a round-up of the best recipes I've tried this year! Granted I've not baked much this year, but there shouldn't be any problem finding a couple of good ones so stay tuned!


Whipped Cream Cupcakes
makes 6

3/4 cup cake flour
2/3 tsp baking powder
1/4 tsp salt
1/2 cup heavy cream, chilled
1 egg
1/3 tsp vanilla extract
1/3 cup + 2 tsp sugar

Preheat oven to 37F. Line muffin tin with paper liners.

Sift the flour, baking powder and salt together into a bowl. Whisk the eggs and vanilla together.

Whip the cream until stiff peaks form. Gradually add the egg mixture while still whipping until thickened and well combined. Gradually add in the sugar.

Fold in the flour mixture in two additions until just combined.

Divide batter evenly amongst paper liners and bake for about 15 minutes or until an inserted skewer comes out mostly clean. Cool completely before decorating.

Sunday, December 29, 2013

vanilla bean cream eclairs.


A few years ago, I was obsessed about making eclairs and cream puffs. I tried a whole bunch of different recipes, tweaked oven temperatures, adjusted baking times, to achieve the perfect (i.e. doesn't collapse and tastes good) eclair/cream puff. In the end, I remembered that Pierre Herme's choux pastry recipe made the most flavorful ones - deliciously buttery - so that recipe is the one I went ahead with for these eclairs.

It's been a while since I've baked choux pastry and I forgot just how much they can puff up when baking. Clearly, I overestimated the size I needed to pipe and they ended up extremely unglamorous-looking. Instead of uniformly slender eclairs, I had fat stubby ones. Lesson learnt: I can afford to use a smaller round piping tip.


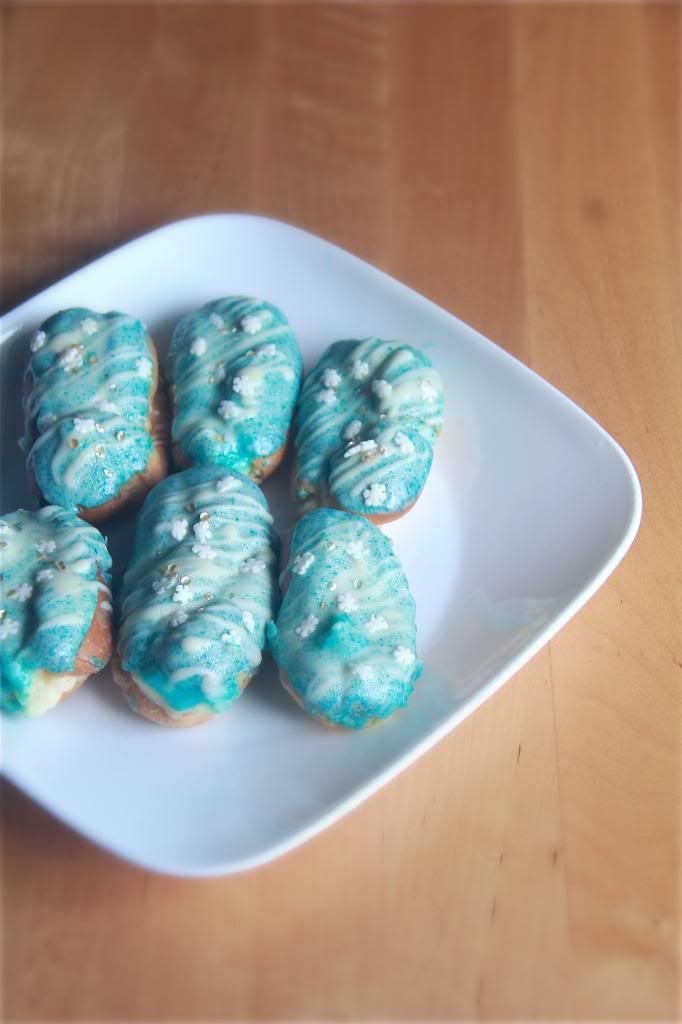
I whipped up a batch of vanilla bean pastry cream and folded in a bit of whipped cream to lighten it up. After filling the cooled pastry with the cream, I placed them in the fridge for the cream to firm up a little while I made the glaze, which I decided to tint a pale blue for the festive season. Unfortunately, the coloring didn't quite dissolve properly and there were tiny little blue specks distributed throughout the glaze. I tried to warm up the glaze again but they still remained. Maybe the gel sort of coloring is not good for dissolving in glazes and such.

So, following the dip in glaze, I gave the eclairs a white chocolate drizzle and peppering of snowflake-shaped and gold sprinkles. It is never the most immediate to me but I realise that eclairs are a good option to turn to when you have the urge to just decorate. (I usually make cakes.)

So these are my Christmas themed bakes this year! Merry (Belated) Christmas!


Vanilla Bean Cream Eclairs
makes about 15 fat mini eclairs (and probably about 20 skinny mini ones)

For the choux pastry:
1/4 cup whole milk
1/4 cup water
1/ 2 stick butter, cubed
1/8 tsp sugar
1/8 tsp salt
1/2 cup flour
2 1/2 eggs, at room temperature, beaten

For the vanilla bean cream:
1 cup whole milk
1/2 vanilla bean, split lengthwise and scraped
3 large egg yolks
1/4 cup sugar
2 tbsp cornstarch
1 tbsp unsalted butter, at room temperature
1/3 cup heavy cream, whipped to stiff peaks

For the white chocolate glaze:
90g white chocolate, chopped
17g oil

Make the vanilla bean cream: Combine the milk and vanilla bean in a saucepan and bring to a boil over medium heat. Cover the pan and turn off the heat and let the mixture stand for 10 minutes.

Whisk the yolks, sugar and cornstarch together in a medium saucepan. Remove vanilla bean pod from the milk. Slowly drizzle the milk into the yolk mixture while whisking constantly. Place the pan over medium heat, still whisking constantly, until it reaches a boil. Let the mixture boil for 1 to 2 minutes, still whisking constantly. Remove from heat and scrape the pastry cream into a bowl.

Let the pastry cream cool to room temperature, stirring occasionally. When it is about 140F, stir in the butter.

Stir in the whipped heavy cream and refrigerate the cream until completely cold, at least 4 hours.

Make the choux pastry: Preheat oven to 375F. Line baking sheets.

In a saucepan, bring the milk, water, butter, sugar and salt to a boil. When the mixture reaches a rolling boil, at all of the flour at once, reduce the heat to medium and stir vigorously with a wooden spoon until the dough comes together. Stir for another 2 to 3 minutes to dry the dough. It will be very soft and smooth.

Transfer dough to a bowl. Beat in the eggs a little at a time, incorporating each addition before adding the next, until all of the eggs have been added and dough is thick and shiny.

Pipe the dough using a round piping tip into 3 inch strips. Bake for 10 minutes. After 5 minutes have passed, slip the handle of a wooden spoon into the door of the oven to keep it ajar. Rotate the baking sheets and then bake for another 6 minutes or until the eclairs are puffed, golden and firm.

Make the white chocolate glaze: Place the white chocolate and oil together in a bowl over a pot of simmering water and heat until the chocolate has almost fully melted, stirring frequently. Remove from heat and stirring, let the residual heat complete the melting. Let the glaze cool until thick enough, when a small amount dropped from a spoon mounds a bit before smoothly disappearing into the mixture, before using.

Tuesday, December 24, 2013

cinnamon chocolate stout mousse brownies.


Brownie recipes are just like chocolate chip cookie recipes - simple, varied and you can never have too many of them. In fact, you might want to keep a few in your arsenal to appease people in different brownie camps. I've tried cakey, fudgey, low-fat, gluten-free, those with only cocoa powder for the chocolaty accent, those with only melted chocolate, those with a mix of both, but this kind of brownie is the first for me.

It's different in it's mixing method, and hence the final texture. Like the name suggests, it's mousse-like. This is because the eggs were separated and whites were whipped before being folded into the batter. So as you can imagine, the brownies rose like a souffle and collapsed slightly afterwards, making the brownies light yet rich and dense at the same time.

I usually prefer to refrigerate my brownies to make them cold and fudge-like but after trying these both chilled and warmed, I would advocate having these warm or at room temperature. They are more fragrant this way, and the mousse-y texture is more apparent.


The original recipe didn't call for cinnamon - it was my own addition and I fear that I may have added in too much, masking the flavour of the stout. I couldn't detect the stout at all when the brownies were cold, and only very faintly when they were warmed. I could tell though, that there was an abstract flavour that contributed to the brownies' richness. But if you're looking for a full-on stout flavour, you'll be disappointed.

On the other hand, if you like chocolate and cinnamon together, you'll like these. Although I said that I probably added in too much, if they were just chocolate cinnamon brownies without the stout, the amount of cinnamon here would be just right.

I know it's Christmas Eve and I should be posting something Christmassy in commemoration and this recipe doesn't really fit the bill, but I'll be seeing to that soon. Wait for it!


Cinnamon Chocolate Stout Mousse Brownies
makes a 9 x 5 inch pan's worth
adapted from here

1/2 stick butter
4 ounces bittersweet chocolate
40ml stout
2 eggs + 1 egg yolk, eggs and whites separated
1/8 tsp cream of tartar
scant 3 tbsp brown sugar
1 tbsp cornstarch
1 tbsp flour
1/4 tsp ground cinnamon

Preheat oven to 375F. Prepare a 9 x 5 inch loaf pan.

Melt the butter and chocolate together in a bowl over a pot of simmering water. Remove from heat and stir in the stout.

Whisk the egg whites and cream of tartar until soft peaks form.

Whisk the egg yolks, sugar, cornstarch, flour and cinnamon until light and pale.

Slowly pour the chocolate mixture into the egg yolk mixture while beating constantly until the mixture is homogenous. Fold in the egg whites 1/3 at a time until well combined.

Scrape the batter into the prepared pan and bake for about 20 minutes or until the top has puffed and looks dry.

Thursday, December 19, 2013

ice cream cone christmas tree cake.


I think it was a few months back when I saw a cake with ice cream cones stuck to its sides. I couldn't have given it more than a 30 seconds look, and I only saw that picture once, but when I had spare ice cream cones to use up I immediately recalled that cake. I think it was divine intervention. And you don't argue with divine intervention.


It's been a while since I made a chocolate cake so I went with my favorite recipe and once again, I'm reminded of why it's my favorite. In a nutshell, it's super chocolaty and extremely moist, not to mention easy to make. And since I was in a chocolate mood, the only frosting I saw fitting for chocolate cake was deep, dark fudgy ganache. While I was raiding the fridge for chocolate for the ganache, I found my three-quarters-empty jar of pumpkin butter. Chocolate and pumpkin - why not? Before I closed the fridge door I also grabbed my bag of chocolate chips for fun.


So in the end, I had two layers of delicious chocolate cake with a ganache-pumpkin butter-chocolate-chip filling. You can't see them but I filled the cones with M&Ms just because. I think the sprinkles add some life and sparkle into the otherwise monotonously brown cake. The chocolate balls lining the circumference of the bottom of the cake? I still don't know why I decided to add them. Maybe I thought they looked like rocks, which addition would then somewhat make sense because of the christmas tree look I was trying to create. (Something was definitely off with me that day.)

At least I hope the mounds of buttercream swirls resemble christmas trees. If I had to be harsh I would say that the only thing christmas-tree-like about them is the color green. And even the green isn't dark enough. But hey it's just cake.


You might notice that only four out of the six cones have buttercream and the other two just have chocolate chips. Well that's because unfortunately, I ran out of buttercream and I tried to make the best out of the situation by covering the cavities with extra ganache and chocolate chips to imitate barren soil where a christmas tree once stood. I think it's not a bad cover-up.

P.S. This cake is on instagram too!


Ice Cream Cone Christmas Tree Cake
makes a 6 inch cake

For the chocolate cake:
1 ounce semi-sweet chocolate, finely chopped
1/2 cup hot coffee
1 cup brown sugar
5/6 cup flour
1/2 cup unsweetened cocoa powder
2/3 tsp baking soda
1/4 tsp baking powder
5/12 tsp salt
1 egg
1/4 cup oil
1/2 cup buttermilk
1/4 tsp vanilla

For the ganache frosting:
170g bittersweet chocolate, chopped finely
200ml heavy cream

For assembly:
swiss meringue buttercream (or your favorite buttercream recipe) tinted green
3 ice cream cones, halved lengthwise
sprinkles (optional)
candy, etc to fill the ice cream cones and decorate the sides of the cake (optional)

Make the ganache frosting: Place the chopped chocolate in a bowl. Heat the cream to boiling point and pour over the chopped chocolate. Let the mixture stand for one minute before stirring gently until the chocolate has melted and mixture is smooth. Chill until ganache has thickened and reached a spreadable consistency.

Bake the cake: Preheat oven to 300F. Prepare a 6 inch cake pan.

Combine chopped chocolate with hot coffee. Let the mixture stand, stirring occasionally, until chocolate is melted and mixture is smooth.

Sift the sugar, flour, cocoa powder, baking soda, baking powder and salt together into a large bowl.

Whisk the egg until thickened slightly and lemon colored. Slowly stream in oil, buttermilk and vanilla while whisking constantly until combined. Whisk in chocolate mixture. Add flour mixture until incorporated.

Scrape batter into prepared pan and bake for about 40 minutes or until an inserted skewer comes out clean. Cool cake completely before frosting.

Assemble the cake: Slice the cooled cake into half lengthwise. Frost the bottom layer of cake with ganache, top with the second layer and frost the entire cake. Plaster the halved ice cream cones evenly around the sides of the cake. Fill them with candy if desired. Pipe swirls of buttercream on top of the cones to imitate christmas trees. Top with a shower of sprinkles and stud extra candy around the cake if you wish. Chill cake at least until the ganache has firmed up.

Saturday, December 14, 2013

cantuccini.


Do you know that feeling? Where time grinds to a halt and you're oblivious to your surroundings. For those precious seconds nothing else matters, and if you can keep doing what you're doing right now, you don't need anything else. Indeed, your life is perfect. Even if it's only for a little while.

Yesterday morning, I made chocolate peanut butter tofu mousse. But it didn't count as baking to me. So that same day at 10 pm when the sky was dark and my family was already in their beds awaiting sleep, there was a sole fluorescent light in the kitchen. The house was silent except for the gentle whirr of the oven heating up. I pottered about the kitchen measuring flour, whisking eggs, stirring sticky batter, and a while later the most delicious scent filled the kitchen. Round one of biscotti baking was done. I could continue, but I decided to leave some fun to be had the next day when I woke up.


So I did, and the first thing I did when I awoke this morning was to head straight to the kitchen to slice up the loaves and arrange the biscotti slices prettily on the baking sheet. 15 minutes later, they were done. As I reached into the oven with my oven mittens and pulled the tray of golden brown cookies, that feeling washed over me. That feeling of pure contentment. I don't think it's because I've not been baking for a while and miss it so. I have a hunch that this feeling will never go away. If there's one thing I'm sure of in my life, it's that I want to never stop baking.


And I don't want to just bake for myself. I want to pass on this joy that I've received by some miracle by baking for others. That's why I want to set up my own bakery one day. And I'll keep working towards that goal, you can count on it.


So these biscotti. They are the traditional kind that is harder, crisper and can stand up to dunking in hot cocoa or coffee. I've made the other kind before, which incorporates butter to make a more tender and flavourful cookie, but I decided on the former because I feel like having a whole lot of crunch this time. They are not very sweet - hardly, in fact - so feel free to drizzle them artistically with chocolate and sprinkles. It's the Christmas season so let's indulge a little!

P.S. I uploaded a video of the biscotti in the making on my instagram!


Cantuccini
adapted from Baking with Julia

2 cups flour
3/4 cup sugar
2 tsp baking powder
1/2 tsp ground cinnamon
1/4 tsp salt
1 1/2 cups unblanched whole almonds
3 large eggs
2 tsp vanilla extract

Preheat oven to 350F. Line baking sheets with parchment.

Whisk the flour, sugar, baking powder, cinnamon and salt together. Stir in the almonds.

Whisk the eggs and vanilla together and then stir them into the flour mixture. The dough may seem dry at this point but it will come together as it is kneaded.

Turn the dough out onto a lightly floured work surface and knead until smooth. Divide the dough into half and shape each half into a 12 inch log. Gently press down on the logs to flatten them until they are about 2 inches wide and 1 inch high. Transfer them to the prepared sheets.

Bake for 30 minutes or until slightly risen and firm to touch. Cool logs completely. At his point, you can wrap the logs in plastic wrap tightly and continue at another time when it is convenient. The logs can be prepared several days ahead.

When the logs have cooled completely, preheat the oven to 350F.

Slice logs diagonally into 1/4 inch thick slices. Place the sliced cookies cut side down on the pans and bake for 10 to 15 minutes, or until the biscotti are crisp and golden. Cool on the baking sheets.

The biscotti can keep for up to a month in an airtight container.

Friday, December 13, 2013

chocolate peanut butter tofu mousse.


It's time to revive this space after nearly two weeks of silence! The truth is, I wanted to make a layer cake but in consideration of my recent overseas trip that involved a lot of eating, I decided to take the healthy-ish route for the time being. Although, I must say that the only thing healthy about this mousse is the tofu. The mousse still contains melted chocolate and not just cocoa powder for the chocolaty element and two full tablespoons of peanut butter. Not to mention the refined sugar.


The good thing is that you don't feel like you're cheating yourself of a proper dessert. This mousse is extremely chocolaty with the peanut butter very noticeably coming through. Fans of Reese's peanut butter cups, you have your recipe. It is also so ridiculously creamy and thick it's almost like pudding. The tofu taste is pretty apparent though. It may take some getting used to but I personally liked it.


I highly recommend that you eat this with a spoonful of red berry jam. It does get a little rich after a while so the jam provides some refreshing relief.

P.S. Don't forget to check out my instagram!


Chocolate Peanut Butter Tofu Mousse
adapted from here

1 (12.3-ounce) package silken tofu, drained
2 ounces bittersweet chocolate, finely chopped
1/4 cup unsweetened cocoa powder
1/4 cup water
1/4 cup sugar
1/2 tsp vanilla extract
2 tbsp peanut butter

Blend the tofu until smooth.

In a double boiler, heat the chocolate, cocoa powder, water and sugar until the chocolate has melted and the mixture is smooth. Remove from heat and stir in the vanilla extract and peanut butter.

Add the chocolate mixture to the tofu and blend until smooth and combined. Divide the mixture amongst jars/ramekins and refrigerate until completely chilled.