I've Moved!

Wednesday, November 30, 2011

stuffed butternut squash.


Once upon a time, there was this butternut squash.


It was feeling lonely so it decided to house some bread, chives, cheese, mushrooms and cream. Just then, salt and pepper began to pour, soon to be followed by a colossal heatwave. An hour later, another tragedy struck.

My spoon. 


Stuffed Butternut Squash
adapted from Dorie's Pumpkin Stuffed With Everything Good
serves 1

I made this quite healthy by using milk instead of cream and subbing half the amount of cheese for cottage cheese. If you've had the original version with cream, you might notice the difference in richness but I haven't, and I think my "lite" version is pretty darn decadent too.

1 half of a butternut squash, slightly more than half a pound
salt and freshly ground pepper
1 slice of stale bread, cut into 1/2 inch squares
30g cheese, such as Gruyere, Emmenthal, cheddar, or a combination, cut into 1/2 inch chunks
1 portobello mushroom, cut into 1/2 inch chunks
1 tbsp finely sliced chives
a handful of walnuts (or even pine nuts)
about 1/3 cup heavy cream or milk
pinch of freshly grated nutmeg

Center a rack in the oven and preheat oven to 350F. Line a baking sheet.

Remove the seeds from the squash with a spoon and season with salt and pepper. Place the squash on the baking sheet. Toss the bread, cheese, mushroom and chives in a bowl. Season with pepper and a bit of salt if your cheese isn't salty. Pack the mixture into the cavity of the squash. If you have too much filling, use a knife to carve more space. The extra squash can be roasted along with the stuffed one.

Stir the cream with the nutmeg and more salt and pepper. Pour on top of the stuffing. Make sure the ingredients are nicely moistened, but not overly so. If you think you need more cream, pour more in. Use your judgement.

Cover the squash with tin foil and bake for 45 minutes. If the squash isn't tender enough to be easily pierced with fork, you need to add a few more minutes. Remove the foil and bake for an extra 5 minutes just for a bit of colour.

Serve immediately.

Tuesday, November 29, 2011

cookies and cream cornettos.


Another cornetto! But it's an easy one this time. Just crushed oreo cookies packed at the tapered end of the cone, a no-churn vanilla ice cream and then topped off with an oreo half.

As convenient as this "ice cream" may seem, I prefer the old-fashioned ice cream recipes because as this starts to melt, there is this oily mouthfeel you get from eating melted whipped cream. Which, obviously, isn't very pleasant. However, this ice cream is 100% non-icy and has a milky taste from the condensed milk which I rather like. Plus, it's low maintenance! Just whip, fold and freeze!


Finally, I've finished up all my ice cream cones. If you want to check out the rest of my cornettos, click here and here.


Cookies and Cream Cornettos
makes 4
inspiration from here

2 oreo cookies, crushed
80g condensed milk
1/2 tsp vanilla extract
90ml whipping cream
2 oreo cookies, twisted apart to get 4 halves in total
4 ice cream cones

Divide the oreo cookie crumbs among the 4 ice cream cones. Make sure they are tightly packed.

In a medium bowl, combine the condensed milk and vanilla extract. Separately whip the cream to medium-stiff peaks and fold gently into the condensed milk mixture until well-combined but don't lose the air! Divide the mixture amongst the 4 cones and freeze until firm, about 2 hours.

Top the cones with an oreo half and consume immediately, or return to the freezer. It's best to eat the cornettos as soon as possible as they may become soggy.

Monday, November 28, 2011

birthday chocolate entremet.


I made these little entremets for my mum's birthday a few days ago.


I realized how much I missed making labour-intensive, multi-component desserts. It's a real pain but if you have a lot of time to spare, it's really quite satisfying to see (and eat!) the end product. I really feel like making more but I need some inspiration. Anyone has any ideas?

almond sponge, hazelnut feuilletine, chocolate mousse, honey-vanilla sauteed pear, chocolate mousse, lacquer glaze, valrhona chocolate pearls and tempered chocolate decorations 


The lacquer glaze is amazing! It's so shiny I can almost see my reflection in it.


Happy birthday, Mummy!

Sunday, November 27, 2011

banana split cheesecake.

*Stupid stupid stupid me deleted some of the photos of this cheesecake in my camera, having forgotten that I've not downloaded them. There were supposed to be 3 more photos for this post. Arrgh!*


I'm confused.

Why is it called banana split cheesecake? I get the banana part, because there's banana in the batter. And there's chocolate too- in the swirl and the oreo cookie crust. The strawberry sauce that was supposed to be served on the side got switched out for strawberry jam because it's so much easier to scoop something out of the jar than to get the blender out.

So. Banana, strawberry and chocolate. Does that equal banana split? I thought a banana split didn't have any fixed flavours. As long there's ice cream served with bananas, it's pretty much a banana split. I can have cookies and cream ice cream and butter pecan ice cream with a sliced banana. Isn't that a banana split too?

I think this cheesecake should be called banana neapolitan cheesecake. Makes more sense to me.

You may recall that I don't like cheese if you've been following this blog. You can hold a dagger to my throat, thrust a fork into my hand and command me to start shoveling but I still wouldn't. But things changed a little ever since I made this hidden berry cheese torte. Made of a 50-50 mix of cream cheese and cottage cheese, it didn't have that hideous tang that I abhor in cheesecakes, nor was it overly cheesy. I even kinda like that cheese torte. Miracles do happen.

As much as I don't like cheese, and cheesecakes, banana split cheesecake sounded too good to give it up. Which is why I took the idea of using equal amounts of cream cheese and cottage cheese instead of all cream cheese. I even used low fat cream cheese so that it would have less of a tang.


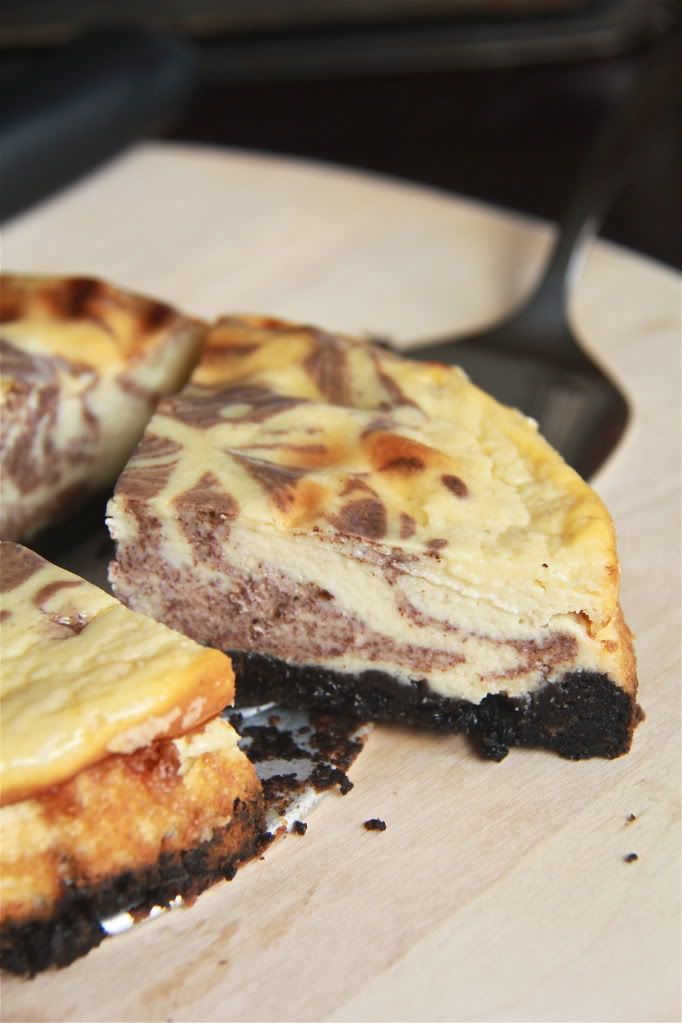
It worked! I finished my portion of the cheesecake and liked it. The banana flavour was really distinct for my first bite but you wouldn't notice it after a while. And the chocolate swirl was just perfect- not too chocolaty that it would overwhelm the banana batter, nor to the point of just being there for the color contrast. Which surprised me considering that there was so little chocolate in there! And I loved the crust. Who wouldn't? I just wished that I could have taken the time to make that strawberry sauce. Jam just didn't fit in too well.

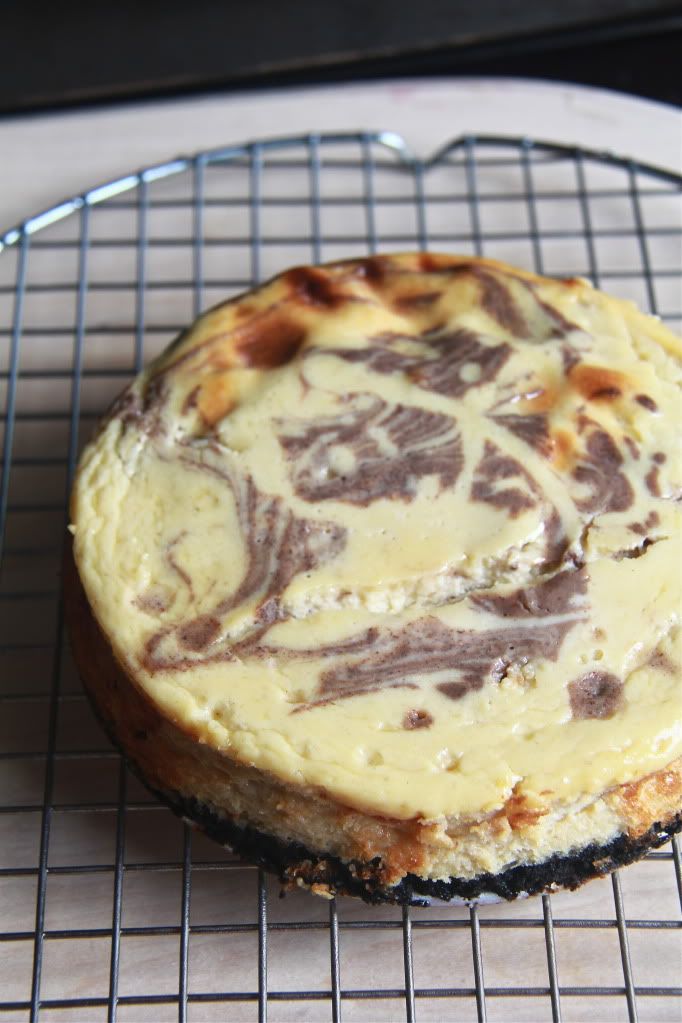
I'm gonna be quite harsh and say that this cheesecake looks atrocious. It wasn't supposed to be like this, with the darkened spots and mini fissure. I know I set the oven at 300F but when I turned my back and checked back 20 minutes later, the oven temperature was mysteriously set at 425F. 425F! Of course the batter would balloon up like crazy and permanently resemble some mountain valley if I didn't quickly adjust the temperature back down again. But the damage was done and even though the top layer settled flattened out again, the smooth surface was marred.

Thankfully, the cheesecake's texture was fairly undamaged. Apart from the uppermost layer which was a little rubbery, the insides were smooth like they should be. You know what, from this time onwards, I'm gonna pull up a chair beside my oven and keep watch. I've got my eyes on you, temperature knob.


Banana Split Cheesecake
slightly adapted from Love and Olive Oil
makes 1 8-inch or 2 6-inch cheesecakes

I used a mix of low-fat cottage cheese and cream cheese which resulted in a runnier batter. Hence, the banana and chocolate batter will mix too easily when you swirl it in. My advice is to pour the chocolate batter in a swirly pattern and forget the knife for later.

24 oreos, crushed finely
1/4 cup melted unsalted butter
250g cream cheese, low-fat or full-fat
250g cottage cheese
2/3 cup sugar
1/2 cup mashed ripe banana
1/4 cup sour cream
2 tbsp all purpose flour
4 eggs
1 ounce unsweetened chocolate, melted

2 cups fresh strawberries
3 tbsp sugar

Preheat oven to 300F. Grease an 8 inch round pan or 2 6-inch round pans. Line bottoms with parchment paper if desired; butter parchment.

Combine the oreo crumbs and melted butter until evenly mixed and dump the mixture into the prepared pan, pressing down to distribute and compact the crumbs.

To make the filling, place the cottage cheese, cream cheese, 2/3 cup sugar, banana, sour cream and  flour in a food processor and pulse to form a smooth paste. With the machine on, add in the eggs one by one. Scrape down the sides of the bowl and pulse again briefly to ensure that all the ingredients are incorporated.

Measure out 1 1/4 cups of the filling and set aside. Pour the remaining filling into the crust. Combine 1 cup of the filling that was set aside with the melted chocolate. Drizzle the chocolate filling in an abstract ribbon pattern over the top of the plain filling in the pan. Drizzle the remaining 1/4 cup filling in the same manner. If you want, you can use a knife to further swirl the two batters together but be careful not to overmix.

Bake in the center of the oven for 45 minutes. Remove the cake from the oven when the center is still slightly jiggly. Run a knife all the way around the edges to release the cake and crust. Return it to the turned off oven and let stand without opening the door for 15 minutes. Remove from the oven and let it cool on a rack until cooled to room temperature. Cover and refrigerate for at least 3 hours, overnight is best.

To make the strawberry sauce, place the strawberries and remaining 3 tbsp sugar in a blender or food processor and puree until smooth.

Saturday, November 26, 2011

broken glass jello.


Oh look! That square of jello has a heart shape in it. How cute.

You know, I always thought jello should be pretty darn easy to make. I mean, how hard can dissolving and pouring be? But of course something always goes wrong when I have to unmold stuff. What is wrong with me? Argh.


You see, I made the colored jello first and tried to unmold and cut them into tiny little squares. Before I could even attempt some knife action, the huge block of jello decided to tear on me because it stuck to the pan. So I got a really uneven bottom. Okay... I carried on cutting them into squares, dumping them into a bowl as I went and all went well for a while. I dumped the bowl of red and green cubes into the fridge and said goodnight.

The next day, I had to empty the bowl of jello cubes into a pan for the actual making of broken glass jello. I reached out to grab a square... and retrieved a jagged half. Holy poo! All the squares jelled together overnight! I tried to peel them away from each other carefully but the bottom layer (the base of the bowl) was beyond repair. In the end, I just ripped the jello apart into small pieces. So much for cutting them.


I guess they looked okay and almost artistic, sitting in that sheet pan but I didn't think so after I poured in the condensed milk layer and sliced the final jello. Oh man... it's freakin' jello! It shouldn't be this hard to make!

The most disappointing part is that it didn't taste fantastic. Sure, there was condensed milk in the stuff but it was rather... ordinary. If only mine could have turned out as pretty as The Food Librarian's, I would feel like the time I spent on it was justified. Oh well...

Friday, November 25, 2011

tres leches cake.


Cake. Baked in a Jar. Soaked in a mixture of milks (including condensed milk!). Topped with whipped cream and sprinkles.

Are you kidding me? Of course you have to make it now! 


And better yet, I baked it in a jar. Now it's adorable and delicious. You know what, I plan to sleep with a jar next to my pillow tonight so I can wake up to the sight of cake. Oh yes, very convenient too. The best part is, you have the whole jar to yourself. No sharing. Sharing is not in my cake vocabulary.


I think it's a texture thing. After the sponge sucks up all the milk mixture, it adopts a super moist, almost pudding-like texture. At some parts where I went a little too poke-happy, it was kinda mushy, but not baby food mushy. But I bet I really liked my baby food when I was a crying, screaming pooping infant.


I took pioneer woman's recipe and divided it by 5 to get three jars worth of cake. Although there was very little batter in each jar, it still took pretty long to bake. I noticed stuff baked in jars always take longer than usual.


I had a lot of fun stabbing the cakes. I might be sadistic. The good thing about this recipe is that you don't have to worry about leaving holes in the cake when you insert a skewer to test for its doneness. You'll have to make a hundred more later anyway. 


Pouring the milk in was pretty darn fun too. You can see how the milk travels from the top down the million holes you poked.

What are you still reading for? Go make the cake now! Oh right, the recipe.


Tres Leches Cake
adapted from The Pioneer Woman 
makes 12 servings

If you decide to bake this in little jars, butter the insides first and place the jars on a baking sheet. Take note that they will take longer than the average cupcake even if it's the same amount of batter. And you may or may not use up all the milk mixture.

1 cup plain flour
1 1/2 tsp baking powder
1/4 tsp salt
5 whole eggs, separated
1 cup sugar, divided
1 tsp vanilla
1/3 cup milk

1 can evaporated milk
1 can sweetened condensed milk
1/4 cup heavy cream or regular milk

For the icing:
1 pint heavy cream
3 tbsp sugar

Preheat oven to 350F. Spray a 9 x 13 inch pan.

Combine flour, baking powder and salt in a large bowl. 

Beat the egg yolks with 3/4 cup sugar on high speed until the yolks are pale yellow. Stir in the milk and vanilla. Pour egg yolk mixture over the flour mixture and stir very gently until combined. The idea here is to not deflate the air out of the egg yolks.

Beat the egg whites on high speed until soft peaks form. Gradually add the remaining 1/4 sugar while beating and beat until the egg whites are stiff but not dry.

Fold the egg whites into the yolk mixture gently until just combined. Pour into the prepared pan and spread and smooth the surface.

Bake for 35 to 45 minutes or until a toothpick comes out clean. Turn cake out on a rimmed platter and allow to cool slightly.

Combine the condensed milk, evaporated milk and heavy cream or regular milk. Pierce the cake with a fork several times. It doesn't matter if the cake is still warm. I feel that a warm cake would absorb the milk mixture better due to the difference in temperatures. Drizzle the milk mixture on the cake- don't neglect the edges!

Allow the cake to stand for at least 30 minutes. I let mine absorb the milk mixture overnight. 

Before serving, whip the 1 pint of heavy cream with the sugar until thick and spreadable. Frost the cake, cut, and serve. 

Thursday, November 24, 2011

cold oven pound cake.


Sometimes you want a light and fluffy cake. Sometimes you want a cake so dense and heavy it sits in your satisfied stomach like a brick. Brick. Cake. Sounds like pound cake to me.


I definitely think pound cakes should have a compact crumb and melt in your mouth texture. Airy pound cakes? Go make yourself a yellow cake, seriously.


I thought a cold oven pound cake would be a good way to make myself a pound heavier. It makes sense- how starting of a cake in a non-preheated oven would result in a denser cake. Remember those times you made muffins at a lower temperature than specified? I betcha got flat wide tops instead of mini mountains.


So la la la la la... I was mixing up my batter and I realized that it was really loose for a pound cake. Did I mess up the quantity of ingredients? Nope, I was positively sure. In the end, I sent my cake batter into the oven, seriously doubtful.


Let's fast forward 16 hours later. I let my cake cool and stand overnight, wrapped tightly, because this sort of cake usually benefits from some resting. But I couldn't help unwrapping it from time to time just to inhale the buttery aroma. Ooh...

I sliced the cake, and I was right. The crumb wasn't as fine as a really good pound cake. The bottom was compact but the top was airy and holey. I'm sorry America's Test Kitchen, but this recipe still needs some tweaking. But still, it was still good sliced and grilled. I highly highly recommend you try the cake this way!


Cold Oven Pound Cake
adapted from America's Test Kitchen

3 cups cake flour
1/2 tsp baking powder
1 tsp salt
1 cup whole milk
2 tsp vanilla
2 1/2 sticks unsalted butter, softened
2 1/2 cups sugar
6 large eggs, room temperature

Place an oven rack in a the lower third of the oven. Grease and flour a 16 cup bundt pan.

Whisk the flour, baking powder and salt together in medium bowl. In another small bowl, whisk the milk and vanilla together.

Beat the butter and sugar together on medium speed until light and fluffy, about 3 to 6 minutes. Beat in the eggs 1 at a time until well combined. Reduce the mixer speed to low and beat in 1/3 of the flour mixture, followed by 1/2 of the milk mixture. Repeat with half of the remaining flour mixture and the remaining milk mixture. Beat in the remaining flour mixture until just combined.

Scrape the batter into the prepared pan and smooth the top. Place the pan in the oven and heat the oven to 325F and bake the cake until a wooden skewer inserted in the center comes out with a few moist crumbs attached, about 70 to 80 minutes. Rotate the pan halfway through baking.

Let the cake cool in the pan for 10 minutes before unmolding the cake onto a wire rack. Let it cool completely, about 2 hours, before serving.

Wednesday, November 23, 2011

baked banana oatmeal.


I customized Heidi's baked oatmeal recipe to come up with this- baked banana oatmeal for one! And that's not all. Because I scaled it down so much, I wasn't willing to crack open an egg to use just 1/3 of it. Big. Mistake. Yes, note the capital M. I've not had baked oatmeal before but I guess the uniqueness of it is how the oats don't go soggy and mushy when cooked. Instead, it takes on a sort of soft oatmeal bar texture. As I left out the binder, the egg, my oats remained soggy and mushy. Not that I didn't like it. I happen to like those textures, strangely enough.

Another thing I did was to leave out the butter. I did it because I was lazy to melt 10g of butter. And of course, I used only bananas instead of bananas and blueberries. I topped it off with some walnuts too.


Next time, I would use a shallower dish so that there would be more exposed surface area to get a nice crunch. P.S. Broil it to get it extra crunchy. This is really delicious for something that's so wholesome!

Tuesday, November 22, 2011

ever heard of a heart-shaped egg?


I picked up this little mold at Daiso the other day. I've got another star-shaped one too. At first I was afraid that the egg may split open when I closed the mold but of course it didn't. Trust the Japanese to come up with such an ingenious idea!


Monday, November 21, 2011

snickerdoodles.


I've never had a snickerdoodle before.

I don't know why there's a snicker in snickerdoodle.

I don't know why there's doodle in snickerdoodle.

I don't know why it's even called snickerdoodle.


All I know is if all snickerdoodles are as delicious as this, I won't ask any more questions. Because my mouth is too full to utter a intelligible sentence. Or word.

I realise that this recipe is not the average snickerdoodle. From what I commonly see, snickerdoodles are usually quite flat and chewy. This one, however, is fat, puffy and cakey.


When I followed the recipe from How Sweet Eats, I omitted the milk because without it, my dough came together nicely into a non-sticky ball. I knew then that the cookies were going to be fluffy and delicious. But I did change one thing, which was to reduce the 1 cup of sugar for the cookies to 3/4 cup. I think it can be slashed even more because the additional coating of cinnamon-sugar does its job perfectly.

Saturday, November 5, 2011

oreo cupcakes.


Many things I say are understatements.

Like I don't like to exercise or I hate cheese or this cupcake is friggin-finger-lickin-delicious.

How can you look at a picture of an oreo cupcake like this and not make it? Duh, you can't! That's why I did it.

I took my favourite chocolate cake recipe and added coarsely chopped oreos that were tossed in a bit of flour, at the bottom of each paper liner. Each cupcake should have 1 oreo's worth of chunks. I did the extra step of tossing the oreos in flour even though some other bloggers may not have done so is because my recipe's batter is fairly thin, being an oil-based one, so the oreos are prone to sinking. It's not foolproof though, majority of the chunks still remained at the bottom.


I finally attempted a duo tone frosting! I swear others make it seem a lot easier than it looks. I followed the method of filling two separate piping bags with two different frostings then placing the two piping bags in another piping bag with a largish tip. I struggled the entire way through.

Firstly, it was a pain trying to insert two piping bags into one tip. Secondly, I couldn't get the frostings to come out at the same time so sometimes a swirl would have more chocolate frosting than cream cheese frosting. Ooh... speaking of cream cheese frosting, that was delish although I did have that same problem of it being too soft- I had to stick it in the fridge for a while to firm up.

I think an easier method would be just simply filling one piping bag with the two frostings side by side. I wish I'd tried that first. But the end result is kinda worth it, don't you think?


Oreo Cupcakes
makes 6

For the chocolate cupcakes:
1/4 of this chocolate cake recipe
6 oreos, coarsely chopped

Make the cupcake batter as directed and before filling each paper liner with the batter, add 1 oreo's worth of chunks into each one. You may wish to toss the oreos with a bit of flour beforehand.

For the chocolate frosting:
2 tbsp unsalted butter, at room temperature
7 tbsp icing sugar, sifted
2 + 1/2 tbsp cocoa powder, sifted
1/8 tsp vanilla extract
1 tbsp milk

In a mixing bowl, cream the butter until smooth. Gradually beat in the icing sugar, cocoa powder and vanilla until incorporated. Beat in the milk until the frosting reaches spreading consistency. This frosting tends to be a bit grainy so I like to make it a day in advance, two would be better, so that the icing sugar and cocoa powder have a chance to dissolve completely.

For the cream cheese frosting:
2 ounces cream cheese, cold
1/2 cup icing sugar, sifted
1/2 tsp vanilla

Beat the cream cheese and vanilla until blended. Add the sugar one third at a time and beat just until smooth and of desired consistency. Do not over beat as it can cause the frosting to become too soft.

Wednesday, November 2, 2011

bacon cornettos.


Just last week I made cornettos with coffee dulce de leche ice cream. This time, I made dulce de leche ice cream wait for it... with bacon and graham cracker chunks! Unlike a typical cornetto, I chose to forgo the chocolate at the bottom of each cone for a graham cracker pie crust which I crumbled and packed firmly in.

I made these cornettos with bacon ice cream in mind but since I had some extra dulce de leche waiting to be used, I swapped the original brown sugar base for a dulce de leche one. I reasoned that it shouldn't be a problem since what we're after is a contrast of salty bacon with a sweet ice cream. I threw in some crumbled pie crust just because.


The last time I made cornettos, there was a slight problem with soggy cones. If you've noticed, a regular cone has two layers overlapping each other. When I ate my last cornetto, the inside layer was noticeably limp but the outside, thankfully, retained its crisp texture. I knew that the outside layer would also become soggy on day 2, so I came up with ways on how to improve on that.

Firstly, you could coat the entire inside of the cones with chocolate but frankly, it's an extra step and can be troublesome. The second idea I had was to thicken the ice cream base. With less fluidity, the ice cream would freeze without seeping into the cones too much. So to achieve that, I used a bit of flour and cooked it into a mixture of milk and dulce de leche.


It worked! Although I don't know how long this method would prevent the cones form going soggy, but 30 hours after freezing, even the inner layer of the cone had a bit of crunch to it.

Now that all four cornettos are gone and swimming in my (and my family's) gastric juices, what flavour should I make with my last four cones?


Bacon Dulce de Leche Ice Cream
inspired by David Lebovitz, loosely adapted from the previous recipe
makes enough to fill 4 cones

1/4 cup dulce de leche
1/2 cup milk (low-fat is fine)
1/4 tsp vanilla extract
1 tsp cornstarch + 1 tbsp milk

1 slice of bacon, cooked till crispy and crumbled
graham cracker pie crust (recipe below)

whipped cream and extra bacon, to decorate

In a sauce pan over medium heat, heat the dulce de leche and milk together until the dulce de leche has dissolved completely. Be sure to stir it from time to time because the dulce de leche may burn. Stir together the cornstarch and 1 tbsp of milk in a small separate bowl until the cornstarch dissolves then stir this mixture into the dulce de leche mixture. Bring to a boil and cook until the mixture has thickened considerably. It should be like the consistency of thick pastry cream. Transfer the mixture to a bowl to cool and stir in the vanilla extract. Chill the mixture and make the ice cream according to your ice cream machine's manufacturer's instructions.

After the churning is completed, fold in the crumbled bacon and graham cracker pie crust until they are evenly dispersed before dividing the ice cream equally among the four cones.

Graham Cracker Pie Crust

1/4 cup crushed graham crackers
1 tbsp melted butter
11g brown sugar
a pinch of cinnamon

Combine all of the above in a bowl. Take a third of the mixture and pack it down on a lined baking sheet so that it's compact and will bake as a sort of free form tart crust. Spread the rest of the mixture on the baking sheet. Bake in a 375F oven for about 7 minutes until golden brown. Let the crust cool.

For the crumbs, take about 2 teaspoons for each cone and spoon it in. Use the back of a spoon to make sure that the crumbs are compact. For the crust, crush it into fairly large pieces to fold into your ice cream.